Introduction
Valence is a unified development environment that enables building trust-minimized cross-chain DeFi applications, called Valence Programs.
Valence Programs are:
- Easy to understand and quick to deploy: a program can be set up with a configuration file and no code.
- Extensible: if we don't yet support a DeFi integration out of the box, new integrations can be written in a matter of hours!
Example Use Case:
A DeFi protocol wants to bridge tokens to another chain and deposit them into a vault. After a certain date, it wants to unwind the position. While the position is active, it may also want to delegate the right to change vault parameters to a designated committee so long as the parameters are within a certain range. Without Valence Programs, the protocol would have two choices:
- Give the tokens to a multisig to execute actions on the protocol's behalf
- Write custom smart contracts and deploy them across multiple chains to handle the cross-chain token operations.
Valence Programs offer the DeFi protocol a third choice: rapidly configure and deploy a secure solution that meets its needs without trusting a multisig or writing complex smart contracts.
Valence Programs
There are two ways to execute Valence Programs.
-
On-chain Execution: Valence currently supports CosmWasm and EVM. SVM support coming soon. The rest of this section provides a high-level breakdown of the components that comprise a Valence Program using on-chain coprocessors.
-
Off-chain Execution via ZK Coprocessor: Early specifications for the Valence ZK System. We aim to move as much computation off-chain as possible since off-chain computation is a more scalable approach to building a cross-chain execution environment.
Domains
A domain is an environment in which the components that form a program (more on these later) can be instantiated (deployed).
Domains are defined by three properties:
- The chain: the blockchain's name e.g. Neutron, Osmosis, Ethereum mainnet.
- The execution environment: the environment under which programs (typically smart contracts) can be executed on that particular chain e.g. CosmWasm, EVM, SVM.
- The type of bridge used from the main domain to other domains e.g. Polytone over IBC, Hyperlane.
Within a particular ecosystem of blockchains (e.g. Cosmos), the Valence Protocol usually defines one specific domain as the main domain, on which some supporting infrastructure components are deployed. Think of it as the home base supporting the execution and operations of Valence Programs. This will be further clarified in the Authorizations & Processors section.
Below is a simplified representation of a program transferring tokens from a given input account on the Neutron domain, a CosmWasm-enabled smart contract platform secured by the Cosmos Hub, to a specified output account on the Osmosis domain, a well-known DeFi platform in the Cosmos ecosystem.
---
title: Valence Cross-Domain Program
---
graph LR
  IA((Input
      Account))
  OA((Output
		  Account))
  subgraph Neutron
  IA
  end
  subgraph Osmosis
  IA -- Transfer tokens --> OA
  end
Valence Accounts
Valence Programs usually perform operations on tokens accross multiple domains. To ensure that the funds remain safe throughout a program's execution, Valence Programs rely on a primitive called Valence Accounts. Additionally, Valence Accounts can also be used to store data that is not directly related to tokens.
In this section we will introduce all the different types of Valence Accounts and explain their purpose.
Base Accounts
A Valence Base Account is an escrow contract that can hold balances for various supported token types (e.g., in Cosmos ics-20 or cw-20) and ensure that only a restricted set of operations can be performed on the held tokens.
Valence Base Accounts are created (i.e., instantiated) on a specific domain and bound to a specific Valence Program. Valence Programs will typically use multiple accounts during the program's lifecycle for different purposes. Valence Base Accounts are generic by nature; their use in forming a program is entirely up to the program's creator.
Using a simple token swap program as an example: the program receives an amount of Token A in an input account and will swap these Token A for Token B using a DEX on the same domain (e.g., Neutron). After the swap operation, the received amount of Token B will be temporarily held in a transfer account before being transfered to a final output account on another domain (e.g., Osmosis).
For this, the program will create the following accounts:
- A Valence Base Account is created on the Neutron domain to act as the Input account.
- A Valence Base Account is created on the Neutron domain to act as the Transfer account.
- A Valence Base Account is created on the Osmosis domain to act as the Output account.
---
title: Valence Token Swap Program
---
graph LR
  IA((Input
    Account))
  TA((Transfer
    Account))
  OA((Output
	Account))
  DEX
  subgraph Neutron
  IA -- Swap Token A --> DEX
  DEX -- Token B --> TA
  end
  subgraph Osmosis
  TA -- Transfer token B --> OA
  end
Note: this is a simplified representation.
Valence Base Accounts do not perform any operation by themselves on the held funds, the operations are performed by Valence Libraries.
Valence Storage Account
The Valence Storage Account is a type of Valence account that can store Valence Type data objects.
Like all other accounts, Storage Accounts follow the same pattern of approving and revoking authorized libraries from being able to post Valence Types into a given account.
While regular Valence (Base) accounts are meant for storage of fungible tokens, Valence Storage accounts are meant for storage of non-fungible objects.
API
Execute Methods
Storage Account is a simple component exposing the following execute methods:
#![allow(unused)]
fn main() {
pub enum ExecuteMsg {
    // Add library to approved list (only admin)
    ApproveLibrary { library: String },
    // Remove library from approved list (only admin)
    RemoveLibrary { library: String },
    // stores the given `ValenceType` variant under storage key `key`
    StoreValenceType { key: String, variant: ValenceType },
}
}
Library approval and removal follow the same implementation as that of the fund accounts.
StoreValenceType is the key method of this contract. It takes in a key of type String, and its
associated value of type ValenceType.
If StoreValenceType is called by the owner or an approved library, it will persist the key-value
mapping in its state. Storage here works in an overriding manner, meaning that posting data
for a key that already exists will override its previous value and act as an update method.
Query Methods
Once a given type has been posted into the storage account using StoreValenceType call, it becomes available
for querying.
Storage account exposes the following QueryMsg:
#![allow(unused)]
fn main() {
pub enum QueryMsg {
    // Get list of approved libraries
    #[returns(Vec<String>)]
    ListApprovedLibraries {},
    // Get Valence type variant from storage
    #[returns(ValenceType)]
    QueryValenceType { key: String },
}
}
Interchain Accounts
A Valence Interchain Account is a contract that creates an ICS-27 Interchain Account over IBC on a different domain. It will then send protobuf messages to the ICA over IBC for them to be executed remotely. It's specifically designed to interact with other chains in the Cosmos ecosystem, and more in particular with chains that don't support smart contracts. To use this account contract, the remote chain must have ICA host functionality enabled and should have an allowlist that includes the messages being executed.
Valence Interchain Accounts are created (i.e., instantiated) on Neutron and bound to a specific Valence Program. Valence Programs will typically use these accounts to trigger remote execution of messages on other domains.
As a simple example, consider a Valence Program that needs to bridge USDC from Cosmos to Ethereum via the Noble Chain. Noble doesn't support CosmWasm or any other execution environment, so the Valence Program will use a Valence Interchain Account to first, create an ICA on Noble, and then send a message to the ICA to interact with the corresponding native module on Noble with the funds previously sent to the ICA.
For this, the program will create a Valence Interchain Account on the Neutron domain to create an ICA on the Noble domain:
---
title: Valence Interchain Account
---
graph LR
    subgraph Neutron
      IA[Interchain Account]
    end
    subgraph Noble
      OA[Cosmos ICA]
    end
    IA -- "MsgDepositForBurn
    protobuf" --> OA
Valence Interchain Accounts do not perform any operation by themselves, the operations are performed by Valence Libraries.
API
Instantiation
Valence Interchain Accounts are instantiated with the following message:
#![allow(unused)]
fn main() {
pub struct InstantiateMsg {
    pub admin: String, // Initial owner of the contract
    pub approved_libraries: Vec<String>,
    pub remote_domain_information: RemoteDomainInfo, // Remote domain information required to register the ICA and send messages to it
}

pub struct RemoteDomainInfo {
    pub connection_id: String,
    pub ica_timeout_seconds: Uint64, // relative timeout in seconds after which the packet times out
}
}
In this message, the connection_id of the remote domain and the timeout for the ICA messages are specified.
Execute Methods
#![allow(unused)]
fn main() {
pub enum ExecuteMsg {
    ApproveLibrary { library: String }, // Add library to approved list (only admin)
    RemoveLibrary { library: String },  // Remove library from approved list (only admin)
    ExecuteMsg { msgs: Vec<CosmosMsg> }, // Execute a list of Cosmos messages, useful to retrieve funds that were sent here by the owner for example.
    ExecuteIcaMsg { msgs: Vec<AnyMsg> }, // Execute a protobuf message on the ICA
    RegisterIca {},                      // Register the ICA on the remote chain
}
}
Library approval and removal follow the same implementation as that of the fund accounts.
ExecuteMsg works in the same way as for the base account.
ExecuteIcaMsg is a list of protobuf messages that will be sent to the ICA on the remote chain. Each message contains
the type_url and the protobuf encoded bytes to be delivered.
RegisterIca is a permissionless call that will register the ICA on the remote chain. This call requires the
Valence Interchain Account to not have another ICA created and open on the remote chain.
Query Methods
Interchain account exposes the following QueryMsg:
#![allow(unused)]
fn main() {
pub enum QueryMsg {
    #[returns(Vec<String>)]
    ListApprovedLibraries {}, // Get list of approved libraries
    #[returns(IcaState)]
    IcaState {}, // Get the state of the ICA
    #[returns(RemoteDomainInfo)]
    RemoteDomainInfo {}, // Get the remote domain information
}

pub enum IcaState {
    NotCreated, // Not created yet
    Closed,     // Was created but closed, so creation should be retriggered
    InProgress, // Creation is in progress, waiting for confirmation
    Created(IcaInformation),
}

pub struct IcaInformation {
    pub address: String,
    pub port_id: String,
    pub controller_connection_id: String,
}
}
There are two specific queries for the Valence Interchain Account. The first one is IcaState which returns the state of the ICA. The second one is RemoteDomainInfo which returns the remote domain information that was provided during instantiation.
ICAs can only be registered if the IcaState is NotCreated or Closed.
Libraries and Functions
Valence Libraries contain the business logic that can be applied to the funds held by Valence Base Accounts. Most often, this logic is about performing operations on tokens, such as splitting, routing, or providing liquidity on a DEX. A Valence Base Account has to first approve (authorize) a Valence Library for it to perform operations on that account's balances. Valence Libraries expose Functions that it supports. Valence Programs can be composed of a more or less complex graph of Valence Base Accounts and Valence Libraries to form a more or less sophisticated cross-chain workflow. During the course of a Valence Program's execution, Functions are called by external parties that trigger the library's operations on the linked accounts.
A typical pattern for a Valence Library is to have one (or more) input account(s) and one (or more) output account(s). While many libraries implement this pattern, it is by no means a requirement.
Valence Libraries play a critical role in integrating Valence Programs with existing decentralized apps and services that can be found in many blockchain ecosystems (e.g., DEXes, liquid staking, etc.).
Now that we know accounts cannot perform any operations by themselves, we need to revisit the token swap program example (mentioned on the Base Accounts page) and bring Valence Libraries into the picture: the program receives an amount of Token A in an input account, and a Token Swap library exposes a swap function that, when called, will perform a swap operation of Token A held by the input account for Token B using a DEX on the same domain (e.g., Neutron), and transfer them to the transfer account. A Token Transfer library that exposes a transfer function will transfer the Token B amount (when the function is called) to a final output account on another domain (e.g. Osmosis). In this scenario, the DEX is an existing service found on the host domain (e.g. Astroport on Neutron), so it is not part of the Valence Protocol.
The program is then composed of the following accounts & libraries:
- A Valence Base Account is created on the Neutron domain to act as the input account.
- A Valence Base Account is created on the Neutron domain to act as the transfer account.
- A Token Swap Valence Library is created on the Neutron domain, authorized by the input account (to be able to act on the held Token A balance), and configured with the input account and transfer account as the respective input and output for the swap operation.
- A Token Transfer Valence Library is created on the Neutron domain, authorized by the transfer account (to be able to act on the held Token B balance), and configured with the transfer account and output account as the respective input and output for the swap operation.
- A Valence Base Account is created on the Osmosis domain to act as the output account.
---
title: Valence Token Swap Program
---
graph LR
  FC[[Function call]]
  IA((Input
	Account))
  TA((Transfer
	Account))
  OA((Output
	Account))
  TS((Token
  	Swap Library))
  TT((Token
  	Transfer Library))
  DEX
  subgraph Neutron
  FC -- 1/Swap --> TS
  TS -- Swap Token A --> IA
  IA -- Token A --> DEX
  DEX -- Token B --> TA
  FC -- 2/Transfer --> TT
  TT -- Transfer Token B --> TA
  end
  subgraph Osmosis
  TA -- Token B --> OA
  end
This example highlights the crucial role that Valence Libraries play for integrating Valence Programs with pre-existing decentralized apps and services.
However, one thing remains unclear in this example: how are Functions called? This is where Programs and Authorizations come into the picture.
Programs and Authorizations
A Valence program is an instance of the Valence protocol. It is a particular arrangement and configuration of accounts and libraries across multiple domains (e.g., a POL lending relationship between two parties). Similarly to how a library exposes executable functions, programs are associated with a set of executable subroutines.
A subroutine is a vector of functions. A subroutine can call out to one or more functions from a single library, or from different libraries. A subroutine is limited to one execution domain (i.e., subroutines cannot use functions from libraries instantiated on multiple domains).
A subroutine can be:
- non‑atomic (e.g., execute function one; if that succeeds, execute function two; then three; and so on)
- atomic (e.g., execute function one, two, and three; if any fail, revert all steps)
Valence programs are typically used to implement complex cross‑chain workflows that perform financial operations in a trust‑minimized way. Because multiple parties may be involved in a program, the parties may wish for limitations on what various parties are authorized to do.
To specify fine‑grained controls over who can initiate the execution of a subroutine, program creators use the authorizations module.
The authorizations module supports access control configuration schemes such as:
| Authorization | Description |
|---|---|
| Open access | Anyone can initiate execution of a subroutine. |
| Permissioned access | Only permissioned actors can initiate execution of a subroutine. |
| Start time | Execution can only be initiated after a starting timestamp or block height. |
| End time | Execution can only be initiated up to a certain timestamp or block height. |
| Authorization model | CosmWasm: TokenFactory tokens (factory/{authorization_contract}/{label}). EVM: address‑based per label with contract/function constraints (no tokenization). |
| Expiration | Authorizations can expire. |
| Enable/disable | Authorizations can be enabled or disabled. |
| Parameter constraints | Authorizations can constrain parameters (e.g., limit to amount only, not denom or receiver). |
To support on‑chain execution, the protocol provides two contracts: the Authorization contract and the Processor contract.
The Authorization contract is the entry point for users. The user sends a set of messages to the Authorization contract and the label (id) of the authorization they want to execute. The Authorization contract verifies the sender and the messages, constructs a message batch based on the subroutine, and passes this batch to the Processor for execution.
- CosmWasm: permissioned workflows are enforced via TokenFactory‑minted per‑label tokens (burn/refund semantics with call limits).
- EVM: permissioned workflows are enforced via per‑label address allowlists with function‑level constraints (contract address + selector/hash), no tokens are minted.
The Processor receives a message batch and executes the contained messages in sequence.
- CosmWasm: maintains High/Medium priority FIFO queues of subroutines and exposes a permissionless
tickto process batches with retry/expiration handling. - EVM: the currently implemented Lite Processor executes immediately on receipt (no queues/insert/evict/retry), while a full queued Processor is scaffolded but not implemented.
graph LR;
	User --> |Subroutine| Auth(Authorizations)
	Auth --> |Message Batch| P(Processor)
	P --> |Function 1| S1[Library 1]
	P --> |Function 2| S2[Library 2]
	P --> |Function N| S3[Library N]
Introduction to Valence ZK
The Valence Protocol provides Zero-Knowledge proofs and a dedicated ZK Coprocessor system to enhance its capabilities, particularly in areas requiring complex computation, privacy, and verifiable off-chain operations. This ZK integration allows Valence to bridge the gap between the rich, flexible environment of off-chain processing and the trust-minimized, verifiable nature of blockchain execution.
At a high level, ZK proofs enable one party (the prover, in this case, the ZK Coprocessor) to prove to another party (the verifier, typically on-chain smart contracts) that a certain statement is true, without revealing any information beyond the validity of the statement itself. In Valence, this means that computationally intensive or private tasks can be executed off-chain by a "guest program" running on the ZK Coprocessor. This guest program produces a result along with a cryptographic proof attesting to the correctness of that result according to the program's logic.
This proof, which is relatively small and efficient to check, is then submitted to the Valence smart contracts on-chain. The on-chain contracts only need to verify this succinct proof to be assured that the off-chain computation was performed correctly, rather than having to re-execute the entire complex computation themselves. This model brings several advantages, including reduced gas costs, increased transaction throughput, the ability to handle private data, and the capacity to implement more sophisticated logic than would be feasible purely on-chain.
Key terms you will encounter in this documentation include:
- ZK Coprocessor: An off-chain service responsible for running "guest programs" and generating ZK proofs of their execution.
- Guest Program: A piece of software designed by developers for off-chain execution on the ZK Coprocessor. It comprises two main parts: the ZK Circuit (which defines the core ZK-provable computations) and the Controller (Wasm-compiled logic that prepares inputs for the circuit, handles its outputs, and interacts with the Coprocessor environment).
- zkVM (Zero-Knowledge Virtual Machine): An environment that can execute arbitrary programs and produce a ZK proof of that execution. The Valence ZK Coprocessor leverages such technology (e.g., SP1) to run guest programs.
- Encoders: Systems that compress blockchain state into formats suitable for ZK proofs. The Unary Encoder handles single-chain state transitions, while the Merkleized Encoder manages cross-chain state dependencies.
- Proof: A small piece of cryptographic data that demonstrates a computation was performed correctly according to a specific program, without revealing all the details of the computation.
- Public Inputs/Outputs: The specific data points that are part of the public statement being proven. The ZK proof attests that the guest program correctly transformed certain public inputs into certain public outputs.
- Witness: The complete set of inputs, both public (known to prover and verifier) and private (known only to the prover), required by a ZK circuit to perform its computation and allow the generation of a proof. The ZK proof demonstrates that the computation was performed correctly using this witness, without revealing the private inputs.
This set of documentation will guide you through understanding how this ZK system works within Valence, how to develop your own guest programs for the Coprocessor, and how to integrate these ZK-proven results with the on-chain components of the Valence Protocol. For detailed information on how blockchain state is encoded for ZK proofs and cross-chain coordination, see State Encoding and Encoders.
Valence ZK System Overview
The Valence Zero-Knowledge (ZK) system facilitates the execution of complex or private computations off-chain, with their correctness verified on-chain through cryptographic proofs. This overview describes the primary components and the general flow of information and operations within this system. The foundational concepts of ZK proofs in Valence are introduced in Introduction to Valence ZK.
At its core, the system integrates an off-chain ZK Coprocessor Service with on-chain smart contracts, primarily the Authorization and VerificationRouter contracts. A key technical challenge is encoding blockchain state into formats suitable for zero-knowledge proofs, enabling pure functions to operate on committed state transitions. For detailed information on state encoding mechanisms and cross-chain coordination, see State Encoding and Encoders.
Component Roles
The Valence ZK system comprises several key components, each with distinct responsibilities.
The ZK Coprocessor Service, operating off-chain, is a persistent service that manages ZK "guest programs." It deploys new guest programs, executes them with specific inputs, manages proving using an underlying zkVM (like SP1), and makes generated proofs available. Developers interact with this service to deploy ZK applications and initiate proof generation.
A Guest Program is application-specific code developed by users. It consists of two parts: the Controller (Wasm-compiled Rust code running in the Coprocessor's sandbox) takes input data, processes it to generate a "witness" for the ZK circuit, and coordinates proof generation. The ZK Circuit (e.g., SP1 circuit) performs the core computation and assertions, taking the witness and producing a proof and public output (Vec<u8>) that forms the primary data for on-chain contracts.
The Authorization contract serves as the entry point for submitting ZK proofs for verification. It handles ZK-specific authorization logic, checking if proof submitters are authorized for given ZK programs (by registry ID) and managing replay protection.
The VerificationRouter contract performs actual cryptographic verification of ZK proofs. This contract uses an immutable append-only design where routes map to specific verifier contracts. The Authorization contract stores the Verification Keys (VKs) and verification routes, then delegates verification to the VerificationRouter, which routes the proof to the appropriate verifier. For SP1 proofs, the SP1VerificationSwitch performs dual verification of both the program proof and domain proof.
ZK Program Flows
The following diagrams illustrate the key workflows in the Valence ZK system:
Deployment Flow
Developers prepare and register their ZK applications, initializing the application before execution. They build guest program components, deploy them to the coprocessor service (e.g., via cargo-valence), and register verification keys on-chain.
graph TD
    Dev[Developer Machine<br/>- Develops Guest Program<br/>- Builds Controller + Circuit] -- Deploys via cargo-valence --> Coproc[ZK Coprocessor Service]
    Dev -- Registers Verification Key --> OnChain[On-Chain Contracts<br/>Authorization + VerificationRouter]

    Coproc -- Assigns --> CID[Controller ID]
    OnChain -- Associates --> RegID[Registry ID]

    classDef dev fill:#e3f2fd
    classDef onchain fill:#f3e5f5
    classDef service fill:#e8f5e8
    classDef data fill:#fff3e0

    class Dev dev
    class OnChain onchain
    class Coproc service
    class CID,RegID data
Runtime Flow
Strategists execute ZK-proven actions on-chain through an operational process. They request proof generation from the coprocessor and then submit verified proofs to trigger on-chain execution.
graph TD
    Strategist[Strategist<br/>- Requests proof generation<br/>- Retrieves proof<br/>- Submits ZKMessage] -- Requests proof generation --> Coproc[ZK Coprocessor Service]
    Coproc -- Executes Guest Program --> Proof[ZK Proof + Public Output]
    Strategist -- Retrieves proof --> Coproc
    Strategist -- Submits ZKMessage + Proof --> OnChain[On-Chain Contracts<br/>Authorization + VerificationRouter]
    OnChain -- Verifies proof --> Valid{Proof Valid?}
    Valid -- Yes --> Processor[Processor Contract]
    Processor -- Executes validated message --> State[Blockchain State Changes]

    classDef strategist fill:#fff8e1
    classDef service fill:#e8f5e8
    classDef onchain fill:#f3e5f5
    classDef data fill:#fff3e0
    classDef decision fill:#ffebee

    class Strategist strategist
    class Coproc service
    class OnChain,Processor onchain
    class Proof,State data
    class Valid decision
Operation
The process of executing an off-chain computation and verifying it on-chain generally follows a sequence of interconnected steps.
Development and Deployment
During development and deployment (off-chain), a developer creates a guest program, defining its Controller and ZK circuit. This guest program is compiled (Controller to Wasm, circuit to target representation) and deployed to the ZK Coprocessor service using cargo-valence CLI, which assigns a unique Controller ID. The Verification Key (VK) for the circuit is registered in an on-chain Authorization.sol contract and associated with a registry ID that the Authorization contract uses.
Proof Request and Generation
Proof request and generation (off-chain) is initiated when an off-chain entity requests the ZK Coprocessor service to execute the deployed guest program with specific input data using cargo-valence CLI. The Coprocessor runs the Controller, which generates the necessary witness for the ZK circuit. The circuit executes with this witness, and the Coprocessor generates the ZK proof and circuit's public output. The Controller may store this proof and output in its virtual filesystem.
Proof Submission and Verification
Following proof generation, the off-chain entity retrieves the ZK proof and circuit's public output from the Coprocessor. It constructs a ZKMessage, which includes the circuit's public output (forming the processorMessage), the registry ID, a blockNumber for replay protection, and the target authorizationContract address. This ZKMessage and ZK proof are submitted to the executeZKMessage function of the Authorization contract.
On-Chain Processing
This triggers on-chain processing. The Authorization contract performs initial checks, verifying sender authorization for the registry ID and ensuring replay protection using the blockNumber. If checks pass, it calls the verify function on the VerificationRouter, passing the ZK proof and public inputs. The VerificationRouter fetches the correct verifier from the route provided by the Authorization contract and delegates the proving to this verifier, passing the vk, proof, public inputs and a payload.
Execution of Proven Action
Upon successful proof verification, the Authorization contract considers the ZKMessage contents (specifically the processorMessage) authentic and authorized. It dispatches this processorMessage to the appropriate Valence Processor contract for execution, leading to blockchain state changes based on the ZK-proven off-chain computation.
This system allows Valence to securely integrate complex off-chain logic with its on-chain operations, opening up a wide range of advanced application possibilities.
End‑to‑End Flow (Services + On‑Chain)
Actors and services:
- Coprocessor service: runs controllers, manages storage/FS, computes proofs
- Domain prover service: produces recursive domain proofs and publishes latest state
- Domain implementations (e.g., Ethereum): controller, circuit, optional light‑client
- Prover backend: SP1 prover infrastructure
- Clients: cargo‑valence CLI or valence‑domain‑clients library/binary
- On‑chain: Authorization, VerificationRouter, and Processor
Flow:
- Domain prover updates: The domain prover ingests historical updates and produces a recursive wrapper proof, publishing the latest State (and wrapper VK) for consumers (see Domain Proofs).
- Pinning: Clients fetch the current Coprocessor root and pin requests with
valence-coprocessor-rootto ensure consistent openings. - Witness building: Guest programs request domain state proofs through the Coprocessor runtime (e.g.,
get_state_proof("ethereum", args)). - Proving: The Coprocessor combines witnesses with historical openings and computes the zkVM proof. A store payload directs the controller to write the proof to the virtual filesystem.
- Retrieval: Clients poll the FS path and retrieve the proof + public inputs (first 32 bytes = Coprocessor root; remainder = circuit output).
- On‑chain verification: The actor submits proof + inputs to Authorization, which delegates to VerificationRouter (e.g., SP1VerificationSwitch) with the appropriate VK and route.
- Execution: On successful verification, Authorization forwards the processorMessage to Processor, which applies state changes.
Developing Valence Coprocessor Apps
This guide is designed for developers looking to build Zero-Knowledge (ZK) applications, or "guest programs," for the Valence ZK Coprocessor. It focuses on using the valence-coprocessor-app template as a foundation. Before diving in, it is beneficial to have a grasp of the concepts presented in Introduction to Valence ZK and Valence ZK System Overview.
The valence-coprocessor-app template repository serves as the primary starting point and practical reference for this guide.
Core Structure of a Coprocessor App
A Valence Coprocessor App (a Guest Program), when based on the template, is primarily structured around two main Rust crates, which compile into the two logical parts of the Guest Program: the Controller and the ZK Circuit.
-
The
controllerCrate (compiles to the Controller): This component contains off-chain logic executed as Wasm within the Valence ZK Coprocessor's sandboxed environment. This Controller acts as an intermediary between user inputs and the ZK circuit. Key responsibilities include receiving input arguments (often JSON) for proof requests, processing inputs to generate a "witness" (private and public data the ZK circuit needs), and interacting with the Coprocessor service to initiate proof generation. The Controller handles proof computation results; it has an entrypoint function the Coprocessor calls upon successful proof generation, allowing the Controller to store the proof or log information. The Controller can utilize a virtual filesystem provided by the Coprocessor, which is FAT-16 based (implying constraints like 3-character file extensions and case-insensitive paths), for persistent data storage. -
The
circuitCrate (defines the ZK Circuit): This crate defines the ZK Circuit itself. The ZK Circuit is the heart of the ZK application, containing the actual computations and assertions whose correctness will be proven. It's typically written using a specialized language or Domain-Specific Language (DSL) that compiles down to a ZK proving system supported by the Coprocessor (for example, SP1). The ZK Circuit receives the witness data prepared by the Controller. It then performs its defined computations and assertions. If all these pass, it produces a public output (as aVec<u8>), which represents the public statement that will be cryptographically verified on-chain. This output forms a crucial part of the "public inputs" of the ZK proof.
While these two crates form the core, the template might also include an optional ./crates/domain crate. This is generally intended for more advanced scenarios, such as defining how to derive state proofs from JSON arguments or for validating block data that might be incorporated within the Coprocessor's operations, though its direct use can vary significantly depending on the specific application's needs.
General Development Workflow
Developing a Coprocessor App typically follows a sequence of steps from setup to deployment and testing:
-
Environment Setup: The initial step involves preparing your development environment. This requires installing Docker, a recent Rust toolchain, and the Cargo Valence subcommand (the
cargo-valenceCLI included in this repository). You would then clone thevalence-coprocessor-apptemplate repository to serve as the foundation for your new ZK application. For development, you can either use the public Valence ZK Coprocessor service athttps://service.coprocessor.valence.zone(default socket) or optionally run a local instance. -
ZK Circuit Development (
./crates/circuit): The next phase is to define the logic of your ZK circuit. This involves specifying the exact computations to be performed, the private inputs (the witness) that the circuit will consume, and the public inputs or outputs it will expose. The public output of your ZK circuit (aVec<u8>) is of particular importance, as this is the data that will ultimately be verified on-chain. It's essential to remember that the first 32 bytes of the full public inputs (as seen by the on-chain verifier) are reserved by the Coprocessor for its own internal root hash; your application-specific public output data will follow these initial 32 bytes. -
Controller Development (
./crates/controller): Concurrently, you'll develop the Controller logic within thecontrollercrate. This includes implementing the logic to parse incoming JSON arguments that are provided when a proof is requested for your application. You will also need to write the code that transforms these user-provided arguments into the precise witness format required by your ZK circuit. A key part of the Controller is its entrypoint function; this function is called by the Coprocessor service when a proof for your program has been successfully generated and is ready. This entrypoint typically receives the proof itself, the initial arguments that triggered the request, and any logs generated during the process. You must also implement how your Controller should handle this generated proof – a common pattern is to store it to a specific path (e.g.,/var/share/proof.bin) within its virtual filesystem using astorecommand payload directed to the Coprocessor. -
Application Build and Deployment: Once the ZK Circuit (from
circuitcrate) and Controller (fromcontrollercrate) are developed, build and deploy your Guest Program using thecargo-valenceCLI. Example:cargo-valence deploy circuit --controller ./crates/controller --circuit <circuit-crate-project-name>The CLI defaults to
https://service.coprocessor.valence.zone; specify--socket <url>if targeting a different endpoint. This compiles both crates (Controller to Wasm) and submits them to the service. On success, the service returns a controller ID (e.g.,8965...df783) used in subsequent requests. -
Requesting Proof Generation: With your Guest Program deployed and its Controller ID known, request proving with:
cargo-valence prove -j '{"value": 42}' -p /var/share/proof.bin <CONTROLLER_ID>Replace the JSON with the expected controller input. The
-ppath tells the controller where to store the resulting proof within the virtual filesystem. The CLI encapsulates this as a payload{ cmd: "store", path: "/var/share/proof.bin" }, which the service passes to the controller entrypoint after proving. -
Retrieving Proofs and Public Inputs: After proving completes and the proof is stored by your controller, retrieve it with:
cargo-valence storage -p /var/share/proof.bin <CONTROLLER_ID> | jq -r '.data' | base64 -d | jqTo view the public inputs:
cargo-valence proof-inputs -p /var/share/proof.bin <CONTROLLER_ID> | jq -r '.inputs' | base64 -d | hexdump -CThe first 32 bytes represent the Coprocessor root; your circuit output follows.
This workflow allows for an iterative development process, enabling you to test and refine your ZK guest programs effectively.
Note: As an alternative to cargo-valence, you can use the valence-coprocessor binary from the domain clients toolkit to call the same REST API directly. Both approaches interact with the Coprocessor using the endpoints and payload conventions described in Coprocessor Internals → Service API.
Client Library Usage
The valence-domain-clients crate provides a Coprocessor client and helpers that call the REST API, submit proving jobs, and poll the virtual filesystem for generated proofs.
- Default base URL:
https://service.coprocessor.valence.zone - REST base path:
/api - Typical flow:
- Submit a prove request with a “store” payload specifying a virtual filesystem path.
- Poll the storage file endpoint until the proof appears.
- Decode the proof and extract public inputs for on‑chain submission.
Headers used by clients (see Coprocessor Internals → Service API for details):
valence-coprocessor-circuit: hex controller IDvalence-coprocessor-root: historical root hex to pin requestsvalence-coprocessor-signature: optional signature over JSON body
Example (async Rust):
use serde_json::json;
use valence_domain_clients::clients::coprocessor::CoprocessorClient;

#[tokio::main]
async fn main() -> anyhow::Result<()> {
    let client = CoprocessorClient::default();
    let circuit = "<controller_id_hex>";
    let root = client.root().await?; // optional pin to current

    // Submit prove (with store payload) and poll storage for the proof
    let args = json!({ "value": 42 });
    let proof = client.get_single_proof(circuit, &args, &root).await?;

    // Decode base64 proof and inputs
    let (_proof_bytes, inputs) = proof.decode()?;
    println!("inputs length: {}", inputs.len());
    Ok(())
}
Incorporating Verifiable External State
Guest programs on the Valence Coprocessor can be designed to utilize verifiable state from external blockchains, like Ethereum. This allows ZK applications to react to or incorporate off-chain data in a trust-minimized way. Services such as the state proof service facilitate this by generating state proofs (e.g., Merkle proofs for account balances or storage slots on Ethereum at specific block heights). Currently, this interaction for fetching external state is often achieved via ABI-encoded HTTP calls, though future implementations might support other protocols like WebSockets.
When developing a guest program, you would design its Controller (within the controller crate) to accept such state proofs as part of its input. The ZK circuit can then use the proven external state in its computations. The resulting ZK proof from the Valence Coprocessor will thus attest to the correctness of operations performed on this externally verified data. More detailed architectural considerations for this pattern, including how the Coprocessor environment might support or interact with such external proofs, are discussed in ZK Coprocessor Internals.
Apps ownership
The apps will be owned by a private key, only if their deployment is signed by the client. The Valence Domain client employs an environment variable VALENCE_SIGNER for specifying its secret key during signature processes. When a signature becomes available for a deployed app, the controller bytecode, storage, and dedicated prover list will only be modifiable upon signing a request using the provided secret key.
The initial phase involves installing the valence-coprocessor binary:
cargo install valence-domain-clients \
  --no-default-features \
  --features coprocessor-bin \
  --bin valence-coprocessor
You can verify the installation by running:
valence-coprocessor --version
To create the signer key, utilize the foundry tool:
cast wallet new --account valence
The private key can be retrieved as follows:
cast wallet private-key --account valence
An easy way to store it in the appropriate environment variable:
export VALENCE_SIGNER='{"SecretEccNistP256":"'$(cast wallet private-key --account valence)'"}'
This readies the environment for utilizing an EccNistP256 signer. Every invocation of the valence-coprocessor binary will leverage such environment variable and sign the requests accordingly.
To view the allocated GPU workers associated with the key:
$ valence-coprocessor provers get
Using valence signer `EccNistP256(...)`...
Fetching provers...
{"owned":[],"public":["wss://prover.coprocessor.valence.zone"]}
The user may assign a specific prover to their app:
valence-coprocessor provers add 'wss://prover.coprocessor.valence.zone'
The co-processor will cycle through the available dedicated GPU provers of the app to generate proofs.
Integrating ZK Proofs with On-Chain Contracts
This document details the process of integrating Zero-Knowledge (ZK) proofs, generated by a Valence Coprocessor guest program, with the Valence Protocol's on-chain smart contracts. It assumes an understanding of the ZK system as outlined in Valence ZK System Overview and how guest programs are developed as described in Developing Valence Coprocessor Apps.
The core of on-chain integration revolves around submitting the ZK proof and its associated public data to the Authorization contract (CosmWasm or EVM), which then collaborates with a VerificationRouter to cryptographically verify the proof's authenticity and correctness. For SP1 proofs, the system uses an SP1VerificationSwitch that performs dual verification: validating both the program proof (using the provided VK) and the domain proof (using the Coprocessor root commitments).
Preparing Data for On-Chain Submission
After your guest program successfully executes on the ZK Coprocessor and a proof is generated, two key pieces of data are essential for on-chain interaction:
- The ZK Proof: This is the raw cryptographic proof data (e.g., SP1 proof bytes) generated by the Coprocessor, attesting to the correct execution of your guest program's ZK circuit.
- The Circuit's Public Output: Your ZK circuit is designed to produce a public output (
Vec<u8>). This output is critical because it represents the data that, once proven correct by the ZK proof, will be used to form theprocessorMessagefor execution by the on-chain Valence Processor contract. When the full "public inputs" are presented to the on-chain verifier, the first 32 bytes contain the Coprocessor Root (historical commitments). The remaining bytes are the circuit output your app defines. For how domain and historical openings bind values to this root, see Domain Proofs.
An off-chain system, such as a script, bot, or backend service, is responsible for retrieving these pieces of data from the Coprocessor (typically after the guest program stores them in its virtual filesystem) and then initiating the on-chain transaction.
The ZKMessage Structure
To submit a ZK-proven action to the Valence Protocol, the off-chain system must construct a ZKMessage. This structure is specifically designed for the executeZKMessage function within the Authorization.sol contract. The ZKMessage encapsulates all necessary information for the on-chain contracts to process the request:
| Field | Type | Description |
|---|---|---|
registry | uint64 | Unique identifier for the deployed ZK guest program. Maps to ZK authorization registry in the Authorization contract. |
blockNumber | uint64 | Current or recent block number for replay protection. Prevents reuse of old proofs if validateBlockNumberExecution is enabled for the registry. |
authorizationContract | address | Address of the target Authorization contract. Can be address(0) to allow any authorization contract, or specific address for binding. |
processorMessage | bytes | Core payload dispatched to Processor contract if ZK proof is valid. Contains the actual message to be executed, derived from the circuit's public output. |
On-Chain Verification Sequence
Once the ZKMessage is constructed and the ZK proof is obtained, the off-chain system submits these to the executeZKMessage function of the Authorization.sol contract. The on-chain processing then unfolds as follows:
-
Initial Checks: The Authorization contract first performs several preliminary checks. It verifies if the
msg.sender(the account submitting the transaction) is authorized to provide proofs for the givenregistryID. It also typically checks theblockNumberfrom theZKMessageagainst its record of the last executed block for thatregistryto prevent replay attacks. -
Delegation to VerificationRouter: If the initial checks pass, the Authorization contract delegates the task of cryptographic proof verification to the VerificationRouter contract whose address it has been configured with using a
route. It calls averifyfunction on the router, passing along the ZK proof, the verifying key (VK), the public inputs for the proof and a payload. -
Proof Verification: The VerificationRouter retrieves the verifier associated by the route and delegates the verification to that verifier. For SP1 proofs, the
SP1VerificationSwitchperforms dual verification:- Program Proof: Uses the provided VK to verify the circuit's computation with your specific public inputs
- Domain Proof: Uses the stored
domainVKto verify the first 32 bytes (coprocessor root hash) which acts as a commitment to all Coprocessor state integrity
The Coprocessor Root hash implicitly contains all embedded state proofs of domains relevant to the ZK proof, managed via a Sparse Merkle Tree (SMT). Every new block appended to chains relevant to the proof's domain is included in this SMT with a ZK domain proof, and the verifications of these inclusions are cryptographically embedded into this root. Both proofs must pass for successful verification. If valid, the router returns a success status to the Authorization contract.
-
Dispatch to Processor: If the VerificationRouter confirms the proof's validity, the Authorization contract considers the
processorMessagewithin theZKMessageto be authentic and authorized for execution. It then typically updates its state for replay protection (e.g., storing theblockNumberas the last executed for thatregistry) and dispatches theprocessorMessageto the appropriate Valence Processor contract. -
Execution by Processor: The Processor contract receives the
processorMessageand executes the sequence of on-chain actions (e.g., calls to various Valence Libraries or other smart contracts) as defined within that message. This is where the result of your ZK-proven off-chain computation translates into tangible on-chain state changes.
This integration pathway ensures that off-chain computations, once proven correct by the ZK Coprocessor, can be securely and reliably acted upon by the Valence on-chain contracts.
Verifying Keys
- Guest program VKs can be fetched from the Coprocessor via
GET /api/circuit/vk(base64) for a given controller context. - For recursive domain proofs, a domain prover service publishes a stable wrapper VK (e.g., via
/api/consts). On‑chain verifiers can bind to this VK and the expected controller ID.
ZK Coprocessor Internals
This document provides an in-depth look into the internal architecture and operational mechanics of the Valence ZK Coprocessor service. It is intended for those who wish to understand more about the Coprocessor's design beyond the scope of typical application development. Familiarity with Valence ZK System Overview is assumed.
The Valence ZK Coprocessor is designed as a persistent off-chain service that registers and executes Zero-Knowledge (ZK) guest applications.
Service Architecture
The Coprocessor service consists of several coordinated components that work together to provide a complete ZK execution environment. It's important to note a key architectural separation: the coprocessor itself (which handles API requests, controller execution, and virtual filesystem management) is distinct from the prover. While they work in tandem, they can be deployed and scaled independently. For instance, Valence runs a dedicated, high-performance prover instance at prover.timewave.computer:37282. Coprocessor instances, including those run locally for development, can connect to this remote prover (typically requiring a VALENCE_PROVER_SECRET for access). This separation also allows developers to run a local coprocessor instance completely isolated from a real prover, using mocked ZK proofs. This is invaluable for rapid iteration and debugging of controller logic without incurring the overhead of actual proof generation.
The main components of the Coprocessor service include:
The API Layer serves as the primary external interface, exposing REST endpoints (typically on port 37281 for the coprocessor service itself) for core operations. Developers can deploy guest programs by submitting controller and circuit bundles, they can request proofs for deployed programs, query the status of ongoing tasks, and retrieve data stored in the virtual filesystem such as generated proofs or execution logs.
Request Management & Database - This component validates incoming requests and queues them for processing. It maintains persistent storage for deployed guest program details including Controller IDs, circuit specifications, and controller bundles, while also tracking proof generation status and execution metadata.
The Controller Executor / Sandbox provides an isolated execution environment for controller crate logic. This sandbox runs a WebAssembly runtime for controller code and provides a crucial interface that allows controllers to signal when witness preparation is complete and proof generation should commence. Controllers can also perform filesystem operations through this interface.
Proving Engine Integration - Orchestrates the actual ZK proof generation process using underlying zkVM systems like SP1 or Groth16. This component manages prover resources, handles the translation of circuits and witnesses into the required formats for specific proving backends, and processes the resulting proof data and public outputs.
The Virtual Filesystem Manager allocates FAT-16 based virtual filesystems to each guest program, enabling controllers to store proofs and logs through store commands. This filesystem has certain limitations on filename length and character sets that developers must consider.
The Coprocessor Process
Coprocessor Root Hash is a notable internal detail where the Coprocessor prepends a 32-byte hash to application-specific public outputs from the ZK circuit. This combined data forms the complete "public inputs" that are cryptographically bound to the proof, ensuring that proofs are tied to the specific Coprocessor instance that produced them. On-chain verifiers must account for this structure when validating proofs.
Task Lifecycle involves proof generation requests progressing through several distinct stages: initial queuing, controller execution for witness generation, circuit proving, and finally proof delivery back to the controller entrypoint. The API provides mechanisms to track task status throughout this lifecycle.
Persistent Job Queues enable the Coprocessor service to handle multiple concurrent proof requests efficiently and reliably through persistent job queues, and worker nodes for computationally intensive proving tasks.
Handling Verifiable State Proofs
Guest programs can incorporate state from external blockchains through a structured integration pattern that enhances their capabilities significantly.
External State Proof Services, such as the eth-state-proof-service, connect to external chains via RPC, query desired state at specific block heights, and construct Merkle proofs relative to known block hashes. These services play a crucial role in bridging external blockchain data into the ZK environment.
The guest program integration follows a clear pattern. During proof ingestion, the controller receives external state proofs via JSON payloads and extracts state values along with relevant metadata like block hashes. In the witness preparation phase, the controller incorporates this external state into the witness for the ZK circuit. The circuit logic then performs computations using the external state data, with the option to verify external proofs directly within the circuit for stronger security guarantees.
Trust Model Considerations - The ZK proof fundamentally attests that given a set of provided inputs (which may include externally proven state at the latest block height), the circuit executed correctly to produce the specified outputs. The Coprocessor provides a state proof interface for each chain that exposes a light client prover wrapped in a recursive circuit. All light client circuits are initialized at a trusted height, where block hash and committee composition are taken as "weakly subjective" public inputs.
Service API (Access & Discovery)
The Coprocessor serves an OpenAPI/Swagger UI and specification alongside its REST endpoints.
You can programmatically discover available routes by fetching the spec. For example, to list available paths:
curl -s https://service.coprocessor.valence.zone/spec | jq -r '.paths | keys[]'
# or against local:
curl -s http://127.0.0.1:37281/spec | jq -r '.paths | keys[]'
Notes
- Virtual filesystem is FAT‑16 emulated; file extensions must be ≤ 3 characters, paths are case‑insensitive.
- The
payloadin proving requests is commonly{ "cmd": "store", "path": "/var/share/proof.bin" }to instruct the controller to store the generated proof.
Related Services
Domain prover services publish recursive proofs and a stable wrapper VK for domains. For how domain and historical proofs are modeled (and how the domain prover feeds the Coprocessor and on‑chain verification), see Domain Proofs. For domain implementation patterns, see State Encoding and Encoders.
Client Conventions
When calling the Coprocessor, clients use a few standard conventions:
Headers
valence-coprocessor-circuit: hex controller ID (context)valence-coprocessor-root: historical root hex (pinning to a known SMT root)valence-coprocessor-signature: optional signature over JSON body (if a signer is configured)
Prove payload
- Include a “store” payload to direct the controller to write the generated proof to the virtual filesystem, for example:
{ "args": { … }, "payload": { "cmd": "store", "path": "/var/share/proofs/<id>.bin" } }
Virtual filesystem
- FAT‑16 emulation with 3‑character file extensions and case‑insensitive paths. A common pattern is to store under
/var/share/proofs/….
Public inputs layout
- The public inputs buffer starts with a 32‑byte Coprocessor Root, followed by the circuit‑defined output bytes used on‑chain.
Sparse Merkle Trees in Valence
A sparse Merkle tree (SMT) is a specialized Merkle tree with leaf indices defined by an injective function from predefined arguments. The verification key of a ZK circuit, being injective to the circuit's definition, serves as an index for available programs.
Since ZK proofs are uniquely tied to their verification keys, we can use these keys to index and organize proofs from different programs. This makes each verification key a unique identifier for its corresponding proof within the collection.
Merkle Tree
A Merkle tree is an authenticated data structure consisting of leaves and nodes that form a tree shape. Each node in this tree represents the cryptographic hash of its children, while the leaves hold an arbitrary piece of data—usually the hash value of some variable input.
For a hash function H, if we insert data items A, B, C into a Merkle tree, the resulting structure would look like:
graph TB
    %% Root node
    r["R := H(t10, t11)"]

    %% Level 1
    m1["t10 := H(t00, t01)"] --> r
    m2["t11 := H(t02, t03)"] --> r

    %% Level 2
    c1["t00 := H(A)"] --> m1
    c2["t01 := H(B)"] --> m1
    c3["t02 := H(C)"] --> m2
    c4["t03 := 0"] --> m2
Figure 1: Basic Merkle tree structure. The node labeling uses a coordinate system where the first digit represents the tree level (0 = leaves, 1 = intermediate nodes, etc.) and the second digit represents the position at that level. Each parent node is computed as the hash of its two children in this binary tree structure.
Membership Proof
A Merkle tree serves as an efficient data structure for validating the membership of a leaf node within a set in logarithmic time, making it especially useful for handling large sets and well-suited for random insertion patterns. A Merkle opening (or Merkle proof) represents an array of sibling nodes that outline a Merkle Path leading to a commitment Root. If the verifier possesses the root and employs a cryptographic hash function, the pre-image of the hash is non-malleable; in a cryptographic hash, it's unfeasible to discover a set of siblings resulting in the root, except for the valid inputs. Given that the leaf node is known to the verifier, a Merkle Proof will consist of a sequence of hashes leading up to the root. This allows the verifier to compute the root value and compare it with the known Merkle root, thereby confirming the membership of any provided alleged member without relying on the trustworthiness of the source. Consequently, a single hash commitment ensures that any verifier can securely validate the membership of any proposed member supplied by an untrusted party.
To prove that C is in the tree, the Merkle proof includes the sibling nodes along the path from C to the root: [t03, t10]. So the verifier, that knows R beforehand, will compute:
t02 := H(C)t11 := H(t02, t03)R' := H(t10, t11)
If R == R', then C is a member of the set.
Note that the depth of the tree is the length of its Merkle opening, that is: we open up to a node with depth equal to the length of the proof.
Sparse Data
Let's consider a public function f that accepts a member and returns a tuple. This tuple consists of the index within the tree as a u64 value, and the hash of the leaf: (i, h) = f(X).
For the example above, let's assume two members:
(3, a) := f(A)(1, b) := f(B)
graph TB
    %% Root node
    r["R := H(t10, t11)"]

    %% Level 1
    m1["t10 := H(t00, t01)"] --> r
    m2["t11 := H(t02, t03)"] --> r

    %% Level 2
    c1["t00 := 0"] --> m1
    c2["t01 := b"] --> m1
    c3["t02 := 0"] --> m2
    c4["t03 := a"] --> m2
The primary distinction of a sparse Merkle tree lies in the deterministic leaf index, making it agnostic to input order. In essence, this structure forms an unordered set whose equivalence remains consistent irrespective of the sequence in which items are appended.
In addition to membership proofs sparse Merkle trees also support generating proofs of non-membership. To achieve this, we carry out a Merkle opening at the specified target index, and expect the returned value to be 0.
Let's assume a non-member X to be (0, x) := f(X). To verify that X is not in the tree, given the root R and the non-membership proof [b, t11], the verifier:
- Computes
(0, x) := f(X)to find whereXshould be located (index 0) - Reconstructs
t10 := H(0, b)using the empty slot (0) and siblingb - Computes the root
R' := H(t10, t11)and checks ifR' == R
If R == R', then 0 is at the slot of X. Since we know X to not be the pre-image of 0 in H, then X is not a member of the tree.
The Valence SMT
Valence's sparse Merkle tree is designed to utilize the hash of the verifying key generated by the ZK circuit as its index. The tree's leaf data will encompass the proof and input arguments for the ZK program. For this particular implementation, we can consider the input arguments as a generic type, which will be specifically defined during development. These input arguments will constitute the key-value pairs that define a subset of the contract state essential for state transition. The proof will be a vector of bytes.
The tree depth is adaptive, representing the smallest value required to traverse from a leaf node to the root, given the number of elements involved. This approach avoids writing nodes that contain unused entries. So if a tree contains two adjacent nodes indexed at [(0,0), (0,1)], the Merkle opening will contain a single element: the sibling leaf of the validated node.
If the tree comprises two nodes with indices [(0,0), (0,2)], the Merkle opening will have two elements, allowing for a complete traversal from the leaves to the root.
Precomputed Empty Subtrees
The Valence SMT implementation includes a precomputed set of empty subtrees based on the selected hash primitive. For example, when a tree contains only empty nodes, all hash values are constant:
graph TB
    %% Root node
    r["R := H(t10, t11)"]

    %% Level 1
    m1["t10 := H(t00, t01)"] --> r
    m2["t11 := H(t02, t03)"] --> r

    %% Level 2
    c1["t00 := 0"] --> m1
    c2["t01 := 0"] --> m1
    c3["t02 := 0"] --> m2
    c4["t03 := 0"] --> m2
In practice, sparse Merkle trees often have many empty positions, especially when the index space is large but only a few positions are occupied. This creates opportunities for optimization through precomputation.
Consider a more realistic scenario where we have a sparse tree with a single leaf X at index 2:
graph TB
    %% Root
    r["R := H(t20, K2)"]

    %% Level 1
    t20["t20 := H(K1, t11)"] --> r
    t21["K2"] --> r

    %% Level 2
    m1["K1"] --> t20
    m2["t11 := H(X, K0)"] --> t20

    %% Level 3
    c3["X"] --> m2
    c4["K0"] --> m2
Rather than computing (K0, K1, K2) each time, these values can be precomputed since they represent known constants: K0 := H(0), K1 := H(K0, K0), K2 := H(K1, K1).
By using SMTs, Valence can efficiently manage and verify large collections of authenticated data, including ZK proofs from coprocessor applications and commitments to program states.
Valence ZK Guest Environment
This document describes the specific execution environment provided by the Valence Coprocessor for "guest applications." Understanding this environment is crucial for developers building robust and efficient ZK applications. It complements the information found in Developing Valence Coprocessor Apps.
When a guest program's controller crate logic is executed by the Valence ZK Coprocessor, it runs within a specialized, sandboxed environment. This environment imposes certain characteristics and provides specific interfaces for interaction.
Execution Sandbox
The primary purpose of the sandbox is to securely execute the guest program's Rust code (often compiled to WebAssembly or a similar intermediate representation) that is responsible for generating the witness for the ZK circuit. This isolation prevents a guest program from interfering with the Coprocessor service itself or other concurrently running guest programs.
While the exact nature of the sandbox can evolve, developers should assume an environment with constrained resources. This means that overly complex or long-running computations within the controller crate (before handing off to the ZK circuit for proving) should be approached with caution. The main computationally intensive work should ideally be designed into the ZK circuit itself, as that is what the proving system is optimized for.
Virtual Filesystem
Each deployed guest program is provided with its own private virtual filesystem by the Coprocessor. This filesystem is essential for storing intermediate data, logs, and most importantly, the generated ZK proofs.
Key characteristics and limitations of this virtual filesystem, as indicated by the valence-coprocessor-app template examples, include:
- FAT-16 Basis: The underlying structure often emulates a FAT-16 filesystem. This implies certain legacy constraints that developers must be aware of.
- Extension Length: File extensions are typically limited to a maximum of three characters (e.g.,
.bin,.txt,.log). - Case Insensitivity: File and directory names are generally treated as case-insensitive (e.g.,
Proof.binandproof.binwould refer to the same file). - Path Structure: Paths are typically Unix-like (e.g.,
/var/share/my_proof.bin). - Interaction: The
controllercrate interacts with this filesystem by sending specific commands to the Coprocessor service rather than through direct OS-level file I/O calls. For example, to store a generated proof, thecontrollerconstructs astorecommand with the target path and data, which the Coprocessor then writes to the program's virtual disk image.
Developers should design their controller logic to work within these constraints, particularly when choosing filenames for storing proofs or other outputs.
Interfacing with the Coprocessor Service
From within its sandboxed execution, the controller crate logic needs to communicate with the host Coprocessor service for several key operations:
- Signaling Witness Readiness: After processing inputs and preparing the witness for the ZK circuit, the
controllermust inform the Coprocessor that it is ready for the proving phase to begin. - Receiving Proof Results: The Coprocessor calls a designated entrypoint function within the
controllercrate upon completion of a proof generation task (successful or failed). This entrypoint receives the proof data, initial arguments, and any logs. - Filesystem Operations: As mentioned above, storing data (like the received proof) or logging information involves sending structured requests to the Coprocessor to perform actions on the program's virtual filesystem.
The exact mechanism for this interaction (e.g., specific function calls, message passing, predefined environment variables or handles) is defined by the Coprocessor's execution environment for guest programs.
Resource Constraints
Guest applications run with finite system resources including limited memory, CPU time, and storage space. Developers should aim for efficiency in their controller crate logic, focusing on input processing, witness generation, and handling results rather than performing heavy computations that are better suited for the ZK circuit itself.
Understanding these environment constraints enables developers to build ZK applications that run efficiently on the Valence Coprocessor.
State Encoding and Encoders
This document explains how the Valence ZK Coprocessor handles state encoding for zero-knowledge proofs and cross-chain state synchronization. Understanding these concepts is essential for building applications that work across multiple blockchains.
Implementation Status: The state encoding mechanisms described in this document represent the design goals and architecture for the Valence ZK Coprocessor. While the core coprocessor infrastructure exists (as shown in the valence-coprocessor-app template), the full state encoding and cross-chain coordination features are still in active development.
The State Encoding Challenge
The core challenge in ZK coprocessor design lies in encoding state. ZK applications are pure functions that must utilize existing state as arguments to produce an evaluated output state. This means we need a way to compress blockchain state into a format suitable for zero-knowledge proofs.
For any state transition, we can describe it as a pure function: f(A) = B, where A is the initial state and B is the resulting state after applying function f.
Pure Functions in zkVMs
The Valence ZK Coprocessor leverages zero-knowledge virtual machines (zkVMs) to execute Rust programs and generate proofs of their execution. Specifically, Valence uses a RISC-V zkVM, currently Succinct's SP1. For state encoding purposes, these applications must be structured as pure functions f(x) = y.
The zkVM workflow for state transitions follows the following pattern:
- Application definition: The state transition logic is written in Rust as a pure function
- Key generation: The compiled application produces a proving key
pkand verifying keyvk - Proof generation: Given inputs
x, the zkVM callsprove(pk, x)to generate proofp - Verification: The proof is verified by calling
verify(vk, x, y, p)
This pure function constraint is what necessitates the state encoding mechanisms described in this document - we must compress mutable blockchain state into immutable inputs and outputs suitable for zero-knowledge proving.
Unary Encoder
The Unary Encoder compresses account state transitions into zero-knowledge proofs. It handles the transformation from on-chain state mutations to ZK-provable computations.
Basic State Transition Example
Consider an account with a key-value store that maps addresses to balances. A traditional on-chain transfer function might look like:
#![allow(unused)]
fn main() {
fn transfer(&mut self, signature: Signature, from: Address, to: Address, value: u64) {
    assert!(signature.verify(&from));
    assert!(value > 0);

    let balance_from = self.get(&from).unwrap();
    let balance_to = self.get(&to).unwrap_or(0);

    self.insert(from, balance_from.checked_sub(value).unwrap());
    self.insert(to, balance_to.checked_add(value).unwrap());
}
}
For ZK execution, we can create a trusted version that delegates signature verification to the ZK circuit:
#![allow(unused)]
fn main() {
fn transfer_trusted(&mut self, from: Address, to: Address, value: u64) {
    let balance_from = self.get(&from).unwrap();
    let balance_to = self.get(&to).unwrap_or(0);

    self.insert(from, balance_from - value);
    self.insert(to, balance_to + value);
}
}
ZK Application Structure
In the current Valence Coprocessor template, ZK applications consist of two components: a controller and a circuit. The controller processes inputs and generates witnesses, while the circuit performs the ZK-provable computation.
Controller (processes JSON inputs and generates witnesses):
#![allow(unused)]
fn main() {
pub fn get_witnesses(args: Value) -> anyhow::Result<Vec<Witness>> {
    let (signature, from, to, value) = parse_transfer_args(args);

    // Verify signature off-chain and prepare witness data
    signature.verify(&from)?;

    let witness_data = TransferWitness {
        from,
        to,
        value,
        initial_state: get_current_state(),
    };

    Ok(vec![Witness::Data(witness_data.encode())])
}
}
Circuit (performs ZK computation):
#![allow(unused)]
fn main() {
pub fn circuit(witnesses: Vec<Witness>) -> Vec<u8> {
    let witness_data = TransferWitness::decode(witnesses[0].as_data().unwrap());
    let mut state = witness_data.initial_state;

    // Perform trusted transfer (signature already verified in controller)
    state.transfer_trusted(witness_data.from, witness_data.to, witness_data.value);

    // Return state commitment for on-chain verification
    state.commitment().encode()
}
}
Note: The above examples show the conceptual structure for state encoding. The current template implementation uses simpler examples (like incrementing a counter), as the full state encoding mechanisms are still in development.
On-Chain Verification
When the target chain receives the proof and circuit output, it can verify execution correctness:
#![allow(unused)]
fn main() {
fn verify(&self, proof: Proof, circuit_output: Vec<u8>) {
    let current_commitment = self.state.commitment();

    // Extract the new state commitment from circuit output
    let new_commitment = StateCommitment::decode(circuit_output);

    // Verify the ZK proof
    proof.verify(&self.vk, &[current_commitment, new_commitment].concat());

    // Apply the proven state transition
    self.state.apply_commitment(new_commitment);
}
}
Merkleized Encoder
For cross-chain applications, the Merkleized Encoder handles state transition dependencies across multiple domains. This enables parallel execution while maintaining correctness for chains that depend on each other's state.
Cross-Chain State Dependencies
Consider three chains where:
- Chain 1 executes independently
- Chain 2 executes independently
- Chain 3 depends on the result from Chain 1
The Merklelized Encoder creates a Merkle tree structure:
        R (Root)
       /         \
     M1           M2
    /  \         /  \
   C1   C2      C3   0
   |    |       |
Chain1 Chain2 Chain3
Each leaf contains the encoded state transition for its respective chain:
C1:(S1 → T1), K1(Chain 1 transition)C2:(S2 → T2), K2(Chain 2 transition)C3:(S3 → T3), K3(Chain 3 transition, depends on T1)
Parallel and Sequential Execution
The ZK coprocessor can execute proofs in parallel where possible:
- Independent execution: Chain 1 and Chain 2 can execute in parallel
- Sequential dependency: Chain 3 waits for Chain 1's result
T1 - State sharing: Chain 3 receives
T1and validates the foreign state while processing
Optimized Verification
The Merkle tree structure provides logarithmic verification efficiency. Each chain only needs:
- Its own state transition arguments
- The Merkle path to the root
R - Any dependent state from other chains
For example, Chain 2 only needs C1 and M2 for its Merkle proof, not the complete state data from Chains 1 and 3.
On-Chain Proof Distribution
Each chain receives the minimal data needed for verification:
- Chain 1:
(R1, T1) - Chain 2:
(R2, T2) - Chain 3:
(R3, T3, R1, T1, C2)
Chain 3's verification process includes:
- Verify its own transition:
verify(R3, T3) - Verify the dependency:
verify(R1, T1) - Query the foreign state:
query(T1) - Reconstruct the commitments and validate the Merkle root
This architecture enables the Valence Coprocessor to securely and efficiently coordinate complex cross-chain programs.
Domain Implementations (Examples)
Domains are pluggable modules that supply controller logic and circuits for chain‑specific state proofs. Each implementation typically includes:
- A controller (Wasm) that knows how to fetch/structure state inputs
- A circuit (zkVM target) that verifies the state proof and binds it to the Coprocessor root
- Optional services (e.g., light clients)
Example: Ethereum (as one implementation)
- Build storage layouts with a builder (e.g., mapping indices, combined slots, variable‑length values)
- Create
StateProofArgsfor the target account/storage and optional payload - Produce a
StateProofwitness that the Coprocessor can open to the historical root and verify
New domains can follow the same pattern: define controller APIs that emit domain‑specific Witness::StateProof entries, implement a circuit that verifies those proofs, and optionally provide a service component for light‑client or state synthesis. For how these proofs bind to the Coprocessor root via domain and historical openings, see Domain Proofs.
Domain Proofs
This document explains how domain proofs are modeled and validated in the Valence Coprocessor and how historical proofs are bound to a domain proof.
Domain proofs bind chain‑specific state (for example, an Ethereum account/storage proof) to a single Coprocessor root. The Coprocessor root is the root of a global Historical tree. Each leaf of that tree is a domain root, and each domain root is the root of a per‑domain sparse Merkle tree that maps block number to state root. Guest programs provide domain‑specific state proofs; the Coprocessor augments them with openings up to the Coprocessor root and proves the combined statement. For API access and client conventions, see Coprocessor Internals and for on‑chain consumption, see On‑Chain Integration.
Structure
Per‑domain, we maintain a sparse Merkle tree keyed by block number whose leaves are state roots. Using the block number as the key improves locality—consecutive blocks tend to share path prefixes—so proof paths are short on average. Globally, we maintain a sparse Merkle tree keyed by Hash(domain identifier) whose leaves are the current domain roots. The root of this Historical tree is the Coprocessor root. The Coprocessor places this 32‑byte root at the start of public inputs for every program proof; the remainder of the inputs is the program’s circuit output.
Binding State to the Coprocessor Root
To bind a domain value to the Coprocessor root, the Coprocessor combines two openings. First, it computes a per‑domain opening from the block number to the state root in the domain tree. Second, it computes a historical opening from Hash(domain id) to the domain root in the Historical tree. These openings are combined into a single “state opening” that binds the state root to the Coprocessor root; the Coprocessor enforces that the opening corresponds to the correct domain identifier. Finally, the domain‑specific value proof (for example, an Ethereum MPT proof) is verified against the state root. The result is a proof that the value is included in the domain state committed by the Coprocessor root at the referenced block.
Adding New Blocks
New blocks are added through the domain’s controller (for example, POST /api/registry/domain/:domain). The controller validates the domain‑specific inputs and yields the new (block number, state root) pair, and the Coprocessor persists the historical update and proofs. You can query the latest per‑domain information at /api/registry/domain/:domain/latest, the current Coprocessor root at /api/historical, a specific update at /api/historical/:root, or a block proof for a domain at /api/historical/:domain/:number.
Recursive Proofs and Publication
The “state transition” for the Historical tree is modeled via recursive proofs produced by a domain prover service. The service ingests historical updates, computes an inner proof over intervals of updates, and wraps it in a stable “wrapper” proof with a published verifying key (VK). Consumers read the latest state and wrapper VK from the domain prover and can bind their verification logic to that VK and the expected controller ID. Per‑domain block validity is enforced when adding a block to the Coprocessor; the wrapper proof chains these updates. See Coprocessor Internals for how the domain prover and Coprocessor interact.
On‑Chain Consumption
On‑chain, program proofs always start with the 32‑byte Coprocessor root in public inputs; the circuit‑defined output follows. Authorization uses a VerificationRouter route to verify proofs against the correct VK and route (for example, a guest program VK or a domain prover wrapper VK). Upon success, Authorization dispatches the validated message to the Processor. There is currently no on‑chain registry of “valid Coprocessor roots”; the domain prover route and VK binding provide the trust anchor. A root registry could be added later if desired.
Authorization & Processors
The Authorization and Processor contracts are foundational pieces of the Valence Protocol, as they enable execution of Valence Programs and enforce access control to the program's Subroutines via Authorizations.
This section explains the rationale for these contracts and shares insights into their technical implementation, as well as how end-users can interact with Valence Programs via Authorizations.
Rationale
- To provide users with a single point of entry to interact with the Valence Program through controlled access to library functions.
- To centralize user authorizations and permissions, making it easy to control application access.
- To have a single address (Processor) that will execute the authorized messages. On CosmWasm this uses execution queues and permissionless ticks; on EVM the Lite Processor executes immediately (no queues).
- To create, edit, or remove different application permissions with ease.
Note: Programs can optionally include libraries and accounts deployed across multiple domains for certain multi-chain scenarios.
Assumptions
-
Funds: You cannot send funds with the messages.
-
Bridging: For programs that optionally span multiple domains, we assume that messages can be sent and confirmed bidirectionally between domains. The Authorization contract on the main domain communicates with the processor in a different domain in one direction and the callback confirming the correct or failed execution in the other direction.
-
Instantiation: All these contracts can be instantiated beforehand and off-chain having predictable addresses. Here is an example instantiation flow using Polytone:
- Predict
authorizationcontract address. - Instantiate polytone contracts & set up relayers.
- Predict
proxycontract address for theauthorizationcontract on each external domain. - Predict
proxycontract address on the main domain for each processor on external domains. - Instantiate all
processors. The sender on external domains will be the predictedproxyand on the main domain it will be the Authorization contract iself. - Instantiate Authorization contract with all the processors and their predicted proxies for external domains and the processor on the main domain.
- Predict
-
Relaying: Relayers will be running once everything is instantiated.
-
Tokenfactory: The main domain has the token factory module with no token creation fee so that we can create and mint these nonfungible tokens with no additional cost.
-
Domains: In the current version, actions in each authorization will be limited to a single domain.
Authorization Contract
The Authorization contract serves as the authority and message routing hub for Valence Programs. It supports two distinct authorization mechanisms: standard authorizations for traditional access control and ZK authorizations for zero-knowledge proof–based execution.
A Valence Program has one Authorization contract and one Processor contract per domain. The Authorization contract defines authorizations that control access to library functions within the program. The contract validates user permissions and routes authorized messages to the associated Processor contract for execution.
Standard Authorizations
Standard authorizations use a label-based system with different authorization modes.
- CosmWasm: Permissionless authorizations allow anyone to execute (default Medium priority). Permissioned authorizations are enforced with per‑label TokenFactory tokens. With call limit, one token is consumed (burned on success, refunded on failure) per execution; without call limit, holding one token suffices. Tokens use
factory/{authorization_contract}/{label}and enable on-chain transferability. - EVM: Permissioned access is enforced per label with address allowlists and function‑level constraints. For each label, the contract stores an array of AuthorizationData entries containing the target contract address and either the function selector or a call hash. No tokens are minted; authorization is purely address/function based.
For standard message execution, the contract validates sender permissions and authorization state, ensures the message(s) align with the label’s subroutine configuration, routes the message to the Processor, and processes callbacks. On CosmWasm, token mint/burn/refund applies for call‑limited flows.
ZK Authorizations
ZK authorizations enable proof‑based execution via a registry‑keyed configuration. Each registry stores allowed execution addresses, a verification key, a verification route (for a VerificationRouter), optional last‑block validation for replay prevention, and a metadata hash linking the VK to the program.
- EVM: Users call
executeZKMessage(bytes inputs, bytes proof, bytes payload). The Authorization verifies sender allowance, optional replay protection, then routes to theVerificationRouter.verify(route, vk, proof, inputs, payload). On success, it injects the currentexecutionIdinto SendMsgs/InsertMsgs and forwards to the Processor. - CosmWasm: Users call
ExecuteZkAuthorization { label, inputs, proof, payload }. The Authorization verifies sender allowance and optional last‑block execution checks, uses the configured verification route, and forwards the decoded Processor message.
Note: CosmWasm cross‑domain routing uses Polytone (CosmWasm↔CosmWasm). EVM cross‑domain routing uses Hyperlane mailboxes. Both environments support callbacks to the Authorization for execution results.
Instantiation
Instantiation parameters vary slightly between CosmWasm and EVM.
CosmWasm
The Authorization contract is instantiated with:
- Processor contract address on the main domain
- Owner address
- Optional list of sub‑owners (second‑tier owners who can perform all actions except sub‑owner management)
Once deployed, authorizations can be created and executed on the main domain. To execute on other domains, the owner adds external domains with connector details (Polytone for CosmWasm domains; Hyperlane + encoder info for EVM domains).
EVM
constructor(address owner, address processor, bool storeCallbacks)
owner: the contract owner (Ownable)processor: the Processor contract addressstoreCallbacks: whether to persist processor callbacks on‑chain (otherwise only events are emitted)
EVM does not use sub‑owners; instead, the owner can add or remove admin addresses that are permitted to perform privileged updates. Cross‑domain routing is handled via Hyperlane mailboxes (set during Processor deployment), not at Authorization instantiation time.
For more information on how to deploy and interact with the EVM authorization contract, check the EVM Authorization contract section.
Owner Functions
This page lists owner/admin actions. Items are grouped by execution environment when behavior differs.
CosmWasm
-
create_authorizations(vec[Authorization]): provides an authorization list which is the core information of the Authorization contract, it will include all the possible set of functions that can be executed. It will contain the following information:-
Label: unique name of the authorization. This label will be used to identify the authorization and will be used as subdenom of the tokenfactory token in case it is permissioned. Due to tokenfactory module restrictions, the max length of this field is 44 characters. Example: If the label is
withdrawand only addressneutron123is allowed to execute this authorization, we will create the tokenfactory/<contract_addr>/withdrawand mint one to that address. Ifwithdrawwas permissionless, there is no need for any token, so it's not created. -
Mode: can either be
PermissionedorPermissionless. IfPermissionlessis chosen, any address can execute this function list. In case ofPermissioned, we will also say what type of permissioned type we want (withCallLimitor without), a list of addresses will be provided for both cases. In case there is aCallLimitwe will mint a certain amount of tokens for each address that is passed, in case there isn’t we will only mint one token and that token will be used all the time. -
NotBefore: from what time the authorization can be executed. We can specify a block height or a timestamp.
-
Expiration: until when (what block or timestamp) this authorization is valid.
-
MaxConcurrentExecutions (default 1): to avoid DDoS attacks and to clog the execution queues, we will allow certain authorizations subroutines to be present a maximum amount of times (default 1 unless overwritten) in the execution queue.
-
Subroutine: set of functions in a specific order to be executed. Subroutines can be of two types:
AtomicorNonAtomic. For theAtomicsubroutines, we will provide an array ofAtomicfunctions, an optionalexpiration_timeand an optionalRetryLogicfor the entire subroutine. For theNonAtomicsubroutines we will just provide an array ofNonAtomicfunctions and an optionalexpiration_time. Theexpiration_timedefines how long messages that are executing a subroutine will be valid for once they are sent from the authorization contract. This is particularly useful for domains that use relayers without timeouts (e.g. Hyperlane). If theexpiration_timeis not provided, the relayer can go down for an indefinite amount of time and the messages will still be valid and execute when it's back up. If theexpiration_timeis provided, the messages will be valid for that amount of time, by adding the current block timestamp to theexpiration_time, and if the relayer is down for longer than that, the messages will be considered expired once the execution is attempted in the Processor contract, returning anExpiredresult.-
AtomicFunction: each Atomic function has the following parameters:-
Domain of execution (must be the same for all functions in v1).
-
MessageDetails: type (e.g. CosmwasmExecuteMsg, EvmCall ...) and message information. Depending on the type of the message that is being sent, we might need to provide additional values and/or only some specific
ParamRestrictionscan be applied:- If we are sending messages that are not for a
CosmWasm ExecutionEnvironmentand the message passed doesn't contain Raw bytes for that particular VM (e.g.EvmRawCall), we need to provide theEncoderinformation for that message along with the name of the library that theEncoderwill use to encode that message. For example, if we are sending a message for anEvmCallon an EVM domain, we need to provide the address of theEncoder Brokerand theversionof theEncoderthat the broker needs to route the message to along with the name of the library that theEncoderwill use to encode that message (e.g.forwarder). - For all messages that are not raw bytes (
jsonformatted), we can apply any of the followingParamRestrictions:MustBeIncluded: the parameter must be included in the message.CannotBeIncluded: the parameter cannot be included in the message.MustBeValue: the parameter must have a specific value.
- For all messages that are raw bytes, we can only apply the
MustBeBytesrestriction, which matches that the bytes sent are the same as the ones provided in restriction, limiting the authorization execution to only one specific message.
- If we are sending messages that are not for a
-
Contract address that will execute it.
-
-
NonAtomicFunction: each NonAtomic function has the following parameters:-
Domain of execution
-
MessageDetails (same as above).
-
Contract address that will execute it.
-
RetryLogic (optional, self-explanatory).
-
CallbackConfirmation (optional): This defines if a
NonAtomicFunctionis completed after receiving a callback (Binary) from a specific address instead of after a correct execution. This is used in case of the correct message execution not being enough to consider the message completed, so it will define what callback we should receive from a specific address to flag that message as completed. For this, the processor will append anexecution_idto the message which will be also passed in the callback by the service to identify what function this callback is for.
-
-
-
Priority (default Med): priority of a set of functions can be set to High. If this is the case, they will go into a preferential execution queue. Messages in the
Highpriority queue will be taken over messages in theMedpriority queue. All authorizations will have an initial state ofEnabled.
Here is an example of an Authorization table after its creation:
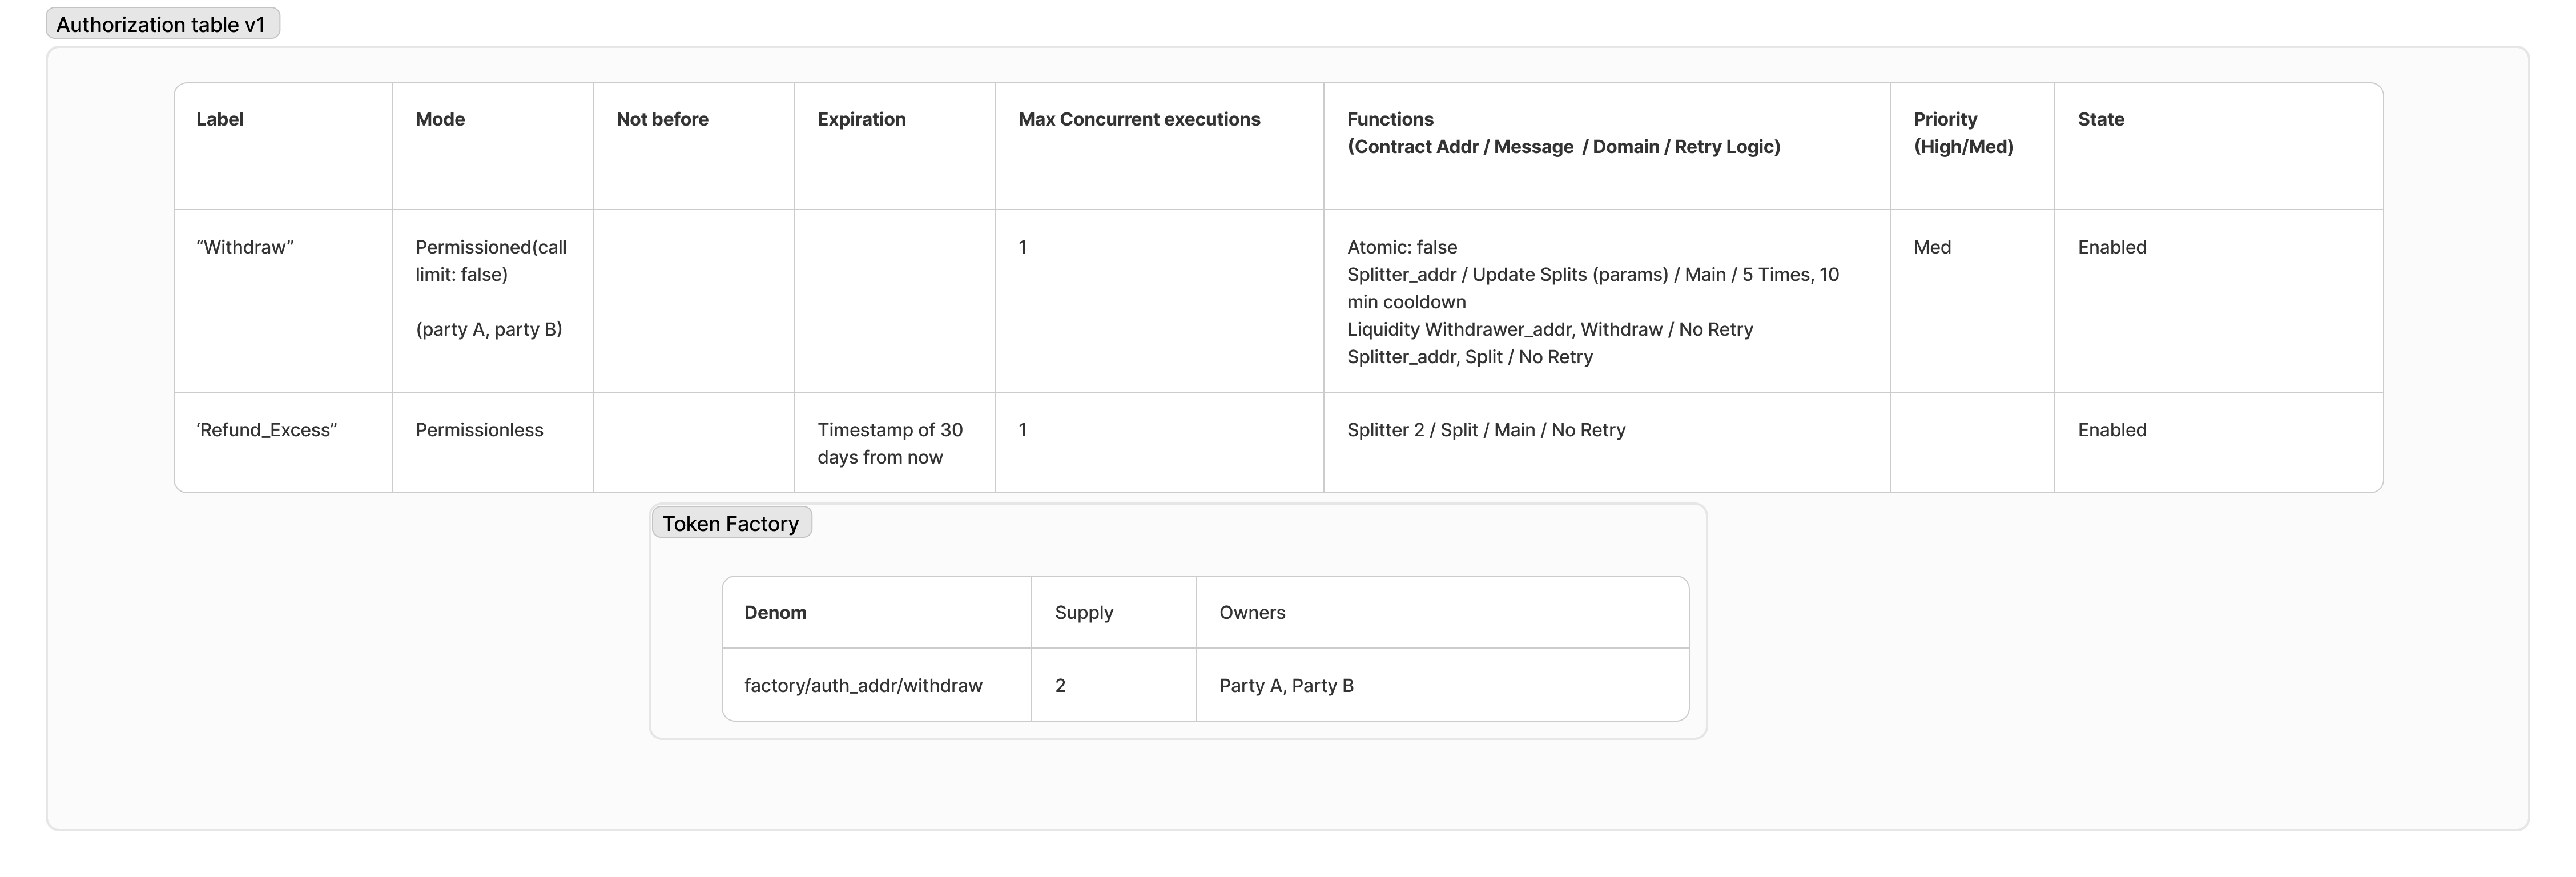
-
-
add_external_domains([external_domains]): to add anExternalDomainto the Authorization contract, the owner will specify what type ofExecutionEnvironmentit has (e.g.CosmWasm,Evm...) and all the information required for each type ofExecutionEnvironment. For example, if the owner is adding a domain that usesCosmWasmas ExecutionEnvironment, they need to provide all the Polytone information; if they are adding a domain that usesEVMas ExecutionEnvironment, they need to provide all the Hyperlane information and theEncoderto be used for correctly encoding messages in the corresponding format. -
modify_authorization(label, updated_values): can modify certain updatable fields of the authorization: start_time, expiration, max_concurrent_executions and priority. -
disable_authorization(label): puts an Authorization to stateDisabled. These authorizations can not be run anymore. -
enable_authorization(label): puts an Authorization to stateEnabledso that they can be run again. -
mint_authorization(label, vec[(addresses, Optional: amounts)]): if the authorization isPermissionedwithCallLimit: true, this function will mint the corresponding token amounts of that authorization to the addresses provided. IfCallLimit: falseit will mint 1 token to the new addresses provided. -
pause_processor(domain): pause the processor of the domain. -
resume_processor(domain): resume the processor of the domain. -
insert_messages(label, queue_position, queue_type, vec[ProcessorMessage]): adds these set of messages to the queue at a specific position in the queue. -
evict_messages(label, queue_position, queue_type): remove the set of messages from the specific position in a queue. -
add_sub_owners(vec[addresses]): add the current addresses as 2nd tier owners. These sub_owners can do everything except adding/removing admins. -
remove_sub_owners(vec[addresses]): remove these addresses from the sub_owner list. -
ZK‑specific owner actions:
create_zk_authorizations(vec[ZkAuthorization]): add ZK registries with VK, allowed execution addresses, route, metadata hash, and optional last‑block validation.modify_zk_authorization { label, validate_last_block_execution }: enable/disable last‑block execution validation for a registry.set_verification_router(address): set the on‑chain verification router address.update_zk_authorization_route { label, new_route }: update the verifier route for a registry.
EVM
- Standard authorization admin:
addStandardAuthorizations(string[] labels, address[][] users, AuthorizationData[][] data)removeStandardAuthorizations(string[] labels)
- Processor/admin management:
updateProcessor(address)addAdminAddress(address)/removeAdminAddress(address)
- ZK authorization admin:
addRegistries(uint64[] registries, ZkAuthorizationData[] data)updateRegistryRoute(uint64 registryId, string route)removeRegistries(uint64[] registries)setVerificationRouter(address)
User Actions
CosmWasm
-
send_msgs(label, vec[ProcessorMessage]): users can run an authorization with a specific label. If the authorization isPermissioned (without limit), the Authorization contract will check if their account is allowed to execute by checking that the account holds the token in its wallet. If the authorization isPermissioned (with limit)the account must attach the authorization token to the contract execution. Along with the authorization label, the user will provide an array of encoded messages, together with the message type (e.g.CosmwasmExecuteMsg,EvmCall, etc.) and any other parameters for that specific ProcessorMessage (e.g. for aCosmwasmMigrateMsgwe need to also pass a code_id). The contract will then check that the messages match those defined in the authorization, that the messages appear in correct order, and that any applied parameter restrictions are correct.If all checks are correct, the contract will route the messages to the correct Processor with an
execution_idfor the processor to callback with. Thisexecution_idis unique for the entire application. If execution of all actions is confirmed via a callback, the authorization token is burned. If execution fails, the token is sent back. Here is an example flowchart of how a user interacts with the Authorization contract to execute functions on an external CosmWasm domain that is connected to the main domain with Polytone:

EVM
sendProcessorMessage(string label, bytes message): users submit an ABI‑encodedProcessorMessage(as defined inIProcessorMessageTypes) with the target label. The contract verifies the sender against the label’s allowlist and validates the messages against the subroutine’s function set (contract address + function selector or call hash). For SendMsgs/InsertMsgs, the Authorization injects the currentexecutionIdbefore forwarding to the Processor. There is no tokenization on EVM; authorization is address/function constrained.
EVM Authorization Contract
If a general message passing protocol like Hyperlane wants to be avoided to not require the deployment of additional infrastructure, we also provide a Solidity version of the Authorization contract with similar functionality than the CosmWasm version.
These are the steps to set up our EVM program using the EVM Authorization contract instead of Hyperlane:
- Deploy
Authorization.solproviding the program owner, the lite processor address (previously deployed) and a flag specifying if we want to store the callbacks in the contract state or just emit them as events (less gas consumption):
constructor(address _owner, address _processor, bool _storeCallbacks) Ownable(_owner)
- Once it's deployed, we need to set the authorization contract as an authorized address on the processor.
function addAuthorizedAddress(address _address)
This will allow processing the messages that the newly deployed authorization contract will forward to the processor.
- Now we can start adding our authorizations:
 /**
     * @notice Adds standard authorizations for a specific label
     * @dev Can only be called by the owner
     * @param _labels Array of labels for the authorizations
     * @param _users Array of arrays of user addresses associated with each label
     * @param _authorizationData Array of arrays of authorization data associated with each label
     */
    function addStandardAuthorizations(
        string[] memory _labels,
        address[][] memory _users,
        AuthorizationData[][] memory _authorizationData
    )
This method allows adding multiple authorizations at the same time using arrays, to optimize the gas consumption. The most important part here is the AuthorizationData, which is defined as follows:
    /**
     * @notice Structure representing the data for the authorization label
     * @dev This structure contains the contract address and the function signature hash
     * @param contractAddress The address of the contract that is authorized to be called
     * @param useFunctionSelector Boolean indicating if the function selector should be used instead of callHash
     * @param functionSelector The function selector of the function that is authorized to be called
     * @param callHash The function signature hash of the function that is authorized to be called
     */
    struct AuthorizationData {
        address contractAddress;
        bool useFunctionSelector;
        bytes4 functionSelector;
        bytes32 callHash;
    }
As explained above, we have two ways of defining our authorization: using the function selector or a callHash. If we use a function selector, the authorized address is allowed to execute that specific function with ANY arguments. For example, if the function is transfer(uint256 amount) the address can specify any amount value when calling the authorization. On the other hand, if we want to restrict the call to a specific value, we provide the call hash so that only those specific call bytes can be executed. For example, we compute the keccak256 hash of the encoded call data (e.g., abi.encodeWithSignature("transfer(uint256)", 1000)) and provide that as the callHash. Then the authorized address can ONLY call this authorization with that specific value.
As we can see this is less flexible than the CosmWasm version due to the nature of the Solidity language vs Rust but tends to be enough for most of the programs. If more flexibility is required, the option of using a message passing protocol with our encoding/decoding mechanisms or using the ZK Coprocessor is also available.
- Now that everything is set up, we can execute our authorization like this:
function sendProcessorMessage(string calldata label, bytes calldata _message)
We simply need to specify what label we want to execute and the encoded ProcessorMessage that will be forwarded to the Processor. This performs all the checks against our AuthorizationData, and if they all pass, the message will be forwarded to the processor, executed, and a callback will be received on the Authorization contract.
Processor Contract
The Processor contract exists on each domain within a Valence Program and handles execution of message batches received from the Authorization contract. There are currently two main processor implementations with different capabilities and execution models.
The Full Processor (CosmWasm) provides comprehensive message processing with sophisticated queue management. It uses a priority queue system with High and Medium priority FIFO queues where High priority is processed first. The processor uses tick-based execution with a permissionless tick() function that processes queued messages. It includes advanced retry logic with function-level and batch-level retry configurations, callback confirmation support where non-atomic functions can require callback confirmations, comprehensive state management with Active/Paused states, Polytone integration for Cosmos cross-chain operations, and support for both atomic and non-atomic execution models with different retry behaviors.
For message processing, the Full Processor enqueues messages with priority and expiration handling. The tick() function processes the queue by handling High priority first, then Medium priority. Expired messages are removed and callbacks sent. Retry cooldown is enforced between retry attempts. For atomic execution, all messages execute in a single transaction, while non-atomic execution processes messages sequentially with per-function retry logic.
Lite Processor
The Lite Processor (EVM) is optimized for gas-constrained environments with immediate execution. It processes messages immediately without a queuing system and includes cross-chain support capabilities. The Lite Processor supports both cross-chain messages and authorized addresses for dual access control. It has limited message types, supporting only Pause, Resume, and SendMsgs operations. Expiration handling validates message expiration before execution, and it includes an automatic callback system for contract senders.
For execution flow, the Lite Processor receives messages via cross-chain handlers or direct calls. It validates sender and origin, checks expiration, immediately executes the subroutine (atomic or non-atomic), and sends callbacks if the sender is a contract.
The table below summarizes the main characteristics of the processors supported:
| Full Processor (CosmWasm) | Lite Processor (EVM) | |
|---|---|---|
| Execution Model | Queue-based with tick | Immediate execution |
| Stores batches in queues | Yes, FIFO queue with priority | No, executed immediately |
| Needs to be ticked | Yes, permissionlessly | No |
| Messages can be retried | Yes, with complex retry logic | No |
| Can confirm non-atomic function with callback | Yes | No |
| Supports Pause operation | Yes | Yes |
| Supports Resume operation | Yes | Yes |
| Supports SendMsgs operation | Yes | Yes |
| Supports InsertMsgs operation | Yes | No, no queues to insert in |
| Supports EvictMsgs operation | Yes | No, no queues to remove from |
Both processors are instantiated with the correct Authorization contract address and implement robust access control to ensure only authorized messages are processed. The choice between processors depends on the execution environment requirements, with CosmWasm supporting full queue-based processing and EVM optimizing for immediate execution with lower gas costs.
Processor
This version of the processor is currently available for CosmWasm Execution Environment only. It contains all the features and full functionality of the processor as described below.
It handles two execution queues: High and Med, which allow giving different priorities to message batches. The Authorization contract will send the message batches to the Processor specifying the priority of the queue where they should be enqueued.
The Processor can be ticked permissionlessly, which will trigger the execution of the message batches in the queues in a FIFO manner. It will handle the Retry logic for each batch (if the batch is atomic) or function (if the batch is non-atomic). In the particular case that the current batch at the top of the queue is not retriable yet, the processor will rotate it to the back of the queue. After a MessageBatch has been executed successfully or it reached the maximum amount of retries, it will be removed from the execution queue and the Processor will send a callback with the execution information to the Authorization contract.
The Authorization contract will be the only address allowed to add message batches to the execution queues. It will also be allowed to Pause/Resume the Processor or to arbitrarily remove functions from the queues or add certain messages at a specific position in any of them.
Execution
When a processor is Ticked, the first Message Batch will be taken from the queue (High if there are batches there or Med if there aren’t).
After taking the Message Batch, the processor will first check if the batch is expired. If that's the case, the processor will discard the batch and return an Expired(executed_functions) ExecutionResult to the Authorization contract. There might be a case that the batch is NonAtomic and it's already partially executed, therefore the processor also returns the number of functions that were executed before the expiration.
If the batch has not expired, the processor will execute the batch according to whether it is Atomic or NonAtomic.
-
For
Atomicbatches, the Processor will execute either all functions or none of them. If execution fails, the batchRetryLogicis checked to determine if the match should be re-enqueued. If not, a callback is sent with aRejected(error)status to the Authorization contract. If the execution succeeded we will send a callback withExecutedstatus to the Authorization contract. -
For
NonAtomicbatches, we will execute the functions one by one and applying the RetryLogic individually to each function if they fail.NonAtomicfunctions might also be confirmed viaCallbackConfirmationsin which case we will keep them in a separate storage location until we receive that specific callback. Each time a function is confirmed, we will re-queue the batch and keep track of what function we have to execute next. If at some point a function uses up all its retries, the processor will send a callback to the Authorization contract with aPartiallyExecuted(num_of_functions_executed, execution_error)execution result if some succeeded orRejected(error)if none did. If all functions are executed successfully, anExecutedexecution result will be sent. ForNonAtomicbatches, the processor must be ticked each time the batch is at the top of the queue to continue, so at least as many ticks will be required as the number of functions in the batch.
Storage
The Processor will receive message batches from the Authorization contract and will enqueue them in a custom storage structure called a QueueMap. This structure is a FIFO queue with owner privileges, which allow the owner to insert or remove messages from any position in the queue.
Each “item” stored in the queue is a MessageBatch object that has the following structure:
#![allow(unused)]
fn main() {
pub struct MessageBatch {
    pub id: u64,
    pub msgs: Vec<ProcessorMessage>,
    pub subroutine: Subroutine,
    pub priority: Priority,
    pub expiration_time: Option<u64>,
    pub retry: Option<CurrentRetry>,
}
}
- id: represents the global id of the batch. The Authorization contract, to understand the callbacks that it will receive from each processor, identifies each batch with an id. This id is unique for the entire application.
- msgs: the messages the processor needs to execute for this batch (e.g. a CosmWasm ExecuteMsg or MigrateMsg).
- subroutine: This is the config that the authorization table defines for the execution of these functions. With this field we can know if the functions need to be executed atomically or not atomically, for example, and the retry logic for each batch/function depending on the config type.
- priority (for internal use): batches will be queued in different priority queues when they are received from the Authorization contract. We also keep this priority here because they might need to be re-queued after a failed execution and we need to know where to re-queue them.
- expiration_time: optional absolute timestamp after which the batch is considered expired by the Processor. When set and already expired at processing time, the batch yields an Expired result (with the number of functions executed so far for NonAtomic).
- retry (for internal use): we are keeping the current retry we are at (if the execution previously failed) to know when to abort if we exceed the max retry amounts.
Lite Processor
This is a simplified version of the Processor contract, with more limited functionality that is optimized for specific domains where gas costs are critical. This version of the processor is currently available for EVM execution environments only.
The main difference between the Lite Processor and the Processor is that the former does not store message batches, but instead executes messages directly when received. The Lite Processor does not handle retries, function callbacks, or queues. More details can be found below.
Execution
The Lite Processor is not ticked, instead it will receive a MessageBatch from the Authorization contract and execute it immediately. Therefore, the execution gas cost will be paid by the relayer of the batch instead of the user who ticks the processor.
There might be a case that the MessageBatch received is already expired, which can happen if the relayer was not working or was slow to send the batch. In this case, the Processor will discard the batch and return an Expired(0) ExecutionResult to the Authorization contract.
This processor does not store batches or use any queue, instead it will simply receive the batch, execute it atomically or non-atomically, and send a callback to the Authorization contract with the ExecutionResult. The only information stored by this processor is the information of the Authorization contract, the information of the Connector (e.g. Hyperlane Mailbox, origin domain id, ...) and the authorized entities that can also execute batches on it without requiring them to be sent from the main domain.
Since there are no queues, operations like InsertAt or RemoveFrom queue that the owner of the Authorization Contract may perform on the Processor are not available on the Lite Processor. Therefore the operations that the Lite Processor supports from the Authorization contract are limited to: Pause, Resume and SendMsgs.
In addition to the limitations above, the Lite Processor does not support retries or function callbacks. This means that the MessageBatch received will be executed only once and the NonAtomic batches can not be confirmed asynchronously because batch execution will be attempted once, non-atomically, the moment it is received.
In addition to executing batches that come from the Authorization contract, the Lite Processor defines a set of authorized addresses that can send batches to it for execution. Since the Processor can execute batches from any address, we only send a callback if the address that sent the batch is a smart contract. Thus the authorized addresses are in charge of the handling/ignoring of these callbacks.
Execution Environment Differences
The Valence Protocol supports both CosmWasm and EVM execution environments, each with different processor implementations and behavioral characteristics. This section outlines the key differences between these environments.
Processor Architecture Differences
The CosmWasm environment provides a Full Processor with queue-based execution using sophisticated FIFO priority queues (High/Medium priority). It requires permissionless tick() calls to process queued messages and includes comprehensive retry mechanisms with configurable intervals. Non-atomic functions can require library callback confirmations, and it uses Polytone for Cosmos ecosystem integration with full state tracking for concurrent executions and callbacks.
The EVM environment provides a Lite Processor with immediate execution that processes messages immediately without queuing. It is designed for EVM gas cost constraints and has limited message types, supporting only Pause, Resume, and SendMsgs operations (no InsertMsgs/EvictMsgs). Messages execute once with immediate success/failure and no retry logic. It includes cross-chain messaging capabilities with minimal state tracking focused on immediate execution.
Execution Success Behavior
In CosmWasm execution, a function fails if the target CosmWasm contract doesn't exist, if the entry point of that contract doesn't exist, if the contract execution fails for any reason, or if contract messages always fail when entry points don't exist (no fallback mechanism).
In EVM execution, a function fails if the contract explicitly fails or reverts, if contract existence checks fail (implemented in EVM Processor), or if Valence Libraries detect execution entering the fallback function (implemented safeguard).
The key difference is that EVM contracts may silently succeed even with non-existent entry points if they have a non-reverting fallback function, while CosmWasm contracts always fail for non-existent entry points.
Message Processing Models
For atomic subroutines, CosmWasm executes all messages in a single transaction via a self-call pattern, while EVM uses try-catch with external call to maintain atomicity.
For non-atomic subroutines, CosmWasm provides sequential execution with per-function retry logic and callback confirmations, while EVM provides sequential execution until first failure with no retry or callback confirmations.
Cross-Chain Integration
For Authorization contract routing, CosmWasm domains route messages via Polytone with proxy creation. Both environments support callback mechanisms for execution result reporting.
Polytone provides IBC-based cross-chain communication with timeout handling and retry mechanisms for reliable cross-chain execution.
Practical Implications
When designing cross-environment programs, developers should account for:
- Execution Guarantees: CosmWasm provides stronger execution failure guarantees
- Retry Capabilities: Only available in CosmWasm environment
- Queue Management: Only CosmWasm supports message prioritization and queue operations
- Gas Models: EVM optimization focuses on immediate execution vs. CosmWasm's more complex state management
- Library Integration: Valence Libraries include EVM-specific safeguards but cannot guarantee behavior for arbitrary contracts
Key Consideration: Functions targeting non-Valence contracts in EVM environments may succeed when they should fail if the contract has a non-reverting fallback function, while equivalent CosmWasm executions would properly fail.
Callbacks
There are different types of callbacks in our application. Each of them have a specific function and are used in different parts of the application.
Function Callbacks
For the execution of NonAtomic batches, each function in the batch can optionally be confirmed with a callback from a specific address. When the processor reaches a function that requires a callback, it will inject the execution_id of the batch into the message that is going to be executed on the library, which means that the library needs to be ready to receive that execution_id and know what the expected callback is and from where it has to come from to confirm that function, otherwise that function will stay unconfirmed and the batch will not move to the next function. The callback will be sent to the processor with the execution_id so that the processor can know what function is being confirmed. The processor will then validate that the correct callback was received from the correct address.
If the processor receives the expected callback from the correct address, the batch will move to the next function. If it receives a different callback than expected from that address, the execution of that function is considered to have failed and it will be retried (if applicable). In either case, a callback must be received to determine if the function was successful or not.
Note: This functionality is not available on the Lite Processor, as this version of the processor is not able to receive asynchronous callbacks from libraries.
Processor Callbacks
Once a Processor batch is executed or it fails and there are no more retries available, the Processor will send a callback to the Authorizations contract with the execution_id of the batch and the result of the execution. All this information will be stored in the Authorization contract state so the history of all executions can be queried from it. This is how a ProcessorCallback looks like:
#![allow(unused)]
fn main() {
pub struct ProcessorCallbackInfo {
    // Execution ID that the callback was for
    pub execution_id: u64,
    // Timestamp of entry creation
    pub created_at: u64,
    // Timestamp of last update of this entry
    pub last_updated_at: u64,
    // Who started this operation, used for tokenfactory actions
    pub initiator: OperationInitiator,
    // Address that can send a bridge timeout or success for the message (if applied)
    pub bridge_callback_address: Option<Addr>,
    // Address that will send the callback for the processor
    pub processor_callback_address: Addr,
    // Domain that the callback came from
    pub domain: Domain,
    // Label of the authorization
    pub label: String,
    // Messages that were sent to the processor
    pub messages: Vec<ProcessorMessage>,
    // Optional ttl for re-sending in case of bridged timeouts
    pub ttl: Option<Expiration>,
    // Result of the execution
    pub execution_result: ExecutionResult,
}

#[cw_serde]
pub enum ExecutionResult {
    InProcess,
    // Everthing executed successfully
    Success,
    // Execution was rejected, and the reason
    Rejected(String),
    // Partially executed, for non-atomic function batches
    // Indicates how many functions were executed and the reason the next function was not executed
    PartiallyExecuted(usize, String),
    // Removed by Owner - happens when, from the authorization contract, a remove item from queue is sent
    RemovedByOwner,
    // Timeout - happens when the bridged message times out
    // We'll use a flag to indicate if the timeout is retriable or not
    // true - retriable
    // false - not retriable
    Timeout(bool),
    // Expired - happens when the batch wasn't executed in time according to the subroutine configuration
    // Indicates how many functions were executed (non-atomic batches might have executed some functions before the expiration)
    Expired(usize),
    // Unexpected error that should never happen but we'll store it here if it ever does
    UnexpectedError(String),
}
}
The key information from here is the label, to identify the authorization that was executed; the messages, to identify what the user sent; and the execution_result, to know if the execution was successful, partially successful or rejected.
Bridge Callbacks
When messages need to be sent through bridges because we are executing batches on external domains, we need to know if, for example, a timeout happened and keep track of it. For this reason we have callbacks per bridge that we support and specific logic that will be executed if they are received. For Polytone timeouts, we will check if the ttl field has not expired and allow permissionless retries if it's still valid. In case the ttl has expired, we will set the ExecutionResult to timeout and not retriable, then send the authorization token back to the user if the user sent it to execute the authorization.
Connectors
Connectors enable the Authorization contract to optionally communicate with external domains for advanced multi-chain programs. When adding an ExternalDomain to the Authorization contract, depending on the ExecutionEnvironment we must specify the Connector information to be used. These connectors are responsible for receiving the message batches from the Authorization contract and trigger the necessary actions for the relayers to pick them up and deliver them to the Processor contract in the ExternalDomain. The connector on the ExternalDomain will also receive callbacks with the ExecutionResult from the Processor contract and send them back to the Authorization contract.
We currently support the following connectors:
Polytone
To connect ExternalDomains that use CosmWasm as ExecutionEnvironment we use Polytone. Polytone is a set of smart contracts that are instantiated on both domains that implement logic to pass messages to each other using IBC. Polytone consists of the following contracts:
- Polytone Note: contract responsible of sending the messages from the Authorization contract to the Processor contract on the external domain and receiving the callback from the Processor contract on the external domain and sending it back to the Authorization contract.
- Polytone Voice: contract that receives the message from Polytone Note and instantiates a Polytone Proxy for each sender that will redirect the message to the destination.
- Polytone Proxy: contract instantiated by Polytone Voice responsible for sending messages received from Polytone Note to the corresponding contract.
To connect the Authorization contract with an external domain that uses Polytone as a connector, we need to provide the Polytone Note address and the predicted Polytone Proxy addresses for both the Authorization contract (when adding the domain) and the Processor Contract (when instantiating the Processor). An IBC relayer must relay these two channels to enable communication.
This is the sequence of messages when using Polytone as a connector:
graph TD
  %% Execution Result Sequence
  subgraph Execution_Sequence [Execution Result Sequence]
    E2[Processor Contract]
    D2[Polytone Note on
    External Domain]
    C2[Polytone Voice on
    Main Domain]
    B2[Polytone Proxy on
    Main Domain]
    A2[Authorization Contract]

    E2 -->|Step 5: Execution Result| D2
    D2 -->|Step 6: Relayer| C2
    C2 -->|Step 7: Instantiate & Forward Result| B2
    B2 -->|Step 8: Execution Result| A2
  end

  %% Message Batch Sequence
  subgraph Batch_Sequence [Message Batch Sequence]
    A1[Authorization Contract]
    B1[Polytone Note on
    Main Domain]
    C1[Polytone Voice on
    External Domain]
    D1[Polytone Proxy on
    External Domain]
    E1[Processor Contract]

    A1 -->|Step 1: Message Batch| B1
    B1 -->|Step 2: Relayer| C1
    C1 -->|Step 3: Instantiate & Forward Batch| D1
    D1 -->|Step 4: Message Batch| E1
  end
Hyperlane
To connect ExternalDomains that use EVM as ExecutionEnvironment we use Hyperlane. Hyperlane is a set of smart contracts that are deployed on both domains and communicate with one another using the Hyperlane Relayer. The required Hyperlane contracts are the following:
- Mailbox: contract responsible for receiving the message for another domain and emitting an event with the message to be picked up by the relayer. The mailbox will also receive messages to be executed on a domain from the relayers and will route them to the correct destination contract.
To connect the Authorization contract with an external domain that uses Hyperlane as a connector, we need to provide the Mailbox address for both the Authorization contract (when adding the domain) and the Processor contract (when instantiating the Processor). A Hyperlane Relayer must relay these two domains using the Mailbox addresses to make the communication possible.
NOTE: There are other Hyperlane contracts that need to be used to set-up Hyperlane, but they are not used in the context of the Authorization contract or the Processor. For more information on how this works, check Hyperlane's documentation or see the Ethereum integration tests we have, where we set up all the required Hyperlane contracts and the relayer in advance before creating our EVM Program.
This is the sequence of messages when using Hyperlane as a connector:
graph TD
  %% Execution Result Sequence
  subgraph Execution_Sequence [Execution Result Sequence]
    E2[Processor Contract]
    D2[Mailbox on
    External Domain]
    C2[Mailbox on
    Main Domain]
    B2[Authorization Contract]

    E2 -->|Step 5: Execution Result| D2
    D2 -->|Step 6: Relayer| C2
    C2 -->|Step 7: Execution Result| B2
  end

  %% Message Batch Sequence
  subgraph Batch_Sequence [Message Batch Sequence]
    A1[Authorization Contract]
    B1[Mailbox on
    Main Domain]
    C1[Mailbox on
    External Domain]
    D1[Processor Contract]

    A1 -->|Step 1: Message Batch| B1
    B1 -->|Step 2: Relayer| C1
    C1 -->|Step 3: Message Batch| D1
  end
Encoding
When a Valence Program needs to communicate with a Processor contract on a non-CosmWasm execution environment, messages must be encoded appropriately for that environment. Two contracts handle this encoding: Encoder Broker and Encoder.
Encoder Broker
The Encoder Broker is a very simple contract that will route the messages to the correct Encoder contract. It maps from Encoder Version to Encoder Contract Address. The Encoder Broker will be instantiated once on the Main Domain with an owner that can add/remove these mappings. An example of Mapping can be "evm_encoder_v1" to <encoder_contract_address_on_neutron>. The Encoder Broker has two queries: Encode and Decode, which routes the message to encode/decode to the Encoder Version specified.
Encoder
The Encoder is the contract that will encode/decode the messages for a specific ExecutionEnvironment. It will be instantiated on the Main Domain an added to the Encoder Broker with a version. Encoders are defined for a specific ExecutionEnvironment and have an Encode and Decode query where we provide the Message to be encoded/decoded. Here is an example of how these queries are performed:
#![allow(unused)]
fn main() {
fn encode(message: ProcessorMessageToEncode) -> StdResult<Binary> {
    match message {
        ProcessorMessageToEncode::SendMsgs {
            execution_id,
            priority,
            subroutine,
            messages,
        } => send_msgs::encode(execution_id, priority, subroutine, messages),
        ProcessorMessageToEncode::InsertMsgs {
            execution_id,
            queue_position,
            priority,
            subroutine,
            messages,
        } => insert_msgs::encode(execution_id, queue_position, priority, subroutine, messages),
        ProcessorMessageToEncode::EvictMsgs {
            queue_position,
            priority,
        } => evict_msgs::encode(queue_position, priority),
        ProcessorMessageToEncode::Pause {} => Ok(pause::encode()),
        ProcessorMessageToEncode::Resume {} => Ok(resume::encode()),
    }
}

fn decode(message: ProcessorMessageToDecode) -> StdResult<Binary> {
    match message {
        ProcessorMessageToDecode::HyperlaneCallback { callback } => {
            Ok(hyperlane::callback::decode(&callback)?)
        }
    }
}
}
As we can see above, the Encoder will have a match statement for each type of message that it can encode/decode. The Encoder will be able to encode/decode messages for a specific ExecutionEnvironment. In the case of ProcessorMessages that include messages for a specific library, these messages will include the Library they are targeting. This allows the Encoder to apply the encoding/decoding logic for that specific library.
This Encoder will be called internally through the Authorization contract when the user sends a message to it. Here is an example of this execution flow:
- The owner adds an
ExternalDomainwith anEVM ExecutionEnvironmentto the Authorization contract, specifying theEncoder Brokeraddress and theEncoder Versionto be used. - The owner creates an authorization with a subroutine with an
AtomicFunctionthat is ofEvmCall(EncoderInfo, LibraryName)type. - A user executes this authorization passing the message. The Authorization contract will route the message to the
Encoder Brokerwith theEncoder Versionspecified inEncoderInfoand passing theLibraryNameto be used for the message. - The
Encoder Brokerwill route the message to the correctEncodercontract, which will encode the message for that particular library and return the encoded bytes to the Authorization Contract. - The Authorization contract will send the encoded message to the Processor contract on the
ExternalDomain, which will be able to decode and interpret the message.
We currently have an Encoder for EVM messages, however more Encoders will be added as we support additional ExecutionEnvironments.
Libraries
This section contains a detailed description of the various libraries that can be used to rapidly build Valence cross-chain programs for each execution environment.
CosmWasm Libraries
This section contains a detailed description of all the libraries that can be used in CosmWasm execution environments.
Astroport LPer library
The Valence Astroport LPer library library allows to provide liquidity into an Astroport Liquidity Pool from an input account and deposit the LP tokens into an output account.
High-level flow
---
title: Astroport Liquidity Provider
---
graph LR
  IA((Input
      Account))
  OA((Output
		  Account))
  P[Processor]
  S[Astroport
      Liquidity
      Provider]
  AP[Astroport
     Pool]
  P -- 1/Provide Liquidity --> S
  S -- 2/Query balances --> IA
  S -- 3/Compute amounts --> S
  S -- 4/Do Provide Liquidity --> IA
  IA -- 5/Provide Liquidity
				  [Tokens] --> AP
  AP -- 5'/Transfer LP Tokens --> OA
Functions
| Function | Parameters | Description |
|---|---|---|
| ProvideDoubleSidedLiquidity | expected_pool_ratio_range: Option<DecimalRange> | Provide double-sided liquidity to the pre-configured Astroport Pool from the input account, and deposit the LP tokens into the output account. Abort it the pool ratio is not within the expected_pool_ratio range (if specified). |
| ProvideSingleSidedLiquidity | asset: Stringlimit: Option<Uint128>expected_pool_ratio_range: Option<DecimalRange> | Provide single-sided liquidity for the specified asset to the pre-configured Astroport Pool from the input account, and deposit the LP tokens into the output account. Abort it the pool ratio is not within the expected_pool_ratio range (if specified). |
Configuration
The library is configured on instantiation via the LibraryConfig type.
#![allow(unused)]
fn main() {
pub struct LibraryConfig {
    // Account from which the funds are LPed
    pub input_addr: LibraryAccountType,
    // Account to which the LP tokens are forwarded
    pub output_addr: LibraryAccountType,
    // Pool address
    pub pool_addr: String,
    // LP configuration
    pub lp_config: LiquidityProviderConfig,
}

pub struct LiquidityProviderConfig {
    // Pool type, old Astroport pools use Cw20 lp tokens and new pools use native tokens, so we specify here what kind of token we are going to get.
    // We also provide the PairType structure of the right Astroport version that we are going to use for each scenario
    pub pool_type: PoolType,
    // Denoms of both native assets we are going to provide liquidity for
    pub asset_data: AssetData,
    /// Max spread used when swapping assets to provide single sided liquidity
    pub max_spread: Option<Decimal>,
}

#[cw_serde]
pub enum PoolType {
    NativeLpToken(valence_astroport_utils::astroport_native_lp_token::PairType),
    Cw20LpToken(valence_astroport_utils::astroport_cw20_lp_token::PairType),
}


pub struct AssetData {
    pub asset1: String,
    pub asset2: String,
}
}
Astroport Withdrawer library
The Valence Astroport Withdrawer library library allows to withdraw liquidity from an Astroport Liquidity Pool from an input account an deposit the withdrawed tokens into an output account.
High-level flow
---
title: Astroport Liquidity Withdrawal
---
graph LR
  IA((Input
      Account))
  OA((Output
		  Account))
  P[Processor]
  S[Astroport
      Liquidity
      Withdrawal]
  AP[Astroport
     Pool]
  P -- 1/Withdraw Liquidity --> S
  S -- 2/Query balances --> IA
  S -- 3/Compute amounts --> S
  S -- 4/Do Withdraw Liquidity --> IA
  IA -- 5/Withdraw Liquidity
				  [LP Tokens] --> AP
  AP -- 5'/Transfer assets --> OA
Functions
| Function | Parameters | Description |
|---|---|---|
| WithdrawLiquidity | - | Withdraw liquidity from the configured Astroport Pool from the input account and deposit the withdrawed tokens into the configured output account |
Configuration
The library is configured on instantiation via the LibraryConfig type.
#![allow(unused)]
fn main() {
pub struct LibraryConfig {
    // Account holding the LP position
    pub input_addr: LibraryAccountType,
    // Account to which the withdrawn assets are forwarded
    pub output_addr: LibraryAccountType,
    // Pool address
    pub pool_addr: String,
    // Liquidity withdrawer configuration
    pub withdrawer_config: LiquidityWithdrawerConfig,
}

pub struct LiquidityWithdrawerConfig {
    // Pool type, old Astroport pools use Cw20 lp tokens and new pools use native tokens, so we specify here what kind of token we are will use.
    // We also provide the PairType structure of the right Astroport version that we are going to use for each scenario
    pub pool_type: PoolType,
}

pub enum PoolType {
    NativeLpToken,
    Cw20LpToken,
}
}
Valence Clearing Queue Library
The Valence Clearing Queue library allows registration and settlement of withdrawal obligations in a FIFO (First-In-First-Out) manner. It maintains a queue of pending withdrawal obligations, with each obligation containing recipient information, payout amounts, and a unique identifier. When settling obligations, funds are pulled from a settlement input account and sent to the specified recipients.
The queue processes obligations based on a strict, monotonically increasing order of the obligation ids. This is meant to prevent any out-of-order errors that may arise from latency or other issues.
Important: This library functions solely as a settlement engine. The settlement account funding (liquidity-management) flow is outside of its scope and is managed by a strategist. This management process likely involves monitoring both the settlement account balance and the obligation queue in order to ensure the settlement account maintains sufficient liquidity for obligation settlements.
High-level flow
---
title: Clearing Queue Library
---
graph LR
  IA((Settlement<br>Account))
  R((Recipient))
  P[Processor]
  CQ[Clearing<br>Queue<br>Library]
  P -- 1/Register<br>Obligation --> CQ
  CQ -- 2/Store<br>Obligation --> CQ
  P -- 3/Settle<br>Next<br>Obligation --> CQ
  CQ -- 4/Query Settlement<br>Account Balance --> IA
  CQ -- 5/Validate & Execute Transfer --> IA
  IA -- 6/Send Funds --> R
Functions
| Function | Parameters | Description |
|---|---|---|
| RegisterObligation | recipient: Stringpayout_amount: Uint128id: Uint64 | Registers a new withdrawal obligation in the queue with the specified recipient, payout coins, and unique ID. Each obligation must have a non-zero payout amount. Recipient must be a valid bech32 address. Obligation id must equal the latest registered obligation id plus 1. |
| SettleNextObligation | - | Settles the oldest withdrawal obligation in the queue by transferring funds from the settlement input account to the specified recipient. Fails if there are no pending obligations or if the input account has insufficient balance. |
Configuration
The library is configured on instantiation via the LibraryConfig type.
#![allow(unused)]
fn main() {
pub struct LibraryConfig {
    /// settlement input account which we tap into in order
    /// to settle the obligations
    pub settlement_acc_addr: LibraryAccountType,
    /// obligation base denom
    pub denom: String,
    /// latest registered obligation id.
    /// if `None`, defaults to 0
    pub latest_id: Option<Uint64>,
}
}
The settlement_acc_addr specifies the account from which funds will be pulled to fulfill settlement obligations. The library will check that this account has sufficient balance before attempting to settle each obligation.
Configured denom is the base clearing denomination which will be applied to all obligation amounts.
Lastly, the optional latest_id field allows to configure the library order to start from a specific id.
If None, latest id defaults to 0. Otherwise, it will start from the specified id.
Duality Lper library
The Valence Duality LPer library allows users to provide liquidity into a Duality Liquidity Pool from an input account and deposit the LP token into an output account.
High-level flow
---
title: Duality Liquidity Provider
---
graph LR
  IA((Input
      Account))
  OA((Output
          Account))
  P[Processor]
  S[Duality
      Liquidity
      Provider]
  DP[Duality
     Pool]
  P -- 1/Provide Liquidity --> S
  S -- 2/Query balances --> IA
  S -- 3/Do Provide Liquidity --> IA
  IA -- 4/Provide Liquidity
                  [Tokens] --> DP
  DP -- 4'/Mint LP Tokens --> OA
Functions
| Function | Parameters | Description |
|---|---|---|
| ProvideLiquidity | - | Provide double-sided liquidity to the pre-configured Duality Pool from the input account, and deposit the LP tokens into the output account. |
Configuration
The library is configured on instantiation via the LibraryConfig type.
#![allow(unused)]
fn main() {
pub struct LibraryConfig {
    /// Address of the input account
    pub input_addr: LibraryAccountType,
    /// Address of the output account
    pub output_addr: LibraryAccountType,
    /// Configuration for the liquidity provider
    /// This includes the pool address and asset data
    pub lp_config: LiquidityProviderConfig,
}

pub struct LiquidityProviderConfig {
    /// Address of the pool we are going to provide liquidity for
    pub pool_addr: String,
    /// Denoms of both assets we are going to provide liquidity for
    /// The assets must be ordered such that:
    /// - `assets.asset1` corresponds to the pool's `token_0`
    /// - `assets.asset2` corresponds to the pool's `token_1`
    pub asset_data: AssetData,
}
}
Implementation Details
Deposit Process
- Balance Check: Queries the input account balance for the specified pool assets.
- Provide Liquidity: Executes a
Depositmessage, which provides liquidity to the pool. Upon depositing, the provider obtains an amount of LP token shares. - Reply Handling: Uses the CosmWasm reply mechanism to handle the two-step process of providing liquidity. Upon successful deposit, the obtained LP token shares will be transferred to the Valence output account, which will hold the position.
Error Handling
- No Funds: Returns an error if attempting to deposit with a zero balance of pool assets.
- Duality Integration: Propagates errors from the Duality Protocol during deposit operations.
Duality Withdrawer library
The Valence Duality Withdrawer library allows users to withdraw liquidity from a Duality Liquidity Pool from an input account and deposit the withdrawn tokens into an output account.
High-level flow
---
title: Duality Liquidity Withdrawal
---
graph LR
  IA((Input
      Account))
  OA((Output
          Account))
  P[Processor]
  S[Duality
      Liquidity
      Withdrawal]
  DP[Duality
     Pool]
  P -- 1/Withdraw Liquidity --> S
  S -- 2/Query balances --> IA
  S -- 3/Do Withdraw Liquidity --> IA
  IA -- 4/Withdraw Liquidity
                  [LP Tokens] --> DP
  DP -- 4'/Transfer assets --> OA
| Function | Parameters | Description |
|---|---|---|
| WithdrawLiquidity | amount: Option<Uint128> | Withdraw liquidity from the configured Duality Pool from the input account, and transfer the withdrawned tokens to the configured output account. If no amount is specified, the entire position is withdrawn. |
Configuration
The library is configured on instantiation via the LibraryConfig type.
#![allow(unused)]
fn main() {
pub struct LibraryConfig {
    // Address of the input account
    pub input_addr: LibraryAccountType,
    // Address of the output account
    pub output_addr: LibraryAccountType,
    // Address of the pool we are going to withdraw liquidity from
    pub pool_addr: String,
}
}
Implementation Details
Withdrawal Process
- Balance Check: Queries the balance of the LP tokens in the input account. To withdraw liquidity, the wallet address must have a positive balance of LP tokens.
- Amount Calculation: Uses the exact amount if specified; otherwise, withdraws the entire balance.
- Withdraw Liquidity: Executes a
Withdrawmessage, which withdraws the specified amount of liquidity to the Valence input account. - Reply Handling: Uses the CosmWasm reply mechanism to handle the two-step withdrawal process. Upon successful withdrawal, the withdrawn tokens are transferred to the Valence output account.
Error Handling
- No Funds: Returns an error if attempting to withdraw with a zero balance of LP tokens.
- Duality Integration: Propagates errors from the Duality Protocol during withdrawal operations.
Valence Forwarder library
The Valence Forwarder library allows to continuously forward funds from an input account to an output account, following some time constraints. It is typically used as part of a Valence Program. In that context, a Processor contract will be the main contract interacting with the Forwarder library.
High-level flow
---
title: Forwarder Library
---
graph LR
  IA((Input
      Account))
  OA((Output
		  Account))
  P[Processor]
  S[Forwarder
    Library]
  P -- 1/Forward --> S
  S -- 2/Query balances --> IA
  S -- 3/Do Send funds --> IA
  IA -- 4/Send funds --> OA
Functions
| Function | Parameters | Description |
|---|---|---|
| Forward | - | Forward funds from the configured input account to the output account, according to the forwarding configs & constraints. |
Configuration
The library is configured on instantiation via the LibraryConfig type.
#![allow(unused)]
fn main() {
pub struct LibraryConfig {
    // Account from which the funds are pulled
    pub input_addr: LibraryAccountType,
    // Account to which the funds are sent
    pub output_addr: LibraryAccountType,
    // Forwarding configuration per denom
    pub forwarding_configs: Vec<UncheckedForwardingConfig>,
    // Constraints on forwarding operations
    pub forwarding_constraints: ForwardingConstraints,
}

pub struct UncheckedForwardingConfig {
    // Denom to be forwarded (either native or CW20)
    pub denom: UncheckedDenom,
    // Max amount of tokens to be transferred per Forward operation
    pub max_amount: Uint128,
}

// Time constraints on forwarding operations
pub struct ForwardingConstraints {
    // Minimum interval between 2 successive forward operations,
    // specified either as a number of blocks, or as a time delta.
    min_interval: Option<Duration>,
}
}
Valence Generic IBC Transfer library
The Valence Generic IBC Transfer library allows to transfer funds over IBC from an input account on a source chain to an output account on a destination chain. It is typically used as part of a Valence Program. In that context, a Processor contract will be the main contract interacting with the Forwarder library.
Note: this library should not be used on Neutron, which requires some fees to be paid to relayers for IBC transfers. For Neutron, prefer using the dedicated (and optimized) Neutron IBC Transfer library instead.
High-level flow
---
title: Generic IBC Transfer Library
---
graph LR
  IA((Input
      Account))
  OA((Output
		  Account))
  P[Processor]
  S[Gen IBC Transfer
    Library]
  subgraph Chain 1
  P -- 1/IbcTransfer --> S
  S -- 2/Query balances --> IA
  S -- 3/Do Send funds --> IA
  end
  subgraph Chain 2
  IA -- 4/IBC Transfer --> OA
  end
Functions
| Function | Parameters | Description |
|---|---|---|
| IbcTransfer | - | Transfer funds over IBC from an input account on a source chain to an output account on a destination chain. |
| EurekaTransfer | eureka_fee | Transfer funds over IBC from an input account on a source chain to an output account on a destination EVM chain using IBC Eureka. The eureka_fee parameter will contain the amount to be paid to a relayer address on the intermediate chain along with the timeout of this fee. All this information can be obtained from a Skip Go query explained in the IBC Eureka section below. Important: the fee timeout is passed in nanoseconds |
Configuration
The library is configured on instantiation via the LibraryConfig type.
#![allow(unused)]
fn main() {
struct LibraryConfig {
  // Account from which the funds are pulled (on the source chain)
  input_addr: LibraryAccountType,
  // Account to which the funds are sent (on the destination chain)
  output_addr: LibraryAccountType,
  // Denom of the token to transfer
  denom: UncheckedDenom,
  // Amount to be transferred, either a fixed amount or the whole available balance.
  amount: IbcTransferAmount,
  // Memo to be passed in the IBC transfer message.
  memo: String,
  // Information about the destination chain.
  remote_chain_info: RemoteChainInfo,
  // Denom map for the Packet-Forwarding Middleware, to perform a multi-hop transfer.
  denom_to_pfm_map: BTreeMap<String, PacketForwardMiddlewareConfig>,
  // Configuration used for IBC Eureka transfers
  eureka_config: Option<EurekaConfig>,
}

// Defines the amount to be transferred, either a fixed amount or the whole available balance.
enum IbcTransferAmount {
  // Transfer the full available balance of the input account.
  FullAmount,
  // Transfer the specified amount of tokens.
  FixedAmount(Uint128),
}

pub struct RemoteChainInfo {
  // Channel of the IBC connection to be used.
  channel_id: String,
  // Port of  the IBC connection to be used.
  port_id: Option<String>,
  // Timeout for the IBC transfer.
  ibc_transfer_timeout: Option<Uint64>,
}

// Configuration for a multi-hop transfer using the Packet Forwarding Middleware
struct PacketForwardMiddlewareConfig {
  // Channel ID from the source chain to the intermediate chain
  local_to_hop_chain_channel_id: String,
  // Channel ID from the intermediate to the destination chain
  hop_to_destination_chain_channel_id: String,
  // Temporary receiver address on the intermediate chain. Typically this is set to an invalid address so the entire transaction will revert if the forwarding fails. If not
  // provided it's set to "pfm"
  hop_chain_receiver_address: Option<String>,
}

// Configuration for IBC Eureka transfers
pub struct EurekaConfig {
    /// The address of the contract on intermediate chain that will receive the callback.
    pub callback_contract: String,
    /// The address of the contract on intermediate chain that will trigger the actions, in this case the Eureka transfer.
    pub action_contract: String,
    /// Recover address on intermediate chain in case the transfer fails
    pub recover_address: String,
    /// Source channel on the intermediate chain (e.g. "08-wasm-1369")
    pub source_channel: String,
    /// Optional memo for the Eureka transfer triggered by the contract. Not used right now but could eventually be used.
    pub memo: Option<String>,
    /// Timeout in seconds to be used for the Eureka transfer. For reference, Skip Go uses 12 hours (43200). If not passed we will use that default value
    pub timeout: Option<u64>,
}
}
Packet-Forward Middleware
The library supports multi-hop IBC transfers using the Packet Forward Middleware (PFM). This allows tokens to be transferred through an intermediate chain to reach their final destination. More information about the PFM functionality can be found in the official documentation.
Generic IBC Transfer library can be configured to make use of PFM as follows:
-
output_addris set to the final receiver address on the final destination chain -
remote_chain_infois configured between the origin and intermediate chain -
denom_to_pfm_mapis configured to map the origin denom to its respectivePacketForwardMiddlewareConfigwhich should contain:local_to_hop_chain_channel_id- origin to intermediate chain channel idhop_to_destination_chain_channel_id- intermediate to destination chain channel idhop_chain_receiver_address- address where funds should settle on the intermediate chain in case of a failure
Official packet-forward-middleware recommends to configure intermediate chain settlement addresses (
hop_chain_receiver_address) with an invalid bech32 string such as"pfm". More information about this can be found in the official documentation.
Consider an example configuration transferring tokens from Osmosis to Gaia via Juno. Library config may look like this:
#![allow(unused)]
fn main() {
LibraryConfig {
    input_addr: input_acc,
    output_addr: output_acc,
    denom: UncheckedDenom::Native(target_denom),
    amount: IbcTransferAmount::FixedAmount(transfer_amount),
    memo: "".to_string(),
    remote_chain_info: RemoteChainInfo {
        channel_id: osmosis_to_juno_channel_id,
        ibc_transfer_timeout: Some(500u64.into()),
    },
    denom_to_pfm_map: BTreeMap::from([(
        denom,
        PacketForwardMiddlewareConfig {
            local_to_hop_chain_channel_id: osmosis_to_juno_channel_id,
            hop_to_destination_chain_channel_id: juno_to_gaia_channel_id,
            hop_chain_receiver_address: None, // if not passed, "pfm" is used
        },
    )]),
    eureka_config: None,
}
}
IBC Eureka
This library supports IBC Eureka transfers using an intermediate chain. This allows tokens to be transferred from the origin chain to EVM chains connected with IBC Eureka using standard IBC transfers together with Skip Go capabilities. For more information on how IBC Eureka works with Skip Go, please refer to this Eureka overview.
Currently, all IBC Eureka transfers are routed through the Cosmos Hub, but the library can be configured to use any other chain as the intermediate chain in the future. The library can be configured to make use of IBC Eureka as follows:
output_addris set to the final receiver address on the final EVM chain (0x address)remote_chain_infois configured between the origin and intermediate chaineureka_configis configured with the addresses used to trigger the actions on the intermediate chain and the callback contract that will be called when the transfer is completed.callback_contract- address of the contract on the intermediate chain that will trigger the callback.action_contract- address of the contract on the intermediate chain that will trigger the actions, in this case the Eureka transfer.recover_address- address on the intermediate chain that will be used to recover the funds in case the transfer fails.source_channel- source channel on the intermediate chainmemo(Optional)- memo to be passed in the IBC transfer message. Currently not used but could potentially be used in the future.timeout(Optional)- timeout in seconds for the Eureka Transfer. If not provided, a default 43200 seconds (12 hours) will be used. Which is the same that Skip Go uses. IMPORTANT: Skip relayers are currently ignoring IBC Eureka transfers with a timeout of less than 10 hours (36000 seconds), therefore we suggest using 12 hours as the default timeout or at least a value higher than 10 hours.
Consider an example configuration transferring ATOM tokens from Neutron to Ethereum. Library config may look like this:
#![allow(unused)]
fn main() {
LibraryConfig {
    input_addr: "neutron1....",
    output_addr: "0x....",
    denom: UncheckedDenom::Native("ibc/C4CFF46FD6DE35CA4CF4CE031E643C8FDC9BA4B99AE598E9B0ED98FE3A2319F9".to_string()),
    amount: IbcTransferAmount::FullAmount,
    memo: "".to_string(),
    remote_chain_info: RemoteChainInfo {
        channel_id: "channel-1", // Neutron to Cosmos Hub channel id
        ibc_transfer_timeout: None, // Default 10 minutes used
    },
    denom_to_pfm_map: BTreeMap::default(),
    eureka_config: {
        callback_contract: "cosmos1lqu9662kd4my6dww4gzp3730vew0gkwe0nl9ztjh0n5da0a8zc4swsvd22".to_string(),
        action_contract: "cosmos1clswlqlfm8gpn7n5wu0ypu0ugaj36urlhj7yz30hn7v7mkcm2tuqy9f8s5".to_string(),
        recover_address: "cosmos1....".to_string(),
        source_channel: "08-wasm-1369".to_string(),
        memo: None,
        timeout: None,
    }
}
}
When configuring the library or executing the EurekaTransfer function, the following Skip Go query can be used to get all the required information. Here's an example query to transfer 5 ATOM from Neutron to Ethereum.
curl -X POST "https://go.skip.build/api/skip/v2/fungible/route" \
  -H "Content-Type: application/json" \
  -d '{
    "source_asset_chain_id": "neutron-1",
    "source_asset_denom": "ibc/C4CFF46FD6DE35CA4CF4CE031E643C8FDC9BA4B99AE598E9B0ED98FE3A2319F9",
    "dest_asset_chain_id": "1",
    "dest_asset_denom": "0xbf6Bc6782f7EB580312CC09B976e9329f3e027B3",
    "amount_in": "5000000",
    "allow_unsafe": true,
    "allow_multi_tx": true,
    "go_fast": true,
    "smart_relay": true,
    "smart_swap_options": {
      "split_routes": true,
      "evm_swaps": true
    },
    "experimental_features": [
      "eureka"
    ]
  }'
This query will return the following key information among other things:
smart_relay_fee_quote- theeureka_feeinformation to execute the transfer. Important: the timeout for the transfer needs to be passed as nanoseconds.source_client- thesource_channelused in theeureka_configwhen configuring the library.callback_adapter_contract_address- thecallback_contractused in theeureka_configwhen configuring the library.entry_contract_address- theaction_contractused in theeureka_configwhen configuring the library.
Valence Neutron IBC Transfer library
The Valence Neutron IBC Transfer library allows to transfer funds over IBC from an input account on Neutron to an output account on a destination chain. It is typically used as part of a Valence Program. In that context, a Processor contract will be the main contract interacting with the Forwarder library.
Note: this library should not be used on another chain other than Neutron, which requires some NTRN fees to be paid to relayers for IBC transfers that the input account should hold. For other CosmWasm chains, use the Generic IBC Transfer library instead.
High-level flow
---
title: Neutron IBC Transfer Library
---
graph LR
  IA((Input
      Account))
  OA((Output
		  Account))
  P[Processor]
  S[Neutron IBC Transfer
    Library]
  subgraph Neutron
  P -- 1/IbcTransfer --> S
  S -- 2/Query balances --> IA
  S -- 3/Do Send funds --> IA
  end
  subgraph Chain 2
  IA -- 4/IBC Transfer --> OA
  end
Functions
| Function | Parameters | Description |
|---|---|---|
| IbcTransfer | - | Transfer funds over IBC from an input account on Neutron to an output account on a destination chain. The input account must hold enough NTRN balance to pay for the relayer fees |
| EurekaTransfer | eureka_fee | Transfer funds over IBC from an input account on a source chain to an output account on a destination EVM chain using IBC Eureka. The eureka_fee parameter will contain the amount to be paid to a relayer address on the intermediate chain along with the timeout of this fee. All this information can be obtained from a Skip Go query explained in the IBC Eureka section below. Important: the fee timeout is passed in nanoseconds |
Configuration
The library is configured on instantiation via the LibraryConfig type.
#![allow(unused)]
fn main() {
struct LibraryConfig {
  // Account from which the funds are pulled (on the source chain)
  input_addr: LibraryAccountType,
  // Account to which the funds are sent (on the destination chain)
  output_addr: LibraryAccountType,
  // Denom of the token to transfer
  denom: UncheckedDenom,
  // Amount to be transferred, either a fixed amount or the whole available balance.
  amount: IbcTransferAmount,
  // Memo to be passed in the IBC transfer message.
  memo: String,
  // Information about the destination chain.
  remote_chain_info: RemoteChainInfo,
  // Denom map for the Packet-Forwarding Middleware, to perform a multi-hop transfer.
  denom_to_pfm_map: BTreeMap<String, PacketForwardMiddlewareConfig>,
  // Configuration used for IBC Eureka transfers
  eureka_config: Option<EurekaConfig>,
}

// Defines the amount to be transferred, either a fixed amount or the whole available balance.
enum IbcTransferAmount {
  // Transfer the full available balance of the input account.
  FullAmount,
  // Transfer the specified amount of tokens.
  FixedAmount(Uint128),
}

pub struct RemoteChainInfo {
  // Channel of the IBC connection to be used.
  channel_id: String,
  // Port of  the IBC connection to be used.
  port_id: Option<String>,
  // Timeout for the IBC transfer.
  ibc_transfer_timeout: Option<Uint64>,
}

// Configuration for a multi-hop transfer using the Packet Forwarding Middleware
struct PacketForwardMiddlewareConfig {
  // Channel ID from the source chain to the intermediate chain
  local_to_hop_chain_channel_id: String,
  // Channel ID from the intermediate to the destination chain
  hop_to_destination_chain_channel_id: String,
  // Temporary receiver address on the intermediate chain. Typically this is set to an invalid address so the entire transaction will revert if the forwarding fails. If not
  // provided it's set to "pfm"
  hop_chain_receiver_address: Option<String>,
}

// Configuration for IBC Eureka transfers
pub struct EurekaConfig {
    /// The address of the contract on intermediate chain that will receive the callback.
    pub callback_contract: String,
    /// The address of the contract on intermediate chain that will trigger the actions, in this case the Eureka transfer.
    pub action_contract: String,
    /// Recover address on intermediate chain in case the transfer fails
    pub recover_address: String,
    /// Source channel on the intermediate chain (e.g. "08-wasm-1369")
    pub source_channel: String,
    /// Optional memo for the Eureka transfer triggered by the contract. Not used right now but could eventually be used.
    pub memo: Option<String>,
    /// Timeout in seconds to be used for the Eureka transfer. For reference, Skip Go uses 12 hours (43200). If not passed we will use that default value
    pub timeout: Option<u64>,
}
}
Packet-Forward Middleware
The library supports multi-hop IBC transfers using the Packet Forward Middleware (PFM). This allows tokens to be transferred through an intermediate chain to reach their final destination. More information about the PFM functionality can be found in the official documentation.
Neutron IBC Transfer library can be configured to make use of PFM as follows:
-
output_addris set to the final receiver address on the final destination chain -
remote_chain_infois configured between the origin and intermediate chain -
denom_to_pfm_mapis configured to map the origin denom to its respectivePacketForwardMiddlewareConfigwhich should contain:local_to_hop_chain_channel_id- origin to intermediate chain channel idhop_to_destination_chain_channel_id- intermediate to destination chain channel idhop_chain_receiver_address- address where funds should settle on the intermediate chain in case of a failure
Official packet-forward-middleware recommends to configure intermediate chain settlement addresses (
hop_chain_receiver_address) with an invalid bech32 string such as"pfm". More information about this can be found in the official documentation.
Consider an example configuration transferring tokens from Neutron to Gaia via Juno. Library config may look like this:
#![allow(unused)]
fn main() {
let cfg = LibraryConfig {
    input_addr: input_acc,
    output_addr: output_acc,
    denom: UncheckedDenom::Native(target_denom),
    amount: IbcTransferAmount::FixedAmount(transfer_amount),
    memo: "".to_string(),
    remote_chain_info: RemoteChainInfo {
        channel_id: neutron_to_juno_channel_id,
        ibc_transfer_timeout: Some(500u64.into()),
    },
    denom_to_pfm_map: BTreeMap::from([(
        denom,
        PacketForwardMiddlewareConfig {
            local_to_hop_chain_channel_id: neutron_to_juno_channel_id,
            hop_to_destination_chain_channel_id: juno_to_gaia_channel_id,
            hop_chain_receiver_address: None, // if not passed, "pfm" is used
        },
    )]),
    eureka_config: None,
}
}
IBC Eureka
This library supports IBC Eureka transfers using an intermediate chain. This allows tokens to be transferred from the origin chain to EVM chains connected with IBC Eureka using standard IBC transfers together with Skip Go capabilities. For more information on how IBC Eureka works with Skip Go, please refer to this Eureka overview.
This works in the same way as the Generic IBC Transfer Library. For more details on how IBC Eureka works, check the Generic IBC Transfer Library IBC Eureka documentation.
Osmosis CL LPer library
The Valence Osmosis CL LPer library library allows to create concentrated liquidity positions on Osmosis from an input account, and deposit the LP tokens into an output account.
High-level flow
---
title: Osmosis CL Liquidity Provider
---
graph LR
  IA((Input
      Account))
  OA((Output
		  Account))
  P[Processor]
  S[Osmosis CL
      Liquidity
      Provider]
  AP[Osmosis CL
     Pool]
  P -- 1/Provide Liquidity --> S
  S -- 2/Query balances --> IA
  S -- 3/Configure target
    range --> S
  S -- 4/Do Provide Liquidity --> IA
  IA -- 5/Provide Liquidity
				  [Tokens] --> AP
  AP -- 5'/Transfer LP Tokens --> OA
Concentrated Liquidity Position creation
Because of the way CL positions are created, there are two ways to achieve it:
Default
Default position creation centers around the idea of creating a position with respect to the currently active tick of the pool.
This method expects a single parameter, bucket_amount, which describes
how many buckets of the pool should be taken into account to both sides
of the price curve.
Consider a situation where the current tick is 125, and the configured tick spacing is 10.
If this method is called with bucket_amount set to 5, the following logic
will be performed:
- find the current bucket range, which is 120 to 130
- extend the current bucket ranges by 5 buckets to both sides, meaning that the range "to the left" will be extended by 5 * 10 = 50, and the range "to the right" will be extended by 5 * 10 = 50, resulting in the covered range from 120 - 50 = 70 to 130 + 50 = 180, giving the position tick range of (70, 180).
Custom
Custom position creation allows for more fine-grained control over the way the position is created.
This approach expects users to specify the following parameters:
tick_range, which describes the price range to be coveredtoken_min_amount_0andtoken_min_amount_1which are optional parameters that describe the minimum amount of tokens that should be provided to the pool.
With this flexibility a wide variety of positions can be created, such as those that are entirely single-sided.
Functions
| Function | Parameters | Description |
|---|---|---|
| ProvideLiquidityDefault | bucket_amount: Uint64 | Create a position on the pre-configured Osmosis Pool from the input account, following the Default approach described above, and deposit the LP tokens into the output account. |
| ProvideLiquidityCustom | tick_range: TickRangetoken_min_amount_0: Option<Uint128>token_min_amount_1: Option<Uint128> | Create a position on the pre-configured Osmosis Pool from the input account, following the Custom approach described above, and deposit the LP tokens into the output account. |
Configuration
The library is configured on instantiation via the LibraryConfig type.
#![allow(unused)]
fn main() {
pub struct LibraryConfig {
    // Account from which the funds are LPed
    pub input_addr: LibraryAccountType,
    // Account to which the LP position is forwarded
    pub output_addr: LibraryAccountType,
    // LP configuration
    pub lp_config: LiquidityProviderConfig,
}

pub struct LiquidityProviderConfig {
    // ID of the Osmosis CL pool
    pub pool_id: Uint64,
    // Pool asset 1
    pub pool_asset_1: String,
    // Pool asset 2
    pub pool_asset_2: String,
    // Pool global price range
    pub global_tick_range: TickRange,
}
}
Osmosis CL liquidity withdrawer library
The Valence Osmosis CL Withdrawer library library allows to withdraw a concentrated liquidity position off an Osmosis pool from an input account, and transfer the resulting tokens to an output account.
High-level flow
---
title: Osmosis CL Liquidity Withdrawal
---
graph LR
  IA((Input
      Account))
  OA((Output
		  Account))
  P[Processor]
  S[Osmosis CL
      Liquidity
      Withdrawal]
  AP[Osmosis CL
     Pool]
  P -- 1/Withdraw Liquidity --> S
  S -- 2/Query balances --> IA
  S -- 3/Compute amounts --> S
  S -- 4/Do Withdraw Liquidity --> IA
  IA -- 5/Withdraw Liquidity
				  [LP Position] --> AP
  AP -- 5'/Transfer assets --> OA
Functions
| Function | Parameters | Description |
|---|---|---|
| WithdrawLiquidity | position_id: Uint64liquidity_amount: String | Withdraw liquidity from the configured Osmosis Pool from the input account, according to the given parameters, and transfer the withdrawned tokens to the configured output account |
Configuration
The library is configured on instantiation via the LibraryConfig type.
#![allow(unused)]
fn main() {
pub struct LibraryConfig {
    // Account holding the LP position
    pub input_addr: LibraryAccountType,
    // Account to which the withdrawn assets are forwarded
    pub output_addr: LibraryAccountType,
    // ID of the pool
    pub pool_id: Uint64,
}
}
Osmosis GAMM LPer library
The Valence Osmosis GAMM LPer library library allows to join a pool on Osmosis, using the GAMM module (Generalized Automated Market Maker), from an input account, and deposit the LP tokens into an output account.
High-level flow
---
title: Osmosis GAMM Liquidity Provider
---
graph LR
  IA((Input
      Account))
  OA((Output
          Account))
  P[Processor]
  S[Osmosis GAMM
      Liquidity
      Provider]
  AP[Osmosis
     Pool]
  P -- 1/Join Pool --> S
  S -- 2/Query balances --> IA
  S -- 3/Compute amounts --> S
  S -- 4/Do Join Pool --> IA
  IA -- 5/Join Pool
                  [Tokens] --> AP
  AP -- 5'/Transfer LP tokens --> OA
Functions
| Function | Parameters | Description |
|---|---|---|
| ProvideDoubleSidedLiquidity | expected_spot_price: Option<DecimalRange> | Provide double-sided liquidity to the pre-configured Osmosis Pool from the input account, and deposit the LP tokens into the output account. Abort it the spot price is not within the expected_spot_price range (if specified). |
| ProvideSingleSidedLiquidity | asset: Stringlimit: Option<Uint128>expected_spot_price: Option<DecimalRange> | Provide single-sided liquidity for the specified asset to the pre-configured Osmosis Pool from the input account, and deposit the LP tokens into the output account. Abort it the spot price is not within the expected_spot_price range (if specified). |
Configuration
The library is configured on instantiation via the LibraryConfig type.
#![allow(unused)]
fn main() {
pub struct LibraryConfig {
    // Account from which the funds are LPed
    pub input_addr: LibraryAccountType,
    // Account to which the LP position is forwarded
    pub output_addr: LibraryAccountType,
    // LP configuration
    pub lp_config: LiquidityProviderConfig,
}

pub struct LiquidityProviderConfig {
    // ID of the Osmosis pool
    pub pool_id: Uint64,
    // Pool asset 1
    pub pool_asset_1: String,
    // Pool asset 2
    pub pool_asset_2: String,
}
}
Osmosis GAMM liquidity withdrawer library
The Valence Osmosis GAMM Withdrawer library library allows to exit a pool on Osmosis, using the GAMM module (Generalized Automated Market Maker), from an input account, an deposit the withdrawed tokens into an output account.
High-level flow
---
title: Osmosis GAMM Liquidity Withdrawal
---
graph LR
  IA((Input
      Account))
  OA((Output
		  Account))
  P[Processor]
  S[Osmosis GAMM
      Liquidity
      Withdrawal]
  AP[Osmosis
     Pool]
  P -- 1/Withdraw Liquidity --> S
  S -- 2/Query balances --> IA
  S -- 3/Compute amounts --> S
  S -- 4/Do Withdraw Liquidity --> IA
  IA -- 5/Withdraw Liquidity
				  [LP Tokens] --> AP
  AP -- 5'/Transfer assets --> OA
Functions
| Function | Parameters | Description |
|---|---|---|
| WithdrawLiquidity | - | Withdraw liquidity from the configured Osmosis Pool from the input account and deposit the withdrawed tokens into the configured output account |
Configuration
The library is configured on instantiation via the LibraryConfig type.
#![allow(unused)]
fn main() {
pub struct LibraryConfig {
    // Account from which the funds are LPed
    pub input_addr: LibraryAccountType,
    // Account to which the LP tokens are forwarded
    pub output_addr: LibraryAccountType,
    // Liquidity withdrawer configuration
    pub withdrawer_config: LiquidityWithdrawerConfig,
}

pub struct LiquidityWithdrawerConfig {
    // ID of the pool
    pub pool_id: Uint64,
}
}
Valence Reverse Splitter library
The Reverse Splitter library allows to route funds from one or more input account(s) to a single output account, for one or more token denom(s) according to the configured ratio(s). It is typically used as part of a Valence Program. In that context, a Processor contract will be the main contract interacting with the Forwarder library.
High-level flow
---
title: Reverse Splitter Library
---
graph LR
  IA1((Input
      Account1))
  IA2((Input
       Account2))
  OA((Output
		  Account))
  P[Processor]
  S[Reverse Splitter
    Library]
  C[Contract]
  P -- 1/Split --> S
  S -- 2/Query balances --> IA1
  S -- 2'/Query balances --> IA2
  S -. 3/Query split ratio .-> C
  S -- 4/Do Send funds --> IA1
  S -- 4'/Do Send funds --> IA2
  IA1 -- 5/Send funds --> OA
  IA2 -- 5'/Send funds --> OA
Functions
| Function | Parameters | Description |
|---|---|---|
| Split | - | Split and route funds from the configured input account(s) to the output account, according to the configured token denom(s) and ratio(s). |
Configuration
The library is configured on instantiation via the LibraryConfig type.
#![allow(unused)]
fn main() {
struct LibraryConfig {
    output_addr: LibraryAccountType,   // Account to which the funds are sent.
    splits: Vec<UncheckedSplitConfig>, // Split configuration per denom.
    base_denom: UncheckedDenom         // Base denom, used with ratios.
}

// Split config for specified account
struct UncheckedSplitConfig {
  denom: UncheckedDenom,                // Denom for this split configuration (either native or CW20).
  account: LibraryAccountType,          // Address of the input account for this split config.
  amount: UncheckedSplitAmount,         // Fixed amount of tokens or an amount defined based on a ratio.
  factor: Option<u64>                   // Multiplier relative to other denoms (only used if a ratio is specified).
}

// Ratio configuration, either fixed & dynamically calculated
enum UncheckedRatioConfig {
  FixedAmount(Uint128), // Fixed amount of tokens
  FixedRatio(Decimal),  // Fixed ratio e.g. 0.0262 for NTRN/STARS (or could be another arbitrary ratio)
  DynamicRatio {        // Dynamic ratio calculation (delegated to external contract)
	contract_addr: "<TWAP Oracle wrapper contract address>",
    params: "base64-encoded arbitrary payload to send in addition to the denoms"
  }
}

// Standard query & response for contract computing a dynamic ratio
// for the Splitter & Reverse Splitter libraries.
#[cw_serde]
#[derive(QueryResponses)]
pub enum DynamicRatioQueryMsg {
    #[returns(DynamicRatioResponse)]
    DynamicRatio {
        denoms: Vec<String>,
        params: String,
    }
}

#[cw_serde]
// Response returned by the external contract for a dynamic ratio
struct DynamicRatioResponse {
    pub denom_ratios: HashMap<String, Decimal>,
}
}
Valence Splitter library
The Valence Splitter library allows to split funds from one input account to one or more output account(s), for one or more token denom(s) according to the configured ratio(s). It is typically used as part of a Valence Program. In that context, a Processor contract will be the main contract interacting with the Forwarder library.
High-level flow
---
title: Splitter Library
---
graph LR
  IA((Input
      Account))
  OA1((Output
		  Account 1))
	OA2((Output
		  Account 2))
  P[Processor]
  S[Splitter
    Library]
  C[Contract]
  P -- 1/Split --> S
  S -- 2/Query balances --> IA
  S -. 3/Query split ratio .-> C
  S -- 4/Do Send funds --> IA
  IA -- 5/Send funds --> OA1
  IA -- 5'/Send funds --> OA2
Functions
| Function | Parameters | Description |
|---|---|---|
| Split | - | Split funds from the configured input account to the output account(s), according to the configured token denom(s) and ratio(s). |
Configuration
The library is configured on instantiation via the LibraryConfig type.
#![allow(unused)]
fn main() {
struct LibraryConfig {
    input_addr: LibraryAccountType,    // Address of the input account
    splits: Vec<UncheckedSplitConfig>, // Split configuration per denom
}

// Split config for specified account
struct UncheckedSplitConfig {
  denom: UncheckedDenom,          // Denom for this split configuration (either native or CW20)
  account: LibraryAccountType,    // Address of the output account for this split config
  amount: UncheckedSplitAmount,   // Fixed amount of tokens or an amount defined based on a ratio
}

// Split amount configuration, either a fixed amount of tokens or an amount defined based on a ratio
enum UncheckedSplitAmount {
  FixedAmount(Uint128),       // Fixed amount of tokens
  FixedRatio(Decimal),        // Fixed ratio e.g. 0.0262 for NTRN/STARS (or could be another arbitrary ratio)
  DynamicRatio {              // Dynamic ratio calculation (delegated to external contract)
    contract_addr: "<TWAP Oracle wrapper contract address>",
    params: "base64-encoded arbitrary payload to send in addition to the denoms"
  }
}

// Standard query & response for contract computing a dynamic ratio
// for the Splitter & Reverse Splitter libraries.
#[cw_serde]
#[derive(QueryResponses)]
pub enum DynamicRatioQueryMsg {
    #[returns(DynamicRatioResponse)]
    DynamicRatio {
        denoms: Vec<String>,
        params: String,
    }
}

#[cw_serde]
// Response returned by the external contract for a dynamic ratio
struct DynamicRatioResponse {
    pub denom_ratios: HashMap<String, Decimal>,
}
}
Supervaults Liquidity Provider library
The Valence Supervaults LPer library library allows to provide liquidity into Neutron Supervaults from an input account and deposit the LP tokens into an output account.
High-level flow
---
title: Supervaults Liquidity Provider
---
graph LR
  IA((Input Account))
  OA((Output Account))
  P[Processor]
  S[Supervaults<br>Liquidity<br>Provider]
  SV[Supervault]
  P -- 1/Provide Liquidity --> S
  S -- 2/Query balances --> IA
  S -- 3/Try Provide Liquidity --> IA
  IA -- 4/Provide Liquidity [Tokens] --> SV
  IA -- 4'/Transfer LP Tokens --> OA
Functions
| Function | Parameters | Description |
|---|---|---|
| ProvideLiquidity | expected_vault_ratio_range: Option<PrecDecimalRange> | Provide liquidity to the pre-configured Supervault from the input account, using available balances of both assets, and deposit the LP tokens into the output account. Abort if the vault price ratio is not within the expected_vault_ratio_range (if specified). Note: PrecDec is a 27 decimal precision value. |
Configuration
The library is configured on instantiation via the LibraryConfig type.
#![allow(unused)]
fn main() {
pub struct LibraryConfig {
    // Account from which the funds are LPed
    pub input_addr: LibraryAccountType,
    // Account to which the LP tokens are forwarded
    pub output_addr: LibraryAccountType,
    // Supervault address
    pub vault_addr: String,
    // LP configuration
    pub lp_config: LiquidityProviderConfig,
}

pub struct LiquidityProviderConfig {
    // Denoms of both native assets we are going to provide liquidity for
    pub asset_data: AssetData,
    // LP token denom for the supervault
    pub lp_denom: String,
}

pub struct PrecDecimalRange {
    pub min: PrecDec,
    pub max: PrecDec,
}

pub struct AssetData {
    pub asset1: String,
    pub asset2: String,
}
}
Supervaults Liquidity Withdrawer library
The Valence Supervaults Withdrawer library library allows to liquidate Supervault LP shares via Neutron Supervaults from an input account and deposit the resulting underlying assets into an output account.
High-level flow
---
title: Supervaults Liquidity Withdrawer
---
graph LR
  IA((Input Account))
  OA((Output Account))
  P[Processor]
  S[Supervaults<br>Liquidity<br>Withdrawer]
  SV[Supervault]
  P -- 1/Withdraw Liquidity --> S
  S -- 2/Query LP balance --> IA
  S -- 3/Try Withdraw Liquidity --> IA
  IA -- 4/Withdraw Liquidity<br>[LP shares] --> SV
  IA -- 4'/Transfer underlying tokens --> OA
Functions
| Function | Parameters | Description |
|---|---|---|
| WithdrawLiquidity | expected_vault_ratio_range: Option<PrecDecimalRange> | Withdraw liquidity from the pre-configured Supervault from the input account, using available LP shares, and deposit the resulting underlying assets into the output account. Abort if the vault price ratio is not within the expected_vault_ratio_range (if specified). Note: PrecDec is a 27 decimal precision value. |
Configuration
The library is configured on instantiation via the LibraryConfig type.
#![allow(unused)]
fn main() {
pub struct LibraryConfig {
    // Account from which the LP shares are liquidated
    pub input_addr: LibraryAccountType,
    // Account to which the resulting underlying tokens are forwarded
    pub output_addr: LibraryAccountType,
    // Supervault address
    pub vault_addr: String,
    // Liquidity withdrawal configuration
    pub lw_config: LiquidityWithdrawerConfig,
}

pub struct LiquidityWithdrawerConfig {
    // Denoms of both underlying native assets we are
    // expecting to receive upon withdrawal
    pub asset_data: AssetData,
    // LP token denom for the supervault
    pub lp_denom: String,
}

pub struct PrecDecimalRange {
    pub min: PrecDec,
    pub max: PrecDec,
}

pub struct AssetData {
    pub asset1: String,
    pub asset2: String,
}
}
Neutron Interchain Querier
Neutron Interchain Querier library enables Valence Programs to configure and carry out
KV-based queries enabled by the interchainqueries module on Neutron.
Prerequisites
Active Neutron ICQ relayer
This library requires active Neutron ICQ Relayers operating on the specified target route.
Valence Middleware broker
Each KV-based query requires a correctly encoded key in order to be registered. This library obtains the query keys from Valence Middleware brokers, which expose particular type registries.
For a given KV-query to be performed, the underlying type registry must implement IcqIntegration trait
which in turn enables the following functionality:
get_kv_key, enabling the ability to get the correctly encodedKVKeyfor query registrationdecode_and_reconstruct, allowing to reconstruct the interchain query result
Read more about the given type ICQ integration in the type registry documentation page.
Valence Storage account
Results received and meant for further processing by other libraries will be stored in Storage Accounts. Each instance of Neutron IC querier will be associated with its own storage account.
Query registration fee
Neutron interchainqueries module is configured to escrow a fee in order to register a query.
The fee parameter is dynamic and can be queried via the interchainqueries module.
Currently the fee is set to 100000untrn, but it may change in the future.
Users must ensure that the fee is provided along with the query registration function call.
Query deregistration
Interchain Query escrow payments can be reclaimed by submitting the RemoveInterchainQuery message.
Only the query owner (this contract) is able to submit this message.
Interchain Queries should be removed after they are no longer needed, however, that moment may be different for each Valence Program depending on its configuration.
Background on the interchainqueries module
Query Registration Message types
Interchain queries can be registered and unregistered by submitting the following neutron-sdk messages:
#![allow(unused)]
fn main() {
pub enum NeutronMsg {
	// other variants
	RegisterInterchainQuery {
		/// **query_type** is a query type identifier ('tx' or 'kv' for now).
		query_type: String,

		/// **keys** is the KV-storage keys for which we want to get values from remote chain.
		keys: Vec<KVKey>,

		/// **transactions_filter** is the filter for transaction search ICQ.
		transactions_filter: String,

		/// **connection_id** is an IBC connection identifier between Neutron and remote chain.
		connection_id: String,

		/// **update_period** is used to say how often the query must be updated.
		update_period: u64,
	},
	RemoveInterchainQuery {
    query_id: u64,
	},
}
}
where the KVKey is defined as follows:
#![allow(unused)]
fn main() {
pub struct KVKey {
    /// **path** is a path to the storage (storage prefix) where you want to read value by key (usually name of cosmos-packages module: 'staking', 'bank', etc.)
    pub path: String,

    /// **key** is a key you want to read from the storage
    pub key: Binary,
}
}
RegisterInterchainQuery variant can be applied for both TX- and KV-based queries.
Given that this library is meant for dealing with KV-based queries exclusively,
transactions_filter field is irrelevant.
This library constructs the query registration message as follows:
#![allow(unused)]
fn main() {
    // helper
    let kv_registration_msg = NeutronMsg::register_interchain_query(
        QueryPayload::KV(vec![query_kv_key]),
        "connection-3".to_string(),
        5,
    );
    // which translates to:
    let kv_registration_msg = NeutronMsg::RegisterInterchainQuery {
        query_type: QueryType::KV.into(),
        keys: vec![query_kv_key],
        transactions_filter: String::new(),
        connection_id: "connection-3".to_string(),
        update_period: 5,
    }
}
query_kv_key here is obtained by querying the associated Middleware Broker for a given type and query parameters.
Query Result Message types
After a query is registered and fetched back to Neutron, its results can be queried with the following Neutron query:
#![allow(unused)]
fn main() {
pub enum NeutronQuery {
    /// Query a result of registered interchain query on remote chain
    InterchainQueryResult {
        /// **query_id** is an ID registered interchain query
        query_id: u64,
    },
	// other types
}
}
which will return the interchain query result:
#![allow(unused)]
fn main() {
pub struct InterchainQueryResult {
    /// **kv_results** is a raw key-value pairs of query result
    pub kv_results: Vec<StorageValue>,

    /// **height** is a height of remote chain
    pub height: u64,

    #[serde(default)]
    /// **revision** is a revision of remote chain
    pub revision: u64,
}
}
where StorageValue is defined as:
#![allow(unused)]
fn main() {
/// Describes value in the Cosmos-SDK KV-storage on remote chain
pub struct StorageValue {
    /// **storage_prefix** is a path to the storage (storage prefix) where you want to read
    /// value by key (usually name of cosmos-packages module: 'staking', 'bank', etc.)
    pub storage_prefix: String,

    /// **key** is a key under which the **value** is stored in the storage on remote chain
    pub key: Binary,

    /// **value** is a value which is stored under the **key** in the storage on remote chain
    pub value: Binary,
}
}
Interchain Query lifecycle
After RegisterInterchainQuery message is submitted, interchainqueries module will deduct
the query registration fee from the caller.
At that point the query is assigned its unique query_id identifier, which is not known in advance.
This identifier is returned to the caller in the reply.
Once the query is registered, the interchain query relayers perform the following steps:
- fetch the specified value from the target domain
- post the query result to
interchainqueriesmodule - trigger
SudoMsg::KVQueryResultendpoint on the contract that registered the query
SudoMsg::KVQueryResult does not carry back the actual query result. Instead, it posts back
a query_id of the query which had been performed, announcing that its result is available.
Obtained query_id can then be used to query the interchainqueries module for the raw
interchainquery result. One thing to note here is that these raw results are not meant to be
(natively) interpreted by foreign VMs; instead, they will adhere to the encoding schemes of
the origin domain.
Library high-level flow
At its core, this library should enable three key functions:
- initiating the interchain queries
- receiving & postprocessing the query results
- reclaiming the escrowed fees by unregistering the queries
Considering that Valence Programs operate across different VMs and adhere to their rules, these functions can be divided into two categories:
- external operations (Valence <> host VM)
- internal operations (Valence <> Valence)
From this perspective, query initiation, receival, and termination can be seen as external
operations that adhere to the functionality provided by the interchainqueries module on Neutron.
On the other hand, query result postprocessing involves internal Valence Program operations. KV-Query query results fetched from remote domains are not readily useful within the Valence scope because of their encoding formats. Result postprocessing is therefore about adapting remote domain data types into canonical Valence Protocol data types that can be reasoned about.
For most Cosmos SDK based chains, KV-storage values are encoded in protobuf. Interpreting protobuf from within CosmWasm context is not straightforward and requires explicit conversion steps. Other domains may store their state in other encoding formats. This library does not make any assumptions about the different encoding schemes that remote domains may be subject to - instead, that responsibility is handed over to Valence Middleware.
Final step in result postprocessing is about persisting the canonicalized query results. Resulting Valence Types are written into a Storage Account, making it available for further processing, interpretation, or other types of processing.
Library Lifecycle
With the baseline functionality in mind, there are a few design decisions that shape the overall lifecycle of this library.
Instantiation flow
Neutron Interchain Querier is instantiated with the full configuration needed to initiate and process the queries that it will be capable of executing. After instantiation, the library has the full context needed to carry out its functions.
Library is configured with the following LibraryConfig. Further sections
will focus on each of its fields.
#![allow(unused)]
fn main() {
pub struct LibraryConfig {
    pub storage_account: LibraryAccountType,
    pub querier_config: QuerierConfig,
    pub query_definitions: BTreeMap<String, QueryDefinition>,
}
}
Storage Account association
Like other libraries, Neutron IC querier has a notion of its associated account.
Associated Storage account will authorize libraries like Neutron IC Querier to persist canonical Valence types under its storage.
Unlike most other libraries, IC querier does not differentiate between input and output accounts. There is just an account, and it is the only account that this library will be authorized to post its results into.
Storage account association follows the same logic of approving/revoking
libraries. Its configuration is done via LibraryAccountType, following
the same account pattern as other libraries.
Global configurations that apply to all queries
While this library is capable of carrying out an arbitrary number of distinct
interchain queries, their scope is bound by QuerierConfig
QuerierConfig describes ICQ parameters that will apply to every query to be
managed by this library. It can be seen as the global configuration parameters,
of which there are two:
#![allow(unused)]
fn main() {
pub struct QuerierConfig {
    pub broker_addr: String,
    pub connection_id: String,
}
}
connection_id here describes the IBC connection between Neutron and the
target domain. This effectively limits each instance of Neutron IC Querier to
be responsible for querying one particular domain.
broker_addr describes the address of the associated middleware broker.
Just as all queries are going to be bound by a particular connection id,
they will also be postprocessed using a single broker instance.
Query configurations
Queries to be carried out by this library are configured with the following type:
#![allow(unused)]
fn main() {
pub struct QueryDefinition {
    pub registry_version: Option<String>,
    pub type_url: String,
    pub update_period: Uint64,
    pub params: BTreeMap<String, Binary>,
    pub query_id: Option<u64>,
}
}
registry_version: Option<String>specifies which version of the type registry the middleware broker should use. When set toNone, the broker uses its latest available type registry version. Set this field when a specific type registry version is needed instead of the latest one.type_url: Stringidentifies the query type within the type registry (via broker). An important thing to note here is that this url may differ from the one used to identify the target type on its origin domain. This decoupling is done intentionally in order to allow for flexible type mapping between domains when necessary.update_period: Uint64specifies how often the given query should be performed/updatedparams: BTreeMap<String, Binary>provides the type registry with the base64 encoded query parameters that are going to be used forKVKeyconstructionquery_id: Option<u64>is an internal parameter that gets modified during runtime. It must be set toNonewhen configuring the library.
Every query definition must be associated with a unique string-based identifier (key).
Query definitions are passed to the library config via BTreeMap<String, QueryDefinition>,
which ensures that there is only one QueryDefinition for every key. While these
keys can be anything, they should clearly identify a particular query. Every function
call exposed by this library expects these keys (and only these keys) as their arguments.
Execution flow
With Neutron IC Querier instantiated, the library is ready to start carrying out the queries.
Query registration
Configured queries can be registered with the following function:
#![allow(unused)]
fn main() {
RegisterKvQuery { target_query: String }
}
Query registration flow consists of the following steps:
- querying the
interchainqueriesmodule for the currently set query registration fee and asserting that the function caller covered all expected fees - querying the middleware broker to obtain the
KVKeyvalue to be used in ICQ registration - constructing and firing the ICQ registration message
Each configured query can be started with this function call.
Query result processing
Interchain Query results are delivered to the interchainqueries module
in an asynchronous manner. To ensure that query results are available to
Valence Programs as fresh as possible, this library leverages sudo callbacks
that are triggered after ICQ relayers post back the results for a query
registered by this library.
This entry point is configured as follows:
#![allow(unused)]
fn main() {
pub fn sudo(deps: ExecuteDeps, _env: Env, msg: SudoMsg) -> StdResult<Response<NeutronMsg>> {
    match msg {
        // this is triggered by the ICQ relayer delivering the query result
        SudoMsg::KVQueryResult { query_id } => handle_sudo_kv_query_result(deps, query_id),
        _ => Ok(Response::default()),
    }
}
}
This function call triggers a set of actions that will process the raw query result into a canonical Valence Type before storing it into the associated Storage account:
- query the
interchainqueriesmodule to obtain the raw query result associated with the givenquery_id - query the broker to deserialize the proto-encoded result into a Rust type
- query the broker to canonicalize the native rust type into
ValenceType - post the resulting canonical type to the associated storage account
After these actions, the associated storage account will hold the adapted query result in its storage on the same block as the result was brought into Neutron.
Query deregistration
Actively registered queries can be removed from the active query set with the following function:
#![allow(unused)]
fn main() {
DeregisterKvQuery { target_query: String }
}
This function will perform two actions.
First it will query the interchainqueries module on Neutron for the target_query.
This is done in order to find the deposit fee that was escrowed upon query
registration.
Next, the library will submit the query removal request to the interchainqueries
module. If this request is successful, the deposit fee tokens will be transferred
to the sender that initiated this function.
Library in Valence Programs
Neutron IC Querier does not behave as a standard library in that it does result in any fungible outcome. Instead, it produces a data object in the form of Valence Type.
While that result could be posted directly to the state of this library, instead, it is posted to an associated output account meant for storing data. Just as some other libraries have a notion of input accounts that grant them the permission of executing some logic, Neutron IC Querier has a notion of an associated account which grants the querier a permission to writing some data into its storage slots.
For example, consider a situation where this library had queried the balance of
some remote account, parsed the response into a Valence Balance type, and wrote
that resulting object into its associated storage account. That same associated
account may be the input account of some other library, which will attempt to
perform its function based on the content written to its input account. This may
involve something along the lines of: if balance > 0, do x; otherwise, do y;.
With that, the IC Querier flow in a Valence Program may look like this:
---
title: Neutron IC Querier in Valence Programs
---
graph LR
    A[neutron IC querier] -->|post Valence type| B(storage account)
    C[other library] -->|interpret Valence type| B
Valence Middleware is being actively developed. More elaborate examples of this library will be added here in the future.
Valence Drop Liquid Staker library
The Valence Drop Liquid Staker library allows to liquid stake an asset from an input account in the Drop protocol and deposit the liquid staking derivate into the output account. It is typically used as part of a Valence Program. In that context, a Processor contract will be the main contract interacting with the Forwarder library.
High-level flow
---
title: Drop Liquid Staker Library
---
graph LR
  IA((Input
      Account))
  CC((Drop Core
      Contract))
  OA((Output
      Account))
  P[Processor]
  S[Drop Liquid Staker
      Library]
  P -- 1/Liquid Stake --> S
  S -- 2/Query balance --> IA
  S -- 3/Do Liquid
  Stake funds --> IA
  IA -- 4/Liquid Stake
   funds --> CC
  CC -- 5/Send LS
  derivative --> OA
Functions
| Function | Parameters | Description |
|---|---|---|
| LiquidStake | ref (Optional): referral address | Liquid stakes the balance of the input account into the drop core contract and deposits LS derivative into the output account. |
Configuration
The library is configured on instantiation via the LibraryConfig type.
#![allow(unused)]
fn main() {
pub struct LibraryConfig {
    pub input_addr: LibraryAccountType,
    pub output_addr: LibraryAccountType,
    // Address of the liquid staker contract (drop core contract)
    pub liquid_staker_addr: String,
    // Denom of the asset we are going to liquid stake
    pub denom: String,
}
}
Valence Drop Liquid Unstaker library
The Valence Drop Liquid Unstaker library allows liquid staked tokens (e.g., dNTRN or dATOM) to be redeemed for underlying assets (e.g., NTRN or ATOM) through the Drop protocol. The liquid staked asset must be available in the input account. When the library's function to redeem the staked assets (Unstake) is invoked, the library issues a withdraw request to the Drop protocol generating a tokenized voucher that is held by the input account. This tokenized voucher can be used to claim the underlying assets (represented as an NFT). Note that the underlying assets are not withdrawn immediately, as the Drop protocol unstakes assets asynchronously. At a later time, when the underlying assets are available for withdrawal, the library's claim function can be invoked with the voucher as an argument. This function will withdraw the underlying assets and deposit them into the output account.
High-level flow
---
title: Drop Liquid Unstaker Library - Unstake Flow
---
graph LR
    IA((Input Account))
    CC((Drop Core Contract))
    P2[Processor]
    S2[Drop Liquid
    Unstaker Library]
    P2 -- "1/Unstake" --> S2
    S2 -- "2/Query balance" --> IA
    S2 -- "3/Do Unstake funds" --> IA
    IA -- "4/Unstake funds" --> CC
    CC -- "5/Send NFT voucher" --> IA
---
title: Drop Liquid Unstaker Library - Withdraw Flow
---
graph LR
    IA((Input Account))
    WW((Withdrawal Manager
    Contract))
    P1[Processor]
    S1[Drop Liquid
    Unstaker Library]
    OA((Output Account))
    P1 -- "1/Withdraw (token_id)" --> S1
    S1 -- "2/Check ownership" --> IA
    S1 -- "3/Do Withdraw" --> IA
    IA -- "4/Send NFT voucher with
    ReceiveMsg" --> WW
    WW -- "5/Send unstaked funds" --> OA
Functions
| Function | Parameters | Description |
|---|---|---|
| Unstake | Unstakes the balance of the input account from the drop core contract and deposits the voucher into the input account. | |
| Withdraw | token_id | Withdraws the voucher with token_id identifier from the input account and deposits the unstaked assets into the output account. |
Configuration
The library is configured on instantiation via the LibraryConfig type.
#![allow(unused)]
fn main() {
pub struct LibraryConfig {
    pub input_addr: LibraryAccountType,
    pub output_addr: LibraryAccountType,
    // Address of the liquid unstaker contract (drop core contract)
    pub liquid_unstaker_addr: String,
    // Address of the withdrawal_manager_addr (drop withdrawal manager)
    pub withdrawal_manager_addr: String,
    // Address of the voucher NFT contract that we get after unstaking and we use for the withdraw
    pub voucher_addr: String,
    // Denom of the asset we are going to unstake
    pub denom: String,
}
}
Valence ICA CCTP Transfer Library
The Valence ICA CCTP Transfer Library library allows remotely executing a CCTP transfer using a Valence interchain account on Noble Chain. It does that by remotely sending a MsgDepositForBurn to the ICS-27 ICA created by the Valence interchain account on Noble. It is typically used as part of a Valence Program. In that context, a Processor contract will be the main contract interacting with the Valence ICA CCTP Transfer Library.
High-level flow
---
title: ICA CCTP Transfer Library
---
graph LR
    subgraph Neutron
      P[Processor]
      L[ICA CCTP
      Transfer Library]
      I[Input Account]
      P -- 1)Transfer --> L
      L -- 2)Query ICA address --> I
      L -- 3)Do ICA MsgDepositForBurn --> I
    end

    subgraph Noble
      ICA[Interchain Account]
      I -- 4)Execute MsgDepositForBurn--> ICA
    end
Functions
| Function | Parameters | Description |
|---|---|---|
| Transfer | - | Transfer funds with CCTP on Noble from the ICA created by the input_acount to a mint_recipient on a destination_domain_id |
Configuration
The library is configured on instantiation via the LibraryConfig type.
#![allow(unused)]
fn main() {
pub struct LibraryConfig {
    // Address of the input account (Valence interchain account)
    pub input_addr: LibraryAccountType,
    // Amount that is going to be transferred
    pub amount: Uint128,
    // Denom that is going to be transferred
    pub denom: String,
    // Destination domain id
    pub destination_domain_id: u32,
    // This address is the bytes representation of the address (with 32 length and padded zeroes)
    // For more information, check https://docs.noble.xyz/cctp/mint#example
    pub mint_recipient: Binary,
}
}
Valence ICA IBC Transfer Library
The Valence ICA IBC Transfer Library library allows remotely executing an IBC transfer using a Valence interchain account on a remote IBC connected domain. It does that by remotely sending a MsgTransfer to the ICA created by the Valence interchain account on the remote domain. It is typically used as part of a Valence Program. In that context, a Processor contract will be the main contract interacting with the Valence ICA IBC Transfer Library.
High-level flow
---
title: ICA IBC Transfer Library
---
graph LR
    subgraph Neutron
      P[Processor]
      L[ICA IBC
      Transfer Library]
      I[Input Account]
      P -- 1)Transfer --> L
      L -- 2)Query ICA address --> I
      L -- 3)Do ICA MsgTransfer --> I
    end

    subgraph Remote domain
      ICA[Interchain Account]
      I -- 4)Execute MsgTransfer --> ICA
    end
Functions
| Function | Parameters | Description |
|---|---|---|
| Transfer | - | Transfer funds using IBC from the ICA created by the input_acount to a receiver on a remote domain using the IBC channel_id |
| EurekaTransfer | eureka_fee | Transfer funds over IBC from an input account on a source chain to an output account on a destination EVM chain using IBC Eureka. The eureka_fee parameter will contain the amount to be paid to a relayer address on the intermediate chain along with the timeout of this fee. All this information can be obtained from a Skip Go query explained in the IBC Eureka section below. Important: the fee timeout is passed in nanoseconds |
Configuration
The library is configured on instantiation via the LibraryConfig type.
#![allow(unused)]
fn main() {
pub struct LibraryConfig {
    // Address of the input account (Valence interchain account)
    pub input_addr: LibraryAccountType,
    // Amount that is going to be transferred
    pub amount: Uint128,
    // Denom that is going to be transferred
    pub denom: String,
    // Receiver on the other chain
    pub receiver: String,
    // Memo to be passed in the IBC transfer message.
    pub memo: String,
    // Remote chain info
    pub remote_chain_info: RemoteChainInfo,
    // Denom map for the Packet-Forwarding Middleware, to perform a multi-hop transfer.
    pub denom_to_pfm_map: BTreeMap<String, PacketForwardMiddlewareConfig>,
    // Configuration used for IBC Eureka transfers
    pub eureka_config: Option<EurekaConfig>,
}

pub struct RemoteChainInfo {
    // Channel ID to be used
    pub channel_id: String,
    // Timeout for the IBC transfer in seconds. If not specified, a default 600 seconds will be used will be used
    pub ibc_transfer_timeout: Option<u64>,
}

// Configuration for a multi-hop transfer using the Packet Forwarding Middleware
struct PacketForwardMiddlewareConfig {
  // Channel ID from the source chain to the intermediate chain
  local_to_hop_chain_channel_id: String,
  // Channel ID from the intermediate to the destination chain
  hop_to_destination_chain_channel_id: String,
  // Temporary receiver address on the intermediate chain. Typically this is set to an invalid address so the entire transaction will revert if the forwarding fails. If not
  // provided it's set to "pfm"
  hop_chain_receiver_address: Option<String>,
}

// Configuration for IBC Eureka transfers
pub struct EurekaConfig {
    /// The address of the contract on intermediate chain that will receive the callback.
    pub callback_contract: String,
    /// The address of the contract on intermediate chain that will trigger the actions, in this case the Eureka transfer.
    pub action_contract: String,
    /// Recover address on intermediate chain in case the transfer fails
    pub recover_address: String,
    /// Source channel on the intermediate chain (e.g. "08-wasm-1369")
    pub source_channel: String,
    /// Optional memo for the Eureka transfer triggered by the contract. Not used right now but could eventually be used.
    pub memo: Option<String>,
    /// Timeout in seconds to be used for the Eureka transfer. For reference, Skip Go uses 12 hours (43200). If not passed we will use that default value
    pub timeout: Option<u64>,
}
}
Packet-Forward Middleware
The library supports multi-hop IBC transfers using the Packet Forward Middleware (PFM). This allows tokens to be transferred through an intermediate chain to reach their final destination. More information about the PFM functionality can be found in the official documentation.
This works in the same way as the Generic IBC Transfer Library. The only difference is that the input account is a Valence interchain account and the receiver is a remote address on the remote domain. For more details on how PFM works, check the Generic IBC Transfer Library PFM documentation.
IBC Eureka
This library supports IBC Eureka transfers using an intermediate chain. This allows tokens to be transferred from the origin chain to EVM chains connected with IBC Eureka using standard IBC transfers together with Skip Go capabilities. For more information on how IBC Eureka works with Skip Go, please refer to this Eureka overview.
This works in the same way as the Generic IBC Transfer Library. The only difference is that the input account is a Valence interchain account and the receiver is a remote address on the remote EVM chain. For more details on how IBC Eureka works, check the Generic IBC Transfer Library IBC Eureka documentation.
Valence Mars Lending library
The Valence Mars Lending library facilitates lending operations on the Mars Protocol from an input account and manages withdrawal of lent assets to an output account. The library creates and manages a Mars credit account that is owned by the input account, enabling simple lending and withdrawal operations. This library enables Valence Programs to earn yield on deposited assets through Mars Protocol's lending markets while maintaining full control over the lending positions through Mars credit accounts.
High-level Flow
---
title: Mars Lending Library
---
graph LR
  IA((Input
      Account))
  OA((Output
      Account))
  P[Processor]
  S[Mars Lending
      Library]
  MC[Mars Credit
     Manager]
  CA[Mars Credit
     Account]
  P -- 1/Lend or Withdraw --> S
  S -- 2/Query balances --> IA
  S -- 3/Execute Create Credit Account
  (if needed) --> IA
  IA -- 4/Create Credit Account --> MC
  MC -.-> |4'/Create| CA
  S -- 5/Execute Lending --> IA
  IA -- 6/Deposit & Lend --> CA
  S -- 7/Execute Withdrawal --> IA
  IA -- 8/Reclaim & Withdraw --> CA
  IA -- 9/Transfer Tokens --> OA
Functions
| Function | Parameters | Description |
|---|---|---|
| Lend | - | Creates a Mars credit account (if one doesn't exist) and lends the entire balance of the specified denom from the input account to the Mars Protocol through the credit account. |
| Withdraw | amount: Option<Uint128> | Withdraws lent assets from the Mars credit account to the output account. If no amount is specified, withdraws the entire position. |
| Borrow | coin: Coin | Borrows the specified amount of the given denom from Mars Protocol through the credit account. The borrowed tokens are sent to the output account specified in the library configuration. |
| Repay | coin: Coin | Repays borrowed assets to Mars Protocol through the input account. The Coin parameter contains denom and amount fields. |
Configuration
The library is configured on instantiation via the LibraryConfig type.
#![allow(unused)]
fn main() {
pub struct LibraryConfig {
    // Address of the input account that will own the credit account
    pub input_addr: LibraryAccountType,
    /// Address of the output account that will receive withdrawn funds
    pub output_addr: LibraryAccountType,
    // Address of the Mars credit manager contract
    pub credit_manager_addr: String,
    // Denom of the asset we are going to lend
    pub denom: String,
}
}
Implementation Details
Credit Account Management
The library automatically handles Mars credit account lifecycle:
- Account Creation: When lending is first initiated, the library checks if a credit account exists for the input address. If not, it creates one through the Mars Credit Manager.
- Account Ownership: The credit account is owned by the input account, ensuring proper access control and security.
- Single Account: Each input account maintains exactly one credit account through this library.
Lending Process
- Balance Check: Queries the input account balance for the specified denom
- Credit Account Resolution: Either uses existing credit account or creates a new one
- Deposit & Lend: Deposits the tokens into the credit account and immediately lends them to Mars Protocol
- Reply Handling: Uses CosmWasm reply mechanism to handle the two-step process of account creation followed by lending
Withdrawal Process
- Credit Account Query: Retrieves the existing credit account for the input address
- Amount Calculation: Uses exact amount if specified, otherwise withdraws the entire balance
- Reclaim & Withdraw: Executes two Mars actions:
Reclaim: Withdraws the lent position back to the credit accountWithdrawToWallet: Transfers the tokens from credit account to the output account
Borrowing Process
- Credit Account Check: Verifies the existence of a credit account for the input address
- Borrow Execution: Executes the borrow action through the Mars credit account, which:
- Borrows the specified amount of the given denom
- Transfers the borrowed tokens to the output account specified in the library configuration
Repayment Process
- Token Transfer: Transfers the repayment tokens from the input account back to the credit account
Error Handling
- No Funds: Returns error if attempting to lend with zero balance
- No Credit Account: Returns error if attempting to withdraw without an existing credit account
- Mars Integration: Propagates Mars Protocol errors for lending/withdrawal operations
Mars Protocol Integration
This library integrates with Mars Protocol's credit account system, which provides:
- Isolated Lending: Each credit account operates independently
- Flexible Actions: Support for multiple DeFi actions through a single account
- Risk Management: Mars Protocol's built-in risk management and liquidation mechanisms
- Composability: Credit accounts can be used for complex DeFi strategies beyond simple lending
Thanks
Thank you to Stana and the Hydro team for contributing this library upstream.
Valence maxBTC Issuer Library
The Valence maxBTC Issuer Library library allows depositing a BTC derivative asset from an input account in the maxBTC issuer contract and deposit the resulting maxBTC into the output account. It is typically used as part of a Valence Program. In that context, a Processor contract will be the main contract interacting with this library.
High-level flow
---
title: maxBTC Issuer Library
---
graph LR
  IA((Input
      Account))
  MB((maxBTC
      Contract))
  OA((Output
      Account))
  P[Processor]
  MIL[maxBTC Issuer
      Library]
  P -- 1/Deposit --> MIL
  MIL -- 2/Query balance --> IA
  MIL -- 3/Do Deposit
        funds --> IA
  IA -- 4/Deposit derivative --> MB
  MB -- 5/Send maxBTC --> OA
Functions
| Function | Parameters | Description |
|---|---|---|
| Issue | Deposits the BTC derivative balance of the input account into the maxBTC contract and deposits the resulting maxBTC into the output account. |
Configuration
The library is configured on instantiation via the LibraryConfig type.
#![allow(unused)]
fn main() {
pub struct LibraryConfig {
    pub input_addr: LibraryAccountType,
    pub output_addr: LibraryAccountType,
    // Address of the maxBTC issuer contract
    pub maxbtc_issuer_addr: String,
    // Denom of the BTC derivative we are going to deposit
    pub btc_denom: String,
}
}
Magma LPer Library
The Valence Magma LPer library allows users to deposit into a Magma Vault Pool from an input account and receive shares into an output account.
High-level flow
---
title: Magma LPer
---
graph LR
  IA((Input
      Account))
  OA((Output
          Account))
  P[Processor]
  S[Magma
      Liquidity
      Provider]
  M[Magma Vault]
  P -- 1/Provide Liquidity --> S
  S -- 2/Query balances --> IA
  S -- 3/Do Provide Liquidity --> IA
  IA -- 4/Provide Liquidity
                  [Tokens] --> M
  M -- 4'/Mint Shares --> OA
Functions
| Function | Parameters | Description |
|---|---|---|
| ProvideLiquidity | amount_0_min: Option<String> amount_1_min: Option<String> | Provide double-sided liquidity to the pre-configured Magma Vault from the input account, and receive the shares into the output account. |
Configuration
The library is configured on instantiation via the LibraryConfig type.
#![allow(unused)]
fn main() {
pub struct LibraryConfig {
    /// Address of the input account
    pub input_addr: LibraryAccountType,
    /// Address of the output account
    pub output_addr: LibraryAccountType,
    /// Configuration for the liquidity provider
    /// This includes the pool address and asset data
    pub lp_config: LiquidityProviderConfig,
}

pub struct LiquidityProviderConfig {
    /// Address of the vault we are going to deposit into
    pub vault_addr: String,
    /// Denoms of both assets we are going to provide liquidity for
    pub asset_data: AssetData,
}
}
Implementation Details
Deposit Process
- Balance Check: Queries the input account balance for the specified pool assets.
- Provide Liquidity: Executes a
Depositmessage, which deposits assets to the vault. Upon depositing, the provider obtains an amount of LP token shares.
Magma Withdrawer library
The Valence Magma Withdrawer library allows users to withdraw liquidity from Magma Vault from an input account and receive the withdrawn tokens into an output account.
High-level flow
---
title: Magma Liquidity Withdrawal
---
graph LR
  IA((Input
      Account))
  OA((Output
          Account))
  P[Processor]
  S[Magma
      Liquidity
      Withdrawal]
  M[Magma Vault]
  P -- 1/Withdraw Liquidity --> S
  S -- 2/Query balance --> IA
  S -- 3/Do Withdraw Liquidity --> IA
  IA -- 4/Withdraw Liquidity
                  [Shares] --> M
  M -- 4'/Transfer assets --> OA
| Function | Parameters | Description |
|---|---|---|
| WithdrawLiquidity | token_min_amount_0: Option<String> token_min_amount_1: Option<String> | Withdraw liquidity from the configured Magma Vault from the input account, and receive tokens to the configured output account. |
Configuration
The library is configured on instantiation via the LibraryConfig type.
#![allow(unused)]
fn main() {
pub struct LibraryConfig {
    // Address of the input account
    pub input_addr: LibraryAccountType,
    // Address of the output account
    pub output_addr: LibraryAccountType,
    // Address of the vault we are going to withdraw liquidity from
    pub vault_addr: String,
}
}
Implementation Details
Withdrawal Process
- Balance Check: Queries the balance of the shares in the input account. To withdraw liquidity, the wallet address must have a positive balance of shares amount.
- Withdraw Liquidity: Executes a
Withdrawmessage, which withdraws the shares of liquidity to the Valence output account.
Error Handling
- No available shares for withdrawal: Returns an error if attempting to withdraw with a zero input value of shares.
Vortex LPer library
The Valence Vortex LPer library allows users to deposit into an Osmosis pool via Vortex contract from an input account. Also, the library allows withdrawing from position via vortex contract and receiving the withdrawn tokens into an output account and output account_2 (principal and counterparty tokens).
High Level Flow
---
title: Vortex lper Library
---
graph LR
  IA((Input
      Account))
  OA((Output
      Accounts))
  P[Processor]
  S[Vortex LPer
      Library]
  P -- 1/Provide or Withdraw liquidity --> S
  S -- 2/Query balances --> IA
  S -- 3/Provide liquidity --> IA
  S -- 4/Withdraw liquidity --> OA
Functions
| Function | Parameters | Description |
|---|---|---|
| ProvideLiquidity | tick_range: TickRangeprincipal_token_min_amount: Uint128counterparty_token_min_amount: Uint128 | tries to deposit the entire principal and counterparty token amounts from the input account to the pool via Vortex. |
| Withdraw | - | withdraws all the liquidity from the position Vortex entered including potential rewards. |
Configuration
The library is configured on instantiation via the LibraryConfig type.
#![allow(unused)]
fn main() {
pub struct LibraryConfig {
    /// Address of the input account
    pub input_addr: LibraryAccountType,
    /// Address of the output account
    pub output_addr: LibraryAccountType,
    /// Address of the second output account
    pub output_addr_2: LibraryAccountType,
    /// Configuration for the liquidity provider
    /// This includes the pool address and asset data
    pub lp_config: LiquidityProviderConfig,
}

pub struct LiquidityProviderConfig {
    /// Code of the vortex contract we are going to instantiate
    pub vortex_code: u64,
    /// Label for the contract instantiation
    pub label: String,
    /// Id of the pool we are going to provide liquidity for
    pub pool_id: u64,
    /// Duration of the round in seconds
    pub round_duration: u64,
    /// Duration of the auction in seconds
    pub auction_duration: u64,
    /// Denoms of both assets we are going to provide liquidity for
    pub asset_data: AssetData,
    /// Whether the principal token is first in the pool
    pub principal_first: bool,
}
}
Implementation Details
Providing Liquidity Process
- Balance Check: Queries the input account balance for the specified pool assets.
- ProvideLiquidity: Initiates the liquidity process by executing a
CreatePositionsubmessage to the Vortex contract.- The initial call instantiates the Vortex contract.
- Once the submessage completes, the reply handler performs the actual position creation in the Osmosis pool by the Vortex contract instance.
Withdrawal Process
- Round End Check: Queries the state of the Vortex contract to check if round ended - which must happen prior to executing a withdrawal.
- Position Check: Checks if the position exists.
- Withdraw: Executes a
EndRoundmessage on Vortex to withdraw the whole position.
EVM Libraries
This section contains a detailed description of all the libraries that can be used in EVM Execution Environments.
Valence Forwarder Library
The Valence Forwarder library allows to continuously forward funds from an input account to an output account, following some time constraints. It is typically used as part of a Valence Program. In that context, a Processor contract will be the main contract interacting with the Forwarder library.
High-level flow
---
title: Forwarder Library
---
graph LR
  IA((Input
      Account))
  OA((Output
		  Account))
  P[Processor]
  S[Forwarder
    Library]
  P -- 1/Forward --> S
  S -- 2/Query balances --> IA
  S -- 3/Do Send funds --> IA
  IA -- 4/Send funds --> OA
Functions
| Function | Parameters | Description |
|---|---|---|
| Forward | - | Forward funds from the configured input account to the output account, according to the forwarding configs & min interval. |
Configuration
The library is configured on deployment using the ForwarderConfig type.
    /**
     * @dev Configuration for a single token forwarding rule
     * @param tokenAddress Address of token to forward (0x0 for native coin)
     * @param maxAmount Maximum amount to forward per execution
     */
    struct ForwardingConfig {
        address tokenAddress;
        uint256 maxAmount;
    }

    /**
     * @dev Interval type for forwarding: time-based or block-based
     */
    enum IntervalType {
        TIME,
        BLOCKS
    }

    /**
     * @dev Main configuration struct
     * @param inputAccount Source account
     * @param outputAccount Destination account
     * @param forwardingConfigs Array of token forwarding rules
     * @param intervalType Whether to use time or block intervals
     * @param minInterval Minimum interval between forwards
     */
    struct ForwarderConfig {
        BaseAccount inputAccount;
        BaseAccount outputAccount;
        ForwardingConfig[] forwardingConfigs;
        IntervalType intervalType;
        uint64 minInterval;
    }

    /**
     * @dev Tracks last execution time/block
     */
    struct LastExecution {
        uint64 blockHeight;
        uint64 timestamp;
    }
Valence CCTP Transfer library
The Valence CCTP Transfer library allows to transfer funds from an input account to a mint recipient using the Cross-Chain Transfer Protocol (CCTP) v1. It is typically used as part of a Valence Program. In that context, a Processor contract will be the main contract interacting with the CCTP Transfer library.
High-level flow
---
title: CCTP Transfer Library
---
graph LR
  IA((Input Account))
  CCTPR((CCTP Relayer))
  MR((Mint Recipient))
  TM((CCTP Token Messenger))
  P[Processor]
  S[CCTP Transfer Library]

  subgraph DEST[ Destination Domain ]
    CCTPR -- 7/Mint tokens --> MR
  end

  subgraph EVM[ EVM Domain ]
    P -- 1/Transfer --> S
    S -- 2/Query balances --> IA
    S -- 3/Do approve and call depositForBurn --> IA
    IA -- 4/ERC-20 approve --> TM
    IA -- 5/Call depositForBurn --> TM
    TM -- 6/Burn tokens and emit event --> TM
  end

  EVM --- DEST
Functions
| Function | Parameters | Description |
|---|---|---|
| Transfer | - | Transfer funds from the configured input account to the mint recipient on the destination domain. |
Configuration
The library is configured on deployment using the CCTPTransferConfig type. A list of the supported CCTP destination domains that can be used in the destinationDomain field can be found here.
    /**
     * @dev Configuration struct for token transfer parameters.
     * @param amount The number of tokens to transfer. If set to 0, the entire balance is transferred.
     * @param mintRecipient The recipient address (in bytes32 format) on the destination chain where tokens will be minted.
     * @param inputAccount The account from which tokens will be debited.
     * @param destinationDomain The domain identifier for the destination chain.
     * @param cctpTokenMessenger The CCTP Token Messenger contract.
     * @param transferToken The ERC20 token address that will be transferred.
     */
    struct CCTPTransferConfig {
        uint256 amount; // If we want to transfer all tokens, we can set this to 0.
        bytes32 mintRecipient;
        Account inputAccount;
        uint32 destinationDomain;
        ITokenMessenger cctpTokenMessenger;
        address transferToken;
    }
Valence Stargate Transfer library
The Valence Stargate Transfer library allows to transfer funds from an input account to a recipient using the Stargate Protocol v2 built on top of LayerZero v2. It is typically used as part of a Valence Program. In that context, a Processor contract will be the main contract interacting with the Stargate Transfer library.
High-level flow
---
title: Stargate Transfer Library
---
graph LR
  IA((Input Account))
  SE((Stargate Executor))
  R((Recipient))
  SP((Stargate Pool))
  SEP((Stargate Endpoint))
  P[Processor]
  S[Stargate Transfer Library]

  subgraph DEST[ Destination Domain ]
    SE -- 8/Mint tokens --> R
  end

  subgraph EVM[ EVM Domain ]
    P -- 1/Transfer --> S
    S -- 2/Query native or ERC20 balance --> IA
    S -- 3/Send native balance or Approve ERC20 and call sendToken --> IA
    IA -- 4/Approve ERC20 (if applies) --> SP
    IA -- 5/Call sendToken and send native token (if applies) --> SP
    SP -- 6/Lock/burn token --> SP
    SP -- 7/Send Fees --> SEP
  end

  EVM --- DEST
Functions
| Function | Parameters | Description |
|---|---|---|
| Transfer | - | Transfer funds from the configured input account to the recipient on the destination domain. |
Configuration
The library is configured on deployment using the StargateTransferConfig type. A list of supported Stargate destination domains that can be used in the destinationDomain field can be found here.
    /**
     * @title StargateTransferConfig
     * @notice Configuration struct for cross-chain token transfers via Stargate Protocol
     * @dev Used to define parameters for LayerZero cross-chain messaging with Stargate
     * @param recipient The recipient address (in bytes32 format) on the destination chain
     * @param inputAccount The account from which tokens will be transferred
     * @param destinationDomain The destination chain endpoint ID. Find all IDs at https://stargateprotocol.gitbook.io/stargate/v2-developer-docs/technical-reference/mainnet-contracts
     * @param stargateAddress Stargate pool address implementing IOFT interface. See https://github.com/stargate-protocol/stargate-v2/blob/main/packages/stg-evm-v2/src/interfaces/IStargate.sol
     * @param transferToken Address of the token to transfer. If transferring native tokens, this will be the zero address (address(0))
     * @param amount Amount of tokens to transfer. If set to 0, all available tokens will be transferred
     * @param minAmountToReceive Minimum amount to receive on destination after fees. If set to 0, fees will be automatically calculated
     * @param refundAddress Address to refund tokens in case of failed transfer. If set to address(0), tokens will be refunded to the input account
     * @param extraOptions Additional options for the LayerZero message. Optional. See https://docs.layerzero.network/v2/developers/evm/protocol-gas-settings/options#option-types
     * @param composeMsg Message to execute logic on the destination chain. Optional. See https://docs.layerzero.network/v2/developers/evm/composer/overview#composing-an-oft--onft
     * @param oftCmd Indicates the transportation mode in Stargate. Empty bytes for "Taxi" mode, bytes(1) for "Bus" mode. See https://stargateprotocol.gitbook.io/stargate/v2-developer-docs/integrate-with-stargate/how-to-swap#sendparam.oftcmd
     */
    struct StargateTransferConfig {
        bytes32 recipient;
        Account inputAccount;
        uint32 destinationDomain;
        IStargate stargateAddress;
        address transferToken;
        uint256 amount;
        uint256 minAmountToReceive;
        address refundAddress;
        bytes extraOptions;
        bytes composeMsg;
        bytes oftCmd;
    }
Standard Bridge Transfer library
The Standard Bridge Transfer library enables transferring funds from an input account to a recipient using a StandardBridge contract. This library works with both the L1StandardBridge and L2StandardBridge implementations, allowing token transfers between Ethereum (Layer 1) and its scaling solutions like Optimism or Base (Layer 2). The library facilitates seamless bridging of assets in both directions - from L1 to L2 and from L2 to L1. It is typically used as part of a Valence Program. In that context, a Processor contract will be the main contract interacting with the Stargate Transfer library.
High-level flow
---
title: Standard Bridge Transfer Library
---
graph LR
  IA((Input Account))
  R((Recipient))
  SBO((Standard Bridge))
  SBD((Standard Bridge))
  P[Processor]
  S[StandardBridgeTransfer
   Library]

  subgraph DEST[ Destination Chain ]
    SBD -- 5/WithdrawTo --> R
  end

  subgraph SRC[ Source Chain ]
    P -- 1/Transfer --> S
    S -- 2/Query native or ERC20 balance --> IA
    IA -- 3/Approve ERC20 (if applies) --> SBO
    IA -- 4/Call bridgeETHTo or bridgeERC20To --> SBO
  end

  SRC --- DEST
Functions
| Function | Parameters | Description |
|---|---|---|
| Transfer | - | Transfer funds from the configured input account to the recipient on the destination chain. |
Configuration
The library is configured on deployment using the StandardBridgeTransferConfig type. More information on the config parameters can be found here.
    /**
     * @dev Configuration struct for StandardBridge transfer parameters.
     * @param amount The number of tokens to transfer. If set to 0, the entire balance is transferred.
     * @param inputAccount The account from which tokens will be transferred from.
     * @param recipient The recipient address on the destination chain.
     * @param standardBridge The StandardBridge contract address (L1 or L2 version).
     * @param token The ERC20 token address to transfer (or address(0) for ETH).
     * @param remoteToken Address of the corresponding token on the destination chain (only used for ERC20 transfers). Must be zero address for ETH transfers.
     * @param minGasLimit Gas to use to complete the transfer on the receiving side. Used for sequencers/relayers.
     * @param extraData Additional data to be forwarded with the transaction.
     */
    struct StandardBridgeTransferConfig {
        uint256 amount;
        BaseAccount inputAccount;
        address recipient;
        IStandardBridge standardBridge;
        address token;
        address remoteToken;
        uint32 minGasLimit;
        bytes extraData;
    }
IBC Eureka Transfer Library
The IBC Eureka Transfer library enables transferring ERC20 tokens from an input account on an EVM chain to a recipient on an IBC Eureka connected chain using the IBC V2 protocol via IBC Eureka's Solidity implementation. This library also takes advantage of Skip Go API that provides an EurekaHandler wrapper and the relaying service for the underlying protocol. It is typically used as part of a Valence Program. In that context, a Processor contract will be the main contract interacting with the IBC Eureka Transfer library.
High-level flow
---
title: IBC Eureka Transfer
---
graph LR
    IA((Input Account))
    R((Recipient))
    EH((Eureka Handler))
    ICS((ICS20Transfer))
    P[Processor]
    I[IBCEurekaTransfer
    Library]

    subgraph DEST[ Destination Chain ]
    R
    end

    subgraph SRC[ Source Chain ]
    P -- 1/Transfer(fees & memo) --> I
    I -- 2/Query ERC20 balance --> IA
    IA -- 3/Approve ERC20 --> EH
    IA -- 4/Call transfer --> EH
    EH -- 5/Forward to ICS20 --> ICS
    end

    ICS -.6/IBC Packet.-> R
    SRC --- DEST
---
title: IBC Eureka Lombard Transfer
---
graph LR
    IA((Input Account))
    R((Recipient))
    EH((Eureka Handler))
    ICS((ICS20Transfer))
    P[Processor]
    I[IBCEurekaTransfer
    Library]
    LV[LBTC Voucher]

    subgraph DEST[ Lombard Ledger ]
    R
    end

    subgraph SRC[ Source Chain ]
    P -- 1/LombardTransfer(fees & memo) --> I
    I -- 2/Query LBTC balance --> IA
    IA -- 3/Approve LBTC --> EH
    IA -- 4/Call lombardTransfer --> EH
    EH -- 5/Transfer LBTC --> LV
    LV -- 6/Mint voucher --> EH
    EH -- 7/Forward voucher to ICS20 --> ICS
    end

    ICS -.6/IBC Packet.-> R
    SRC --- DEST
Functions
| Function | Parameters | Description |
|---|---|---|
| Transfer | fees: Relay fee structurememo: Additional information | Transfer tokens from the configured input account to the recipient on the destination IBC chain. The fees parameter specifies relay fees, fee recipient, and quote expiry. The memo parameter can contain additional information that might execute logic on the destination chain. |
| LombardTransfer | fees: Relay fee structurememo: Additional information | Transfers LBTC from the configured input account to the recipient on the Lombard Ledger IBC chain. Works the same way as Transfer but is specific to LBTC transfers to Lombard chain where a burn of the LBTC token and a minting of a voucher happens before triggering the transfer using Eureka. |
Configuration
The library is configured on deployment using the IBCEurekaTransferConfig type.
    /**
     * @dev Configuration struct for token transfer parameters.
     * @param amount The number of tokens to transfer. If set to 0, the entire balance is transferred.
     * @param minAmountOut The minimum amount of tokens expected to be received on the destination chain. This is only used for Lombard transfers.
     *                     If set to 0, same as amount will be used.
     * @param transferToken The ERC20 token address that will be transferred.
     * @param inputAccount The account from which tokens will be debited.
     * @param recipient The recipient address on the destination IBC chain (in bech32 format).
     * @param sourceClient The source client identifier (e.g. cosmoshub-0).
     * @param timeout The timeout for the IBC transfer in seconds. Skip Go uses 12 hours (43200 seconds) as the default timeout.
     * @param eurekaHandler The EurekaHandler contract which is a wrapper around the ICS20Transfer contract.
     */
    struct IBCEurekaTransferConfig {
        uint256 amount;
        uint256 minAmountOut;
        address transferToken;
        BaseAccount inputAccount;
        string recipient;
        string sourceClient;
        uint64 timeout;
        IEurekaHandler eurekaHandler;
    }
IMPORTANT: Skip relayers are currently ignoring IBC Eureka transfers with a timeout of less than 10 hours (36000 seconds), therefore we suggest using 12 hours as the default timeout or at least a value higher than 10 hours.
Special Considerations
- The EurekaHandler contract on Ethereum that is used to transfer from Ethereum to IBC chains is at
0xfc2d0487a0ae42ae7329a80dc269916a9184cf7c. - The recipient address is not in Bytes32 format but in the format used by the IBC chain (e.g., bech32:
cosmos1...). - To build the
Feesstructure for the transfer, we query the Skip Go API to obtain all the necessary information. Here is an example of a query:
curl -X POST "https://go.skip.build/api/skip/v2/fungible/route" \
  -H "Content-Type: application/json" \
  -d '{
    "source_asset_denom": "0xbf6Bc6782f7EB580312CC09B976e9329f3e027B3",
    "source_asset_chain_id": "1",
    "dest_asset_denom": "uatom",
    "dest_asset_chain_id": "cosmoshub-4",
    "amount_in": "20000000",
    "allow_multi_tx": true,
    "allow_unsafe": true,
    "go_fast": true,
    "smart_relay": true,
    "experimental_features": ["eureka"],
    "smart_swap_options": {
      "split_routes": true,
      "evm_swaps": true
    }
  }'
This is an example query to obtain the fee information for transferring 20 ATOM from Ethereum (chain ID 1) to the Cosmos Hub (chain ID cosmoshub-4). This will return us a response from which we can extract the smart_relay_fee_quote information that contains all the information to build the Fees structure. Important: The quoteExpiry timestamp of the Fees is passed in seconds.
- The memo can be used to execute logic on the destination chain. For example, if we want to execute a hop on the destination chain, we can use the memo to specify the hop parameters. Here is an example of a memo:
{"dest_callback":{"address":"cosmos198plfkpwzpxxrlpvprhfmdkcf3frpa7kvduq9cw8lh02mm327tgqhh3s55"},"wasm":{"contract":"cosmos1zvesudsdfxusz06jztpph4d3h5x6veglqsspxns2v2jqml9nhywshhfp5j","msg":{"action":{"action":{"ibc_transfer":{"ibc_info":{"memo":"","receiver":"elys1....","recover_address":"cosmos1...","source_channel":"channel-1266"}}},"exact_out":false,"timeout_timestamp":1744774447117660400}}}}
For more details on how this memo works, please refer to the IBC callback middleware documentation.
The dest_callback field specifies the address of the contract that will be called on the destination chain. In this case, cosmos198plfkpwzpxxrlpvprhfmdkcf3frpa7kvduq9cw8lh02mm327tgqhh3s55 is a contract deployed on the Cosmos Hub that can handle these callbacks. The contract cosmos1zvesudsdfxusz06jztpph4d3h5x6veglqsspxns2v2jqml9nhywshhfp5j is the contract deployed to trigger these additional actions. These 2 contracts can be reused for all memos.
In this particular case, the memo is used to trigger an additional IBC transfer on the destination chain, in this case from the Cosmos Hub to Elys. The receiver is the address specified in the receiver field and the recover_address is the address that will receive the tokens in case of a failure.
- The function will automatically deduct relay fees from the total amount being transferred.
- IBC transfers require specifying a timeout period, after which the transfer is considered failed if not completed.
Valence AAVE Position Manager library
The Valence AAVE Position Manager library allows management of lending positions using an input account and an output account using the AAVE v3 Protocol. It is typically used as part of a Valence Program. In that context, a Processor contract will be the main contract interacting with the AAVE Position Manager library.
High-level flows
---
title: AAVE Position Manager Supply Flow
---
flowchart LR
    P[Processor]
    A[AAVE Position
    Manager Library]
    IA((Input Account))
    AP((AAVE Pool))

    P -- 1/Supply(amount) --> A
    A -- 2/Query balance --> IA
    A -- 3/Approve ERC20(amount) and call supply --> IA
    IA -- 4/Supply --> AP
    AP -- 5/Mint aTokens --> IA
---
title: AAVE Position Manager Borrow Flow
---
flowchart LR
 P[Processor]
 A[AAVE Position
 Manager Library]
 IA((Input Account))
 AP((AAVE Pool))
 P -- 1/Borrow(amount) --> A
 A -- 2/Call borrow --> IA
 IA -- 4/Borrow --> AP
 AP -- 5/Send borrowed tokens --> IA
---
title: AAVE Position Manager Withdraw Flow
---
flowchart LR
 P[Processor]
 A[AAVE Position
 Manager Library]
 IA((Input Account))
 AP((AAVE Pool))
 OA((Output Account))
 P -- 1/Withdraw(amount) --> A
 A -- 2/Call withdraw --> IA
 IA -- 3/Withdraw --> AP
 AP -- 4/Send withdrawn tokens --> OA
---
title: AAVE Position Manager Repay Flow
---
flowchart LR
    P[Processor]
    A[AAVE Position
    Manager Library]
    IA((Input Account))
    AP((AAVE Pool))

    P -- 1/Repay(amount) --> A
    A -- 2/Query balance --> IA
    A -- 3/Approve ERC20(amount) and call repay --> IA
    IA -- 4/Repay --> AP
    AP -- 5/Burn debt tokens  --> IA
---
title: AAVE Position Manager RepayWithShares Flow
---
flowchart LR
    P[Processor]
    A[AAVE Position
    Manager Library]
    IA((Input Account))
    AP((AAVE Pool))

    P -- 1/RepayWithShares(amount) --> A
    A -- 2/Call repayWithATokens --> IA
    IA -- 3/Repay --> AP
    AP -- 4/Burn aTokens --> IA
    AP -- 5/Burn debt tokens --> IA
Functions
| Function | Parameters | Description |
|---|---|---|
| supply | amount | Supplies tokens from the input account to the AAVE protocol. The input account will receive these corresponding aTokens. If amount is 0 the entire balance will be used. |
| borrow | amount | Borrows tokens from the AAVE protocol using the collateral previously supplied. The input account will receive the borrowed tokens and the debt tokens. |
| withdraw | amount | Withdraws previously supplied tokens from AAVE and sends them to the output account. Passing 0 will withdraw the entire balance. |
| repay | amount | Repays borrowed tokens to the AAVE protocol from the input account. Passing 0 repays the entire balance. |
| repayWithShares | amount | Repays borrowed tokens using aTokens directly, which can be more gas-efficient. Passing 0 will repay as much as possible. |
More details on how the interaction with the AAVE v3 protocol works can be found in the AAVE V3 Pool documentation.
Configuration
The library is configured on deployment using the AavePositionManagerConfig type.
    /**
     * @title AavePositionManagerConfig
     * @notice Configuration struct for Aave lending operations
     * @dev Used to define parameters for interacting with Aave V3 protocol
     * @param poolAddress The address of the Aave V3 Pool contract
     * @param inputAccount The Base Account from which transactions will be initiated
     * @param outputAccount The Base Account that will receive withdrawals. Can be the same as inputAccount.
     * @param supplyAsset Address of the token to supply to Aave
     * @param borrowAsset Address of the token to borrow from Aave
     * @param referralCode Referral code for Aave protocol (if applicable - 0 if the action is executed directly by the user, without any middle-men)
     */
    struct AavePositionManagerConfig {
        IPool poolAddress;
        BaseAccount inputAccount;
        BaseAccount outputAccount;
        address supplyAsset;
        address borrowAsset;
        uint16 referralCode;
    }
Valence PancakeSwap V3 Position Manager library
The Valence PancakeSwap V3 Position Manager library allows management of liquidity positions using an input account and an output account through the PancakeSwap V3 Protocol. It is typically used as part of a Valence Program. In that context, a Processor contract will be the main contract interacting with the PancakeSwap V3 Position Manager library.
High-level flows
---
title: PancakeSwap V3 Position Manager Create Position Flow
---
flowchart LR
    P[Processor]
    PM[PancakeSwap V3
    Position Manager Library]
    IA((Input Account))
    NPM((Nonfungible
    Position Manager))
    MC((MasterChef V3))

    P -- 1/createPosition(tickLower, tickUpper, amount0, amount1) --> PM
    PM -- 2/Query balances --> IA
    PM -- 3/Approve tokens and call mint --> IA
    IA -- 4/Mint position --> NPM
    NPM -- 5/Return tokenId & mint NFT --> IA
    PM -- 6/Transfer NFT to MasterChef --> IA
    IA -- 7/Transfer NFT --> MC
---
title: PancakeSwap V3 Position Manager Withdraw Position Flow
---
flowchart LR
    P[Processor]
    PM[PancakeSwap V3
    Position Manager Library]
    IA((Input Account))
    NPM((Nonfungible
    Position Manager))
    MC((MasterChef V3))
    OA((Output Account))

    P -- 1/withdrawPosition(tokenId) --> PM
    PM -- 2/Call collectTo for fees --> IA
    IA -- 3/Collect fees --> MC
    MC -- 4/Send fees --> OA
    PM -- 5/Call harvest for rewards --> IA
    IA -- 6/Harvest rewards --> MC
    MC -- 7/Send CAKE rewards --> OA
    PM -- 8/Withdraw NFT --> IA
    IA -- 9/Request NFT withdrawal --> MC
    MC -- 10/Return NFT --> IA
    PM -- 11/Query position details --> IA
    IA -- 12/Get position details --> NPM
    PM -- 13/Decrease all liquidity --> IA
    IA -- 14/Remove liquidity --> NPM
    PM -- 15/Collect tokens --> IA
    IA -- 16/Collect tokens --> NPM
    NPM -- 17/Send tokens --> OA
    PM -- 18/Burn empty NFT --> IA
    IA -- 19/Burn NFT --> NPM
Functions
| Function | Parameters | Description |
|---|---|---|
| createPosition | tickLower, tickUpper, amount0, amount1 | Creates a position on PancakeSwap V3 by providing liquidity in a specific price range and stakes it with the input account in MasterChef V3. If amount0 or amount1 is 0, the entire balance of that token will be used. Returns the tokenId of the created position. |
| withdrawPosition | tokenId | Performs a complete withdrawal of a position: collects accumulated fees, harvests CAKE rewards, unstakes the NFT from MasterChef, removes all liquidity, and burns the NFT. Returns the amounts of fees collected, liquidity withdrawn, and rewards received and deposits all of them in the output account. |
Configuration
The library is configured on deployment using the PancakeSwapV3PositionManagerConfig type.
/**
 * @notice Configuration parameters for the PancakeSwapV3PositionManager
 * @param inputAccount Account used to provide liquidity and manage positions
 * @param outputAccount Account that receives withdrawn funds and rewards
 * @param positionManager Address of PancakeSwap's NonfungiblePositionManager contract
 * @param masterChef Address of PancakeSwap's MasterChefV3 for staking NFT positions and accrue CAKE rewards
 * @param token0 Address of the first token in the pair
 * @param token1 Address of the second token in the pair
 * @param poolFee Fee tier of the liquidity pool in 1/1,000,000 increments (e.g., 500 = 0.05%, 3000 = 0.3%)
 * @param timeout Maximum time for transactions to be valid
 * @param slippageBps Maximum allowed slippage in basis points (1 basis point = 0.01%)
 */
struct PancakeSwapV3PositionManagerConfig {
    BaseAccount inputAccount;
    BaseAccount outputAccount;
    address positionManager;
    address masterChef;
    address token0;
    address token1;
    uint24 poolFee;
    uint16 slippageBps; // Basis points (e.g., 100 = 1%)
    uint256 timeout;
}
Valence Compound V3 Position Manager library
The Valence Compound V3 Position Manager library allows management of liquidity positions using an input account and an output account through the Compound V3 Protocol. It is typically used as part of a Valence Program. In that context, a Processor contract will be the main contract interacting with the Compound V3 Position Manager library.
High-level flows
---
title: Compound V3 Position Manager Supply
---
flowchart LR
    P[Processor]
    PM[Compound V3
    Position Manager Library]
    IA((Input Account))
    MP((Compound
    Market Proxy))

    P -- 1/supply(amount) --> PM
    PM -- 2/Query balances --> IA
    PM -- 3/Approve tokens and call supply --> IA
    IA -- 4/Supply --> MP
    MP -- 5/Return collateral tokens --> IA
---
title: Compound V3 Position Manager Withdraw
---
flowchart LR
    P[Processor]
    PM[Compound V3
    Position Manager Library]
    IA((Input Account))
    OA((Output Account))
    MP((Compound
    Market Proxy))

    P -- 1/withdraw(amount) --> PM
    PM -- 2/Call WithdrawTo --> IA
    IA -- 3/WithdrawTo(output
     account) --> MP
    MP -- 4/Burn collateral tokens --> IA
    MP -- 5/Send withdrawn tokens --> OA
---
title: Compound V3 Position Manager Claim Rewards
---
flowchart LR
    P[Processor]
    PM[Compound V3
    Position Manager Library]
    IA((Input Account))
    OA((Output Account))
    CR((Compound
    V3 CometRewards))

    P -- 1/claimAllRewards() --> PM
    PM -- 2/Call claimTo --> IA
    IA -- 3/claimTo(output
     account) --> CR
    CR -- 5/Send accrued reward tokens --> OA
Functions
| Function | Parameters | Description |
|---|---|---|
| supply | amount | Supplies tokens from the input account to the Compound V3 protocol. The input account will receive the corresponding collateral tokens. If amount is 0 the entire balance will be used. |
| withdraw | amount | Withdraws previously supplied tokens from Compound V3 and sends them to the output account. Passing 0 will withdraw the entire balance. |
| supplyCollateral | asset, amount | Supplies the token specified in asset. Works the same way as supply but instead of supplying the token specified in the library config, it supplies the token passed as a parameter |
| withdrawCollateral | asset, amount | Withdraw the token specified in asset. Works the same way as withdraw but instead of withdrawing the token specified in the library config, it withdraws the token passed as a parameter |
| getRewardOwed | Returns the rewards accrued but not yet claimed for the position | |
| claimAllRewards | Claims the reward accrued by the position to position's output account |
Configuration
The library is configured on deployment using the CompoundV3PositionManagerConfig type.
    /**
     * @title CompoundV3PositionManagerConfig
     * @notice Configuration struct for CompoundV3 lending operations
     * @dev Used to define parameters for interacting with CompoundV3 protocol
     * @param inputAccount The Base Account from which transactions will be initiated
     * @param outputAccount The Base Account that will receive withdrawals.
     * @param baseAsset Address of the base token of the CompoundV3 market
     * @param marketProxyAddress Address of the CompoundV3 market proxy
     * @param rewards Address of the CompoundV3 CometRewards contract
     */
    struct CompoundV3PositionManagerConfig {
        BaseAccount inputAccount;
        BaseAccount outputAccount;
        address baseAsset;
        address marketProxyAddress;
        address rewards;
    }
Acknowledgments
Thanks to Mujtaba, Hareem, and Ayush from Orbit for this contribution.
Valence BalancerV2Swap Library
The Valence BalancerV2Swap library enables token swaps from an input account to an output account using the Balancer V2 protocol. It is typically used as part of a Valence Program. In that context, a Processor contract will be the main contract interacting with the BalancerV2Swap library.
High-level flow
---
title: BalancerV2Swap Library
---
graph LR
    IA((Input Account))
    OA((Output Account))
    BV((Balancer Vault))
    P[Processor]
    S[BalancerV2Swap Library]

    subgraph EVM[ EVM Domain ]
        P -- 1/swap or multiSwap --> S
        S -- 2/Query balances --> IA
        S -- 3/Do approve --> IA
        IA -- 4/ERC-20 approve --> BV
        S -- 5/Execute swap --> IA
        IA -- 6/Call swap/batchSwap --> BV
        BV -- 7/Transfer output tokens --> OA
    end
Functions
| Function | Parameters | Description |
|---|---|---|
| swap | poolId, tokenIn, tokenOut, userData, amountIn, minAmountOut, timeout | Execute a single token swap through a Balancer V2 pool. |
| multiSwap | poolIds, tokens, userDataArray, amountIn, minAmountOut, timeout | Execute a multi-hop swap through multiple Balancer V2 pools. |
Single Swap Parameters
The swap function requires the following parameters:
| Parameter | Type | Description |
|---|---|---|
| poolId | bytes32 | The ID of the Balancer pool to use for the swap |
| tokenIn | address | Address of the token to swap from |
| tokenOut | address | Address of the token to swap to |
| userData | bytes | Additional data for specialized pools (usually empty bytes) |
| amountIn | uint256 | Amount of tokens to swap. If set to 0, all available tokens in the input_account will be swapped |
| minAmountOut | uint256 | Minimum amount of output tokens to receive (slippage tolerance). If set to 0 it means no slippage protection is applied. |
| timeout | uint256 | How long the transaction is valid for (in seconds) |
Multi-Hop Swap Parameters
The multiSwap function enables complex trading routes through multiple pools:
| Parameter | Type | Description |
|---|---|---|
| poolIds | bytes32[] | Array of pool IDs to use for each swap step (in sequence) |
| tokens | address[] | Array of all token addresses involved in the swap path (in sequence), needs to contain exactly 1 more element than the poolIds array |
| userDataArray | bytes[] | Additional data for specialized pools (one entry per pool). This data can be empty for all current Balancer pools but is reserved for possible future pool logic. Must be the same length as the poolIds array |
| amountIn | uint256 | Amount of tokens to swap. If set to 0, all available tokens in the input_account will be swapped |
| minAmountOut | uint256 | Minimum amount of output tokens to receive (slippage tolerance). If set to 0 it means no slippage protection is applied. |
| timeout | uint256 | How long the transaction is valid for (in seconds) |
For more information on how swaps work on Balancer V2, please refer to the Single Swap and Batch Swap documentation.
Configuration
The library is configured on deployment using the BalancerV2SwapConfig type.
/**
 * @title BalancerV2SwapConfig
 * @notice Configuration for Balancer V2 swaps
 * @param inputAccount The account from which tokens will be taken
 * @param outputAccount The account to which result tokens will be sent
 * @param vaultAddress Address of the Balancer V2 Vault
 */
struct BalancerV2SwapConfig {
    BaseAccount inputAccount;
    BaseAccount outputAccount;
    address vaultAddress;
}
Valence Splitter Library
The EVM Splitter library allows splitting funds from one input account to one or more output accounts, for one or more tokens according to the configured split configurations. Each token can be split using fixed amounts, fixed ratios, or dynamic ratios calculated by an external oracle contract. This library enables Valence Programs to distribute assets across multiple accounts with precise control over allocation strategies.
High-level Flow
---
title: Splitter Library
---
graph LR
  IA((Input
      Account))
  OA1((Output
      Account 1))
  OA2((Output
      Account 2))
  P[Processor]
  S[Splitter
    Library]
  O[Dynamic Ratio
    Oracle]
  P -- 1/Split --> S
  S -- 2/Query balances --> IA
  S -. 3/Query dynamic ratio .-> O
  S -- 4/Transfer to OA1 --> IA
  S -- 4'/Transfer to OA2 --> IA
  IA -- 5/Transfer funds --> OA1
  IA -- 5'/Transfer funds --> OA2
Functions
| Function | Parameters | Description |
|---|---|---|
| split | - | Splits funds from the configured input account to the output accounts according to the configured split configurations for each token. |
Configuration
The library is configured on deployment using the SplitterConfig type.
    /**
     * @title SplitterConfig
     * @notice Configuration struct for splitting operations
     * @param inputAccount Address of the input account
     * @param splits Split configuration per token address
     */
    struct SplitterConfig {
        BaseAccount inputAccount;
        SplitConfig[] splits;
    }

    /**
     * @title SplitConfig
     * @notice Split config for specified account
     * @param outputAccount Address of the output account
     * @param token Address of the token account. Use address(0) to send ETH
     * @param splitType type of the split
     * @param splitData encoded configuration based on the type of split
     */
    struct SplitConfig {
        BaseAccount outputAccount;
        address token;
        SplitType splitType;
        bytes splitData;
    }

    /**
     * @title SplitType
     * @notice enum defining allowed variants of split config
     */
    enum SplitType {
        FixedAmount,    // Split a fixed amount of tokens
        FixedRatio,     // Split based on a fixed ratio (percentage)
        DynamicRatio    // Split based on a dynamic ratio from oracle
    }

    /**
     * @title DynamicRatioAmount
     * @notice Params for dynamic ratio split
     * @param contractAddress Address of the dynamic ratio oracle contract
     * @param params Encoded parameters for the oracle
     */
    struct DynamicRatioAmount {
        address contractAddress;
        bytes params;
    }
Split Types
Fixed Amount
Splits an exact number of tokens regardless of the total balance. The splitData contains the encoded amount as uint256.
Fixed Ratio
Splits tokens based on a fixed percentage of the total balance. The splitData contains the encoded ratio as uint256 scaled by 10^18.
Dynamic Ratio
Splits tokens based on a ratio calculated by an external oracle contract. The splitData contains an encoded DynamicRatioAmount struct with the oracle contract address and parameters.
Implementation Details
Validation Rules
The library enforces several validation rules during configuration:
- Input Account: Must be a valid non-zero address
- No Duplicates: Cannot have duplicate splits for the same token and output account combination
- Split Type Consistency: Cannot mix different split types for the same token
- Ratio Sum: For fixed ratio splits, the sum of all ratios for a token must equal 1.0 (10^18)
- Oracle Validation: Dynamic ratio oracle addresses must be valid smart contracts
Execution Process
- Balance Query: Retrieves the current balance for each token from the input account
- Amount Calculation: Calculates split amounts based on the configured split type:
- Fixed Amount: Uses the configured amount directly
- Fixed Ratio: Multiplies balance by ratio and divides by 10^18
- Dynamic Ratio: Queries the oracle contract for the current ratio
- Transfer Execution: Executes transfers from the input account to each output account
Oracle Integration
For dynamic ratio splits, the library integrates with external oracle contracts implementing the IDynamicRatioOracle interface:
interface IDynamicRatioOracle {
    function queryDynamicRatio(IERC20 token, bytes calldata params)
        external view returns (uint256 ratio);
}
The oracle returns a ratio scaled by 10^18, which must not exceed 1.0 (10^18). This enables integration with price oracles, TWAP calculators, or other dynamic pricing mechanisms.
Native Asset Support
The library supports both ERC20 tokens and native ETH:
- ERC20 Tokens: Use the token contract address
- Native ETH: Use
address(0)as the token address
Acknowledgments
Thanks to Mujtaba, Hareem, and Ayush from Orbit for this contribution.
Middleware
This section contains a description of the Valence Protocol middleware design.
Valence Protocol Middleware components:
Middleware Broker
Middleware broker acts as an app-level integration gateway in Valence Programs. Integration here is used rather ambiguously on purpose - brokers should remain agnostic to the primitives being integrated into Valence Protocol. These primitives may involve but not be limited to:
- data types
- functions
- encoding schemes
- any other distributed system building blocks that may be implemented differently
Problem statement
Valence Programs can be configured to span over multiple domains and last for an indefinite duration of time.
Domains integrated into Valence Protocol are sovereign and evolve on their own.
Middleware brokers provide the means to live with these differences by enabling various primitive conversions to be as seamless as possible. Seamless here primarily refers to causing no downtime to bring a given primitive up-to-date, and making the process of doing so as easy as possible for the developers.
To visualize a rather complex instance of this problem, consider the following situation. A Valence Program is initialized to continuously query a particular type from a remote domain, modify some of its values, and send the altered object back to the remote domain for further actions. At some point during the runtime, remote domain performs an upgrade which extends the given type with additional fields. The Valence Program is unaware of this upgrade and continues with its order of operations. However, the type in question from the perspective of the Valence Program had drifted and is no longer representative of its origin domain.
Among other things, Middleware brokers should enable such programs to gracefully recover into a synchronized state that can continue operating in a correct manner.
Broker Lifecycle
Brokers are singleton components that are instantiated before the program start time.
Valence Programs refer to their brokers of choice by their respective addresses.
This means that the same broker instance for a particular domain could be used across many Valence Programs.
Brokers maintain their set of type registries and index
them by semver. New type registries can be added to the broker during runtime.
While programs have the freedom to select a particular version of a type registry
to be used for a given request, by default, the most up to date type registry is used.
Two aforementioned properties reduce the amount of work needed to upkeep the integrations across active Valence Programs: updating one broker with the latest version of a given domain will immediately become available for all Valence Programs using it.
API
Broker interface is agnostic to the type registries it indexes. A single query is exposed:
#![allow(unused)]
fn main() {
pub struct QueryMsg {
    pub registry_version: Option<String>,
    pub query: RegistryQueryMsg,
}
}
This query message should only change in situations where it may become limiting.
After receiving the query request, broker will relay the contained RegistryQueryMsg
to the correct type registry, and return the result to the caller.
Middleware Type Registry
Middleware type registries are static components that define how primitives external to the Valence Protocol are adapted to be used within Valence programs.
While type registries can be used independently, they are typically meant to be registered into and used via brokers to ensure versioning is kept up to date.
Type Registry lifecycle
Type Registries are static contracts that define their primitives during compile time.
Once a registry is deployed, it is expected to remain unchanged. If a type change is needed, a new registry should be compiled, deployed, and registered into the broker to offer the missing or updated functionality.
API
All type registry instances must implement the same interface defined in middleware-utils.
Type registries function in a read-only manner - all of their functionality is exposed
with the RegistryQueryMsg. Currently, the following primitive conversions are enabled:
#![allow(unused)]
fn main() {
pub enum RegistryQueryMsg {
    /// serialize a message to binary
    #[returns(NativeTypeWrapper)]
    FromCanonical { obj: ValenceType },
    /// deserialize a message from binary/bytes
    #[returns(Binary)]
    ToCanonical { type_url: String, binary: Binary },

    /// get the kvkey used for registering an interchain query
    #[returns(KVKey)]
    KVKey {
        type_id: String,
        params: BTreeMap<String, Binary>,
    },

    #[returns(NativeTypeWrapper)]
    ReconstructProto {
        type_id: String,
        icq_result: InterchainQueryResult,
    },
}
}
RegistryQueryMsg can be seen as the superset of all primitives that Valence Programs
can expect. No particular type being integrated into the system is required to implement
all available functionality, although that is possible.
To maintain a unified interface across all type registries, they have to adhere to the same
API as all other type registries. This means that if a particular type is enabled in a type
registry and only provides the means to perform native <-> canonical conversion, attempting
to call ReconstructProto on that type will return an error stating that reconstructing
protobuf for this type is not enabled.
Module organization
Primitives defined in type registries should be outlined in a domain-driven manner. Types, encodings, and any other functionality should be grouped by their domain and are expected to be self-contained, not leaking into other primitives.
For instance, an osmosis type registry is expected to contain all registry instances related to
the Osmosis domain. Different registry instances should be versioned by semver, following that
of the external domain of which the primitives are being integrated.
Enabled primitives
Currently, the following type registry primitives are enabled:
- Neutron Interchain Query types:
- reconstructing native types from protobuf
- obtaining the
KVKeyused to initiate the query for a given type
- Valence Canonical Types:
- reconstructing native types from Valence Types
- mapping native types into Valence Types
Example integration
For an example, consider the integration of the osmosis gamm pool.
Neutron Interchain Query integration
Neutron Interchain Query integration for a given type is achieved by implementing
the IcqIntegration trait:
#![allow(unused)]
fn main() {
pub trait IcqIntegration {
    fn get_kv_key(params: BTreeMap<String, Binary>) -> Result<KVKey, MiddlewareError>;
    fn decode_and_reconstruct(
        query_id: String,
        icq_result: InterchainQueryResult,
    ) -> Result<Binary, MiddlewareError>;
}
}
get_kv_key
Implementing the get_kv_key will provide the means to obtain the KVKey needed
to register the interchain query. For osmosis gamm pool, the implementation may look
like this:
#![allow(unused)] fn main() { impl IcqIntegration for OsmosisXykPool { fn get_kv_key(params: BTreeMap<String, Binary>) -> Result<KVKey, MiddlewareError> { let pool_prefix_key: u8 = 0x02; let id: u64 = try_unpack_domain_specific_value("pool_id", ¶ms)?; let mut pool_access_key = vec![pool_prefix_key]; pool_access_key.extend_from_slice(&id.to_be_bytes()); Ok(KVKey { path: STORAGE_PREFIX.to_string(), key: Binary::new(pool_access_key), }) } } }
decode_and_reconstruct
Other part of enabling interchain queries is the implementation of decode_and_reconstruct.
This method will be called upon ICQ relayer posting the query result back to the interchainqueries
module on Neutron. For osmosis gamm pool, the implementation may look
like this:
#![allow(unused)]
fn main() {
impl IcqIntegration for OsmosisXykPool {
    fn decode_and_reconstruct(
        _query_id: String,
        icq_result: InterchainQueryResult,
    ) -> Result<Binary, MiddlewareError> {
        let any_msg: Any = Any::decode(icq_result.kv_results[0].value.as_slice())
            .map_err(|e| MiddlewareError::DecodeError(e.to_string()))?;

        let osmo_pool: Pool = any_msg
            .try_into()
            .map_err(|_| StdError::generic_err("failed to parse into pool"))?;

        to_json_binary(&osmo_pool)
            .map_err(StdError::from)
            .map_err(MiddlewareError::Std)
    }
}
}
Valence Type integration
Valence Type integration for a given type is achieved by implementing
the ValenceTypeAdapter trait:
#![allow(unused)]
fn main() {
pub trait ValenceTypeAdapter {
    type External;

    fn try_to_canonical(&self) -> Result<ValenceType, MiddlewareError>;
    fn try_from_canonical(canonical: ValenceType) -> Result<Self::External, MiddlewareError>;
}
}
Ideally, Valence Types should represent the minimal amount of information needed and avoid any domain-specific logic or identifiers. In practice, this is a hard problem: native types that are mapped into Valence types may need to be sent back to the remote domains. For that reason, we cannot afford leaking any domain-specific fields and instead store them in the Valence Type itself for later reconstruction.
In case of ValenceXykPool, this storage is kept in its domain_specific_fields field.
Any fields that are logically common across all possible integrations into this type
should be kept in their dedicated fields. In the case of constant product pools, such
fields are the assets in the pool, and the shares issued that represent those assets:
#![allow(unused)]
fn main() {
#[cw_serde]
pub struct ValenceXykPool {
    /// assets in the pool
    pub assets: Vec<Coin>,

    /// total amount of shares issued
    pub total_shares: String,

    /// any other fields that are unique to the external pool type
    /// being represented by this struct
    pub domain_specific_fields: BTreeMap<String, Binary>,
}
}
try_to_canonical
Implementing the try_from_canonical will provide the means of mapping a native remote type
into the canonical Valence Type to be used in Valence Protocol.
For osmosis gamm pool, the implementation may look like this:
#![allow(unused)]
fn main() {
impl ValenceTypeAdapter for OsmosisXykPool {
    type External = Pool;

    fn try_to_canonical(&self) -> Result<ValenceType, MiddlewareError> {
        // pack all the domain-specific fields
        let mut domain_specific_fields = BTreeMap::from([
            (ADDRESS_KEY.to_string(), to_json_binary(&self.0.address)?),
            (ID_KEY.to_string(), to_json_binary(&self.0.id)?),
            (
                FUTURE_POOL_GOVERNOR_KEY.to_string(),
                to_json_binary(&self.0.future_pool_governor)?,
            ),
            (
                TOTAL_WEIGHT_KEY.to_string(),
                to_json_binary(&self.0.total_weight)?,
            ),
            (
                POOL_PARAMS_KEY.to_string(),
                to_json_binary(&self.0.pool_params)?,
            ),
        ]);

        if let Some(shares) = &self.0.total_shares {
            domain_specific_fields
                .insert(SHARES_DENOM_KEY.to_string(), to_json_binary(&shares.denom)?);
        }

        for asset in &self.0.pool_assets {
            if let Some(token) = &asset.token {
                domain_specific_fields.insert(
                    format!("pool_asset_{}_weight", token.denom),
                    to_json_binary(&asset.weight)?,
                );
            }
        }

        let mut assets = vec![];
        for asset in &self.0.pool_assets {
            if let Some(t) = &asset.token {
                assets.push(coin(u128::from_str(&t.amount)?, t.denom.to_string()));
            }
        }

        let total_shares = self
            .0
            .total_shares
            .clone()
            .map(|shares| shares.amount)
            .unwrap_or_default();

        Ok(ValenceType::XykPool(ValenceXykPool {
            assets,
            total_shares,
            domain_specific_fields,
        }))
    }
}
}
try_from_canonical
Other part of enabling Valence Type integration is the implementation of try_from_canonical.
This method will be called when converting from canonical back to the native version of the types.
For osmosis gamm pool, the implementation may look like this:
#![allow(unused)]
fn main() {
impl ValenceTypeAdapter for OsmosisXykPool {
    type External = Pool;

    fn try_from_canonical(canonical: ValenceType) -> Result<Self::External, MiddlewareError> {
        let inner = match canonical {
            ValenceType::XykPool(pool) => pool,
            _ => {
                return Err(MiddlewareError::CanonicalConversionError(
                    "canonical inner type mismatch".to_string(),
                ))
            }
        };
        // unpack domain specific fields from inner type
        let address: String = inner.get_domain_specific_field(ADDRESS_KEY)?;
        let id: u64 = inner.get_domain_specific_field(ID_KEY)?;
        let future_pool_governor: String =
            inner.get_domain_specific_field(FUTURE_POOL_GOVERNOR_KEY)?;
        let pool_params: Option<PoolParams> = inner.get_domain_specific_field(POOL_PARAMS_KEY)?;
        let shares_denom: String = inner.get_domain_specific_field(SHARES_DENOM_KEY)?;
        let total_weight: String = inner.get_domain_specific_field(TOTAL_WEIGHT_KEY)?;

        // unpack the pool assets
        let mut pool_assets = vec![];
        for asset in &inner.assets {
            let pool_asset = PoolAsset {
                token: Some(Coin {
                    denom: asset.denom.to_string(),
                    amount: asset.amount.into(),
                }),
                weight: inner
                    .get_domain_specific_field(&format!("pool_asset_{}_weight", asset.denom))?,
            };
            pool_assets.push(pool_asset);
        }

        Ok(Pool {
            address,
            id,
            pool_params,
            future_pool_governor,
            total_shares: Some(Coin {
                denom: shares_denom,
                amount: inner.total_shares,
            }),
            pool_assets,
            total_weight,
        })
    }
}
}
Valence Types
Valence Types are a set of canonical type wrappers to be used inside Valence Programs.
Primary operational domain of Valence Protocol will need to consume, interpret, and otherwise manipulate data from external domains. For that reason, canonical representations of such types are defined in order to form an abstraction layer that all Valence Programs can reason about.
Canonical Type integrations
Canonical types to be used in Valence Programs are enabled by the Valence Protocol.
For instance, consider Astroport XYK and Osmosis GAMM pool types. These are two distinct data types that represent the same underlying concept - a constant product pool.
These types can be unified in the Valence Protocol context by being mapped to and from the following Valence Type definition:
#![allow(unused)]
fn main() {
pub struct ValenceXykPool {
    /// assets in the pool
    pub assets: Vec<Coin>,

    /// total amount of shares issued
    pub total_shares: String,

    /// any other fields that are unique to the external pool type
    /// being represented by this struct
    pub domain_specific_fields: BTreeMap<String, Binary>,
}
}
For a remote type to be integrated into the Valence Protocol means that there are available adapters that map between the canonical and original type definitions.
These adapters can be implemented by following the design outlined by type registries.
Active Valence Types
Active Valence types provide the interface for integrating remote domain representations of the same underlying concepts. Remote types can be integrated into Valence Protocol if and only if there is an enabled Valence Type representing the same underlying primitive.
TODO: start a dedicated section for each Valence Type
Currently enabled Valence types are:
- XYK pool
- Balance response
Valence Asserter
Valence Asserters provide the means to assert boolean conditions about Valence Types.
Each Valence Type variant may provide different assertion queries. To offer a unified API, Valence Asserter remains agnostic to the underlying type being queried and provides a common gateway to all available types.
Motivation
Primary use case for Valence Type assertions is to enable conditional execution of functions. A basic example of this may be expressed as "provide liquidity if and only if the pool price is greater than X".
While specific conditions like this could be internalized in each function that is to be executed, Valence Asserter aims to:
- enable such assertions to be performed prior to any library function (system level)
- not limit the assertions to a particular condition (generalize)
With the following goals satisfied, arbitrary assertions can be performed on the processor level.
Each function call that the configured program wishes to execute only if a certain condition is met can then
be placed in a message batch and prepended with an assertion message.
This way, when the message batch is being processed, any assertions that do not evaluate to true (return an Err) will
prevent later messages from executing as expected. If the batch is atomic, the whole batch will abort.
If the batch is non-atomic, various authorization configuration
options will dictate the further behavior.
High-level flow
---
title: Forwarder Library
---
graph LR
  IA((Storage Account))
  P[Processor]
  S[Valence Asserter]
  P -- 1/Assert --> S
  S -- 2/Query storage slot(s) --> IA
  S -- 3/Evaluate the predicate --> S
  S -- 4/Return OK/ERR --> P
API
| Function | Parameters | Description | Return Value |
|---|---|---|---|
| Assert | a: AssertionValuepredicate: Predicateb: AssertionValue | Evaluate the given predicate R(a, b). If a or b are variables, they get fetched using the configuartion specified in the respective QueryInfo.Both a and b must be deserializable into the same type. | - predicate evaluates to true: Ok()- predicate evaluates to false: Err |
Design
Assertions to be performed are expressed as R(a, b), where:
- a and b are values of the same type
- R is the predicate that applies to a and b
Valence Asserter design should enable such predicate evaluations to be performed in a generic manner within Valence Programs.
Assertion values
Assertion values are defined as follows:
#![allow(unused)]
fn main() {
pub enum AssertionValue {
    // storage account slot query
    Variable(QueryInfo),
    // constant valence primitive value
    Constant(ValencePrimitive),
}
}
Two values are required for any comparison. Both a and b can be configured to be obtained in one of two ways:
- Constant value (known before program instantiation)
- Variable value (known during program runtime)
Any combination of these values can be used for a given assertion:
- constant-constant (unlikely)
- constant-variable
- variable-variable
Variable assertion values
Variable assertion values are meant to be used for information that can only become known during runtime.
Such values will be obtained from Valence Types, which expose their own set of queries.
Valence Types reside in their dedicated storage slots in Storage Accounts.
Valence Asserter uses the following type in order to obtain the Valence Type and query its state:
#![allow(unused)]
fn main() {
pub struct QueryInfo {
    // addr of the storage account
    pub storage_account: String,
    // key to access the value in the storage account
    pub storage_slot_key: String,
    // b64 encoded query
    pub query: Binary,
}
}
Constant assertion values
Constant assertion values are meant to be used for assertions where one of the operands is known before runtime.
Valence Asserter expects constant values to be passed using the ValencePrimitive enum which wraps around the standard cosmwasm_std types:
#![allow(unused)]
fn main() {
pub enum ValencePrimitive {
    Decimal(cosmwasm_std::Decimal),
    Uint64(cosmwasm_std::Uint64),
    Uint128(cosmwasm_std::Uint128),
    Uint256(cosmwasm_std::Uint256),
    String(String),
}
}
Predicates
Predicates R are specified with the following type:
#![allow(unused)]
fn main() {
pub enum Predicate {
    LT,  // <
    LTE, // <=
    EQ,  // ==
    GT,  // >
    GTE, // >=
}
}
In the context of Valence Asserter, the predicate treats a as the left-hand-side and b as the right-hand-side variables (a < b).
While comparison of numeric types is pretty straightforward, it is important to note that string predicates are evaluated in lexicographical order and are case sensitive:
- "Z" < "a"
- "Assertion" != "assertion"
Example
Consider that a Valence Program wants to provide liquidity to a liquidity pool if and only if
the pool price is above 10.0.
Pool price can be obtained by querying a ValenceXykPool variant which exposes the following query:
#![allow(unused)]
fn main() {
ValenceXykQuery::GetPrice {} -> Decimal
}
The program is configured to store the respective ValenceXykPool in a Storage Account with address
neutron123..., under storage slot pool.
Filling in the blanks of R(a, b), we have:
- variable
ais obtained with theGetPrice {}query ofneutron123...storage slotpool - predicate
Ris known in advance:> - constant
bis known in advance:10.0
Thefore the assertion message may look as follows:
"assert": {
  "a": {
    "variable": {
      "storage_account": "neutron123...",
      "storage_slot": "pool",
      "query": b64("GetPrice {}"),
    }
  },
  "predicate": Predicate::GT,
  "b": {
    "constant": "10.0",
  },
}
Program manager
The program manager is an off-chain tool that helps instantiate, update and migrate a program.
Guides
Program manager components:
Manager config - before the manager can work
The manager is performing actions on chains included in the program, and for that the manager need to have certain information that will allow him to perform those actions.
You can read more about the manager config here.
Wallet
The manager requires a funded wallet to perform actions on chain, it expects the mnemonic of the wallet to be included in the MANAGER_MNEMONIC environment variable.
- Note - This wallet should NOT be the owner of the program, this is a helper wallet that allows the manager to execute actions on chain, it should be funded with just enough funds to perform those actions.
How to use program manager
The program manager is a library, it can be used as dependency in any rust project.
There are 3 functions that allow you to interact with a program:
init_program(&mut ProgramConfig)- Instantiate a new programupdate_program(ProgramConfigUpdate)- Update existing programmigrate_program(ProgramConfigMigrate)- Migrate existing program to a new program
Instantiate a program
init_program() takes a program config to instantiate and mutate it with the instantiated program config.
Read more in Program config
Update a program
update_program() takes a set of instructions to update an existing program and returns a set of messages that can be executed by the owner.
This is useful to batch update library configs and authorizations.
- Note -
update_program()returns a set of messages that are needed to perform the update, those messages must be executed by the owner of the program.
Read more in Program config update
Migrate a program
migrate_program() allows the owner to "disable" an old program, and move all the funds to the new program.
This is useful when you want to disable an old program and move the funds to a new program.
- Note -
migrate_program()returns a set of messages to move the funds and pause the program that must be executed by the owner.
Read more in Program config migrate
Manager config
The program manager requires information like chain connection details and bridges details, this must be provided to the manager via a config.
#![allow(unused)]
fn main() {
pub struct Config {
    // Map of chain connections details
    pub chains: HashMap<String, ChainInfo>,
    // Contract information per chain for instantiation
    pub contracts: Contracts,
    // Map of bridges information
    pub bridges: HashMap<String, HashMap<String, Bridge>>,
    pub general: GeneralConfig,
}
}
Setup
The manager config is a global mutateable config and can be read and set from anywhere in your project.
Get config
You can get the config like this:
#![allow(unused)]
fn main() {
let manager_config = valence_program_manager::config::GLOBAL_CONFIG.lock().await
}
Write config
Writing to the config is possible with:
#![allow(unused)]
fn main() {
let mut manager_config = valence_program_manager::config::GLOBAL_CONFIG.lock().await

// Mutate field
manager_config.general.registry_addr = "addr1234".to_string();

// Write full config
*manager_config = new_manager_config;
}
Non-async functions
The manager config is using tokio::sync::Mutex, because of that, you need to use blocking operation in non-async functions, like this:
#![allow(unused)]
fn main() {
let rt = tokio::runtime::Builder::new_current_thread()
        .enable_all()
        .build()
        .unwrap();
rt.block_on(valence_program_manager::config::GLOBAL_CONFIG.lock())
}
- Note - You must be careful with blocking, the manager might be blocked from accessing the global config if not freed properly.
Example
We have a public repo that include configs for major persistant environments (like mainnet and testnet)
It can be used directly in the manager to deploy on those environments or as example to a working manager config layout.
Config fields
Chains
This is a map of chain_id => ChainInfo.
It allows the manager to connect to chains that are required by your program and to execute actions on chain and query data.
#![allow(unused)]
fn main() {
pub struct ChainInfo {
    pub name: String,
    pub rpc: String,
    pub grpc: String,
    pub prefix: String,
    pub gas_price: String,
    pub gas_denom: String,
    pub coin_type: u64,
}
}
-
Note - Your program might require multiple chains, all chains must be included in the config or the manager will fail.
-
Note - Neutron chain must be included even if the program is not using it as a domain.
Contracts
Contracts field includes all the code ids of contract
#![allow(unused)]
fn main() {
pub struct Contracts {
    pub code_ids: HashMap<String, HashMap<String, u64>>,
}
}
code_ids field is a map of chain_id => map(contract_name => code_id)
This allows the manager to find the code id of a contract on a specific chain to instantiate it.
Bridges
The bridge is a complex map of bridge information needed for cross-chain operations.
The easiest way to explain it is by toml format:
[bridges.neutron.juno.polytone.neutron]
voice_addr      = "neutron15c0d3k8nf5t82zzkl8l7he3smx033hsr9dvzjeeuj7e8n46rqy5se0pn3e"
note_addr       = "neutron174ne8p7zh539sht8sfjsa9r6uwe3pzlvqedr0yquml9crfzsfnlshvlse8"
other_note_port = "wasm.juno1yt5kcplze0sark8f55fklk70uay3863t5q3j3a8kgvs3rlmjya9qys0d2y"
connection_id   = "connection-95"
channel_id      = "channel-4721"
[bridges.neutron.juno.polytone.juno]
voice_addr      = "juno1c9hx3q7sd2d0xgknc52ft6qsqxemkuxh3nt8d4rmdtdua25x5h0sdd2zm5"
note_addr       = "juno1yt5kcplze0sark8f55fklk70uay3863t5q3j3a8kgvs3rlmjya9qys0d2y"
other_note_port = "wasm.neutron174ne8p7zh539sht8sfjsa9r6uwe3pzlvqedr0yquml9crfzsfnlshvlse8"
connection_id   = "connection-530"
channel_id      = "channel-620"
We are providing a bridge information here between neutron and juno chains, the bridge we are using is polytone, and the first information is for the neutron "side", while the second information is for the juno "side".
General
#![allow(unused)]
fn main() {
pub struct GeneralConfig {
    pub registry_addr: String,
}
}
General field holds general information that is needed for the manager to work:
registry_addr- The registry contract address on neutron.
Instantiate program
The manager is using the program config to instantiate the full flow of the program on-chain.
After instantiation of a program, the program config will contain the instantiated data of the program.
#![allow(unused)]
fn main() {
pub struct ProgramConfig {
    pub id: u64,
    pub name: String,
    pub owner: String,
    pub links: BTreeMap<Id, Link>,
    pub accounts: BTreeMap<Id, AccountInfo>,
    pub libraries: BTreeMap<Id, LibraryInfo>,
    pub authorizations: Vec<AuthorizationInfo>,
    #[serde(default)]
    pub authorization_data: AuthorizationData,
}
}
Id
Unique identifier of a program, it is used to save the program config on-chain.
Should be set to 0 when instantiating a new program.
Name
A short description of the program to easily identify it.
Links
A map of links between libraries and the connected input and output accounts.
This allows us to represent a program in a graph.
#![allow(unused)]
fn main() {
pub struct Link {
    /// List of input accounts by id
    pub input_accounts_id: Vec<Id>,
    /// List of output accounts by id
    pub output_accounts_id: Vec<Id>,
    /// The library id
    pub library_id: Id,
}
}
Accounts
A list of accounts that are being used by the program
#![allow(unused)]
fn main() {
pub struct AccountInfo {
    // The name of the account
    pub name: String,
    // The type of the account
    pub ty: AccountType,
    // The domain this account is on
    pub domain: Domain,
    // The instantiated address of the account
    pub addr: Option<String>,
}
}
Name
Identifying name for this account
AccountType
Account type allows the manager to know whether the account should be instantiated or not, and what type of account we should instantiate.
#![allow(unused)]
fn main() {
pub enum AccountType {
    /// Existing address on chain
    Addr { addr: String },
    /// This is our base account implementation
    Base { admin: Option<String> },
}
}
Domain
On what domain the account exists or should be instantiated on.
Addr
This field will be set by the manager once the account is intantiated.
Libraries
A list of libraries that are being used by the program.
#![allow(unused)]
fn main() {
pub struct LibraryInfo {
    pub name: String,
    pub domain: Domain,
    pub config: LibraryConfig,
    pub addr: Option<String>,
}
}
Name
The identifying name of this specific library
Domain
The specific domain this library is on.
Config
The library specific config that will be used during instantiation.
LibraryConfig is an enum of libraries that currently exist and can be used in programs.
Addr
This will include the address of the library contract once instantiated
Authorizations
This is a list of all authorizations that should be included in the authorization contract.
Authorization data
This field includes all the data regarding authorization contract and processors on all chains.
#![allow(unused)]
fn main() {
pub struct AuthorizationData {
    /// authorization contract address on neutron
    pub authorization_addr: String,
    /// List of processor addresses by domain
    /// Key: domain name | Value: processor address
    pub processor_addrs: BTreeMap<String, String>,
    /// List of authorization bridge addresses by domain
    /// The addresses are on the specified domain
    /// Key: domain name | Value: authorization bridge address on that domain
    pub authorization_bridge_addrs: BTreeMap<String, String>,
    /// List of processor bridge addresses by domain on neutron chain
    pub processor_bridge_addrs: Vec<String>,
}
}
authorization_addr- Authorization contract address on neutronprocessor_addrs- Map of all processors by domainauthorization_bridge_addrs- Bridge account address of the authorization contract on all chainsprocessor_bridge_addrs- List of bridge accounts of processors on neutron chain
Update a program
Updating a program allows you to:
- Change the owner of a program
- Update libraries configs
- Add/Modify/Enable/Disable authorizations
The manager will NOT perform those operations directly, rather output a list of messages that needs to be executed by the owner to achieve the updated program.
#![allow(unused)]
fn main() {
pub struct ProgramConfigUpdate {
    /// The id of a program to update
    pub id: u64,
    /// New owner, if the owner is to be updated
    pub owner: Option<String>,
    /// The list of library config updates to perform
    pub libraries: BTreeMap<Id, LibraryConfigUpdate>,
    /// A list of authorizations
    pub authorizations: Vec<AuthorizationInfoUpdate>,
}
}
Id
The id of the program to perform the update on, the manager will look for this id in the on-chain registry and pull the current program config that exists.
Owner
Optional field to update the owner, it takes the new owner address.
Libraries
A map of library_id => library_config.
LibraryConfigUpdate is an enum that includes all possible libraries and their LibraryConfigUpdate type
Authorizations
A list of operations to do on the authorizations table
#![allow(unused)]
fn main() {
pub enum AuthorizationInfoUpdate {
    Add(AuthorizationInfo),
    Modify {
        label: String,
        not_before: Option<Expiration>,
        expiration: Option<Expiration>,
        max_concurrent_executions: Option<u64>,
        priority: Option<Priority>,
    },
    /// Disable by label
    Disable(String),
    /// Disable by label
    Enable(String),
}
}
Add
Adds a new authorization with that info
Modify
Modifies an existing authorization with that label
Disable
Disables an existing authorization by label
Enable
Enable a disabled authorization by label
Migrate a program
Migrating a program allows you to pause an existing program and perform funds transfer from accounts that hold funds in an old program to accounts in the new program.
Like updating a program, the manager will not perform those actions but will output a set of instructions to be executed by the owner.
Unlike the update, migration requires 2 sets of actions:
- Transfer all funds from the old program to the new program
- Pause the old program processors
Pausing the program will not allow any actions to be done on the old program including transferring the funds, for this reason, we first transfer all the funds, and only then pausing the old program.
#![allow(unused)]
fn main() {
pub struct ProgramConfigMigrate {
    pub old_id: Id,
    /// The new program we instantiate
    pub new_program: ProgramConfig,
    /// Transfer funds details
    pub transfer_funds: Vec<FundsTransfer>,
}
}
Old id
This is the id of the old program
New program
This is the config of the new program to instantiate
Transfer funds
A list of transfers to perform
#![allow(unused)]
fn main() {
pub struct FundsTransfer {
    pub from: String,
    pub to: LibraryAccountType,
    pub domain: Domain,
    pub funds: Coin,
}
}
from- From what adress to move funds to, must be an account owned by the old programto- ALibraryAccountTypecan either be set as an address, or an account id of an account in the new programdomain- On what domain to perform this transfer, bothfromandtomust be on that domainfunds- The amount of funds to transfer
Build a program config
The manager entry points are expecting a rust type, you can use any way you are familiar with to build this type, here are some examples
Using deployer
Timewave Deployer is an easy way of building programs, you can follow the README to set the deployer.
You can view Timewave deployments repository to see an example of already deployed programs using the deployer.
Program builder
Our above deployer is using a rust builder to build a program, an example of this can be found in our program template
#![allow(unused)]
fn main() {
let mut builder = ProgramConfigBuilder::new("example-program", owner.as_str());
}
ProgramConfigBuilder::new(NAME, OWNER) provides an easy way to add accounts, libraries and authorizations to build the program config.
JSON file
A program config can also be parsed from a JSON file to ProgramConfig type.
Here is an example from past deployments of a JSON file of a program config that can be provided to the manager to be intantiated.
Library account type
When we build a new program, we don't yet have an on-chain address, but there are several components that require an address to operate, for example a library needs to know the input account address it should operate on.
When building a fresh program config, we are using ids instead of addresses, the manager first predicts all the addresses of to-be instantiated contracts, and replace the ID with the address where an id was used.
To achieve this we are using the LibraryAccountType that first uses an id, and allows us to replace it with an address later when this contract was instantiated.
#![allow(unused)]
fn main() {
pub enum LibraryAccountType {
    #[serde(rename = "|library_account_addr|", alias = "library_account_addr")]
    Addr(String),
    #[serde(rename = "|account_id|", alias = "account_id")]
    AccountId(Id),
    #[serde(rename = "|library_id|", alias = "library_id")]
    LibraryId(Id),
}
}
LibraryAccountType is an enum that includes 3 options:
Addr(String)- Already instantiated on-chain address, this means we should not replace itAccountId(Id)- Account id that should be replaced with the address of an accountLibraryId(Id)- Library id that should be replaced with the address of a library
Methods
to_string() -> StdResult
If LibraryAccountType:Addr, we return the address as a string.
#![allow(unused)]
fn main() {
let addr = LibraryAccountType::Addr("some_addr".to_string());

let addr_string = addr.to_string();

assert_eq!(addr_string, "some_addr")
}
Will error if LibraryAccountType is an id.
to_addr(api: &dyn cosmwasm_std::Api) -> StdResult<cosmwasm_std::Addr>
Returns the address in cosmwasm_std::Addr type
#![allow(unused)]
fn main() {
let addr = LibraryAccountType::Addr("some_addr".to_string());
let api = mock_api();

let addr_as_addr = addr.to_addr(&api);

assert_eq!(addr_as_addr, cosmwasm_std::Addr::unchecked("some_addr"))
}
Will error if LibraryAccountType is an id.
to_raw_placeholder() -> String
Although it is encouraged for libraries to accept the LibraryAccountType directly as an address, some libraries may require a Strin.
to_raw_placeholder allows us to still use account ids in library config where a String is expected.
#![allow(unused)]
fn main() {
struct LibraryConfig {
    addr: String,
}
let addr_id = LibraryAccountType::AccountId(1);

let library_config = LibraryConfig { addr: addr_id.to_raw_placeholder() }

// Here is library config before passing to the manager:
// LibraryConfig { addr: "|lib_acc_placeholder|:1" }

init_program(&mut program_config);

// Here is the library config after instantiation:
// LibraryConfig { addr: "addres_of_account_id_1" }
}
from_str(input: &str) -> Result<Self, String>
You can get LibraryAccountType::Addr from a string
#![allow(unused)]
fn main() {
let addr = "some_addr";

let LAT = LibraryAccountType::from(addr);
let LAT: LibraryAccountType = addr.into();

// Both are equal to `LibraryAccountType::Addr("some_addr".to_string())`
}
get_account_id(&self) -> Id
Gets the id if LibraryAccountType::AccountId, else it panics.
get_library_id(&self) -> Id;
Gets the id if LibraryAccountType::LibraryId, else it panics.
Examples
Here are some examples of Valence Programs that you can use to get started.
Token Swap Program
This example demonstrates a simple token swap program whereby two parties wish to exchange specific amounts of (different) tokens they each hold, at a rate they have previously agreed on. The program ensures the swap happens atomically, so neither party can withdraw without completing the trade.
---
title: Valence token swap program
---
graph LR
	InA((Party A Deposit))
	InB((Party B Deposit))
	OutA((Party A Withdraw))
	OutB((Party B Withdraw))
	SSA[Splitter A]
	SSB[Splitter B]
	subgraph Neutron
	InA --> SSA --> OutB
	InB --> SSB --> OutA
	end
The program is composed of the following components:
- Party A Deposit account: a Valence Base account which Party A will deposit their tokens into, to be exchanged with Party B's tokens.
- Splitter A: an instance of the Splitter library that will transfer Party A's tokens from its input account (i.e. the Party A Deposit account) to its output account (i.e. the Party B Withdraw account) upon execution of its
splitfunction. - Party B Withdraw account: the account from which Party B can withdraw Party A's tokens after the swap has successfully completed. Note: this can be a Valence Base account, but it could also be a regular chain account, or a smart contract.
- Party B Deposit account: a Valence Base account which Party B will deposit their funds into, to be exchanged with Party A's funds.
- Splitter B: an instance of the Splitter library that will transfer Party B's tokens from its input account (i.e. the Party B Deposit account) to its output account (i.e. the Party A Withdraw account) upon execution of its
splitfunction. - Party A Withdraw account: the account from which Party A can withdraw Party B's tokens after the swap has successfully completed. Note: this can be a Valence Base account, but it could also be a regular chain account, or a smart contract.
The way the program is able to fulfil the requirement for an atomic exchange of tokens between the two parties is done by implementing an atomic subroutine composed of two function calls:
- Splitter A's
splitfunction - Splitter B's
splitfunction
The Authorizations component will ensure that either both succeed, or none is executed, thereby ensuring that funds remain safe at all time (either remaining in the respective deposit accounts, or transferred to the respective withdraw accounts).
Crosschain Vaults
Note: This example is still in the design phase and includes new or experimental features of Valence Programs that may not be supported in the current production release.
Overview
You can use Valence Programs to create crosschain vaults. Users interact with a vault on one chain while the tokens are held on another chain where yield is generated.
Note: In our initial implementation we use Neutron for co-processing and Hyperlane for general message passing between the co-processor and the target domain. Deployment of Valence programs as zk RISC-V co-processors with permissionless message passing will be available in the coming months.
In this example, we have made the following assumptions:
- Users can deposit tokens into a standard ERC-4626 vault on Ethereum.
- ERC-20 shares are issued to users on Ethereum.
- If a user wishes to redeem their tokens, they can issue a withdrawal request which will burn the user's shares when tokens are redeemed.
- The redemption rate that tells us how many tokens can be redeemed per shares is given by: \( R = \frac{TotalAssets}{TotalIssuedShares} = \frac{TotalInVault + TotalInTransit + TotalInPostion}{TotalIssuedShares}\)
- A permissioned coordinator actor called the "Strategist" is authorized to transport funds from Ethereum to Neutron where they are locked in some DeFi protocol. And vice-versa, the Strategist can withdraw from the position so the funds are redeemable on Ethereum. The redemption rate must be adjusted by the Strategist accordingly.
---
title: Crosschain Vaults Overview
---
graph LR
	User
	EV(Ethereum Vault)
	NP(Neutron Position)

	User -- Tokens --> EV
	EV -- Shares --> User
	EV -- Coordinator Transport --> NP
	NP -- Coordinator Transport --> EV
While we have chosen Ethereum and Neutron as examples here, one could similarly construct such vaults between any two chains as long as they are supported by Valence Programs.
Implementing Crosschain Vaults as a Valence Program
Recall that Valence Programs are comprised of Libraries and Accounts. Libraries are a collection of Functions that perform token operations on the Accounts. Since there are two chains here, Libraries and Accounts will exist on both chains.
Since gas is cheaper on Neutron than on Ethereum, computationally expensive operations, such as constraining the coordinator actions will be done on Neutron. Authorized messages will then be executed by each chain's Processor. Hyperlane is used to pass messages from the Authorization contract on Neutron to the Processor on Ethereum.
---
title: Program Control
---
graph TD
	Strategist
	subgraph Ethereum
		EP(Processor)
		EHM(Hyperlane Mailbox)
		EL(Ethereum Valence Libraries)
		EVA(Valence Accounts)
	end
	subgraph Neutron
		A(Authorizations)
		NP(Processor)
		EE(EVM Encoder)
		NHM(Hyperlane Mailbox)
		NL(Neutron Valence Libraries)
		NVA(Valence Accounts)
	end

	Strategist --> A
	A --> EE --> NHM --> Relayer --> EHM --> EP --> EL --> EVA
	A --> NP --> NL--> NVA
Libraries and Accounts needed
On Ethereum, we'll need Accounts for:
- Deposit: To hold user deposited tokens. Tokens from this pool can be then transported to Neutron.
- Withdraw: To hold tokens received from Neutron. Tokens from this pool can then be redeemed for shares.
On Neutron, we'll need Accounts for:
- Deposit: To hold tokens bridged from Ethereum. Tokens from this pool can be used to enter into the position on Neutron.
- Position: Will hold the vouchers or shares associated with the position on Neutron.
- Withdraw: To hold the tokens that are withdrawn from the position. Tokens from this pool can be bridged back to Ethereum.
We'll need the following Libraries on Ethereum:
- Bridge Transfer: To transfer funds from the Ethereum Deposit Account to the Neutron Deposit Account.
- Forwarder: To transfer funds between the Deposit and Withdraw Accounts on Ethereum. Two instances of the Library will be required.
We'll need the following Libraries on Neutron:
- Position Depositor: To take funds in the Deposit and create a position with them. The position is held by the Position account.
- Position Withdrawer: To redeem a position for underlying funds that are then transferred to the Withdraw Account on Neutron.
- Bridge Transfer: To transfer funds from the Neutron Withdraw Account to the Ethereum Withdraw Account.
Note that the Accounts mentioned here are the standard Valence Base Accounts. The Bridge Transfer library will depend on the token being transferred, but will offer similar functionality to the IBC Transfer library. The Position Depositor and Withdrawer will depend on the type of position, but can be similar to the Liquidity Provider and Liquidity Withdrawer.
Vault Contract
The Vault contract is a special contract on Ethereum that has an ERC-4626 interface.
User methods to deposit funds
- Deposit: Deposit funds into the registered Deposit Account. Receive shares back based on the redemption rate.
Deposit { amount: Uint256, receiver: String } - Mint: Mint shares from the vault. Expects the user to provide sufficient tokens to cover the cost of the shares based on the current redemption rate.
Mint {
	shares: Uint256,
	receiver: String
}
---
title: User Deposit and Share Mint Flow
---
graph LR
	User
	subgraph Ethereum
		direction LR
		EV(Vault)
		ED((Deposit))
	end

	User -- 1/ Deposit Tokens --> EV
	EV -- 2/ Send Shares --> User
	EV -- 3/ Send Tokens --> ED
User methods to withdraw funds
- Redeem: Send shares to redeem assets. This creates a
WithdrawRecordin a queue. This record is processed at the nextEpochRedeem { shares: Uint256, receiver: String, max_loss_bps: u64 } - Withdraw: Withdraw amount of assets. It expects the user to have sufficient shares. This creates a
WithdrawRecordin a queue. This record is processed at the nextEpoch.Withdraw { amount: Uint256, receiver: String, max_loss_bps: u64 }
Withdraws are subject to a lockup period after the user has initiated a redemption. During this time the redemption rate may change. Users can specify an acceptable loss in case the redemption rate decreases using the max_loss_bps parameter.
After the Epoch has completed, a user may complete the withdrawal by executing the following message:
- CompleteWithdraw: Pop the
WithdrawRecord. Pull funds from the Withdraw Account and send to user. Burn the user's deposited shares.
---
title: User Withdraw Flow
---
graph RL
	subgraph Ethereum
		direction RL
		EV(Vault)
		EW((Withdraw))
	end
	EW -- 2/ Send Tokens --> EV -- 3/ Send Tokens --> User
	User -- 1/ Deposit Shares --> EV
Strategist methods to manage the vault
The vault validates that the Processor is making calls to it. On Neutron, the Authorization contract limits the calls to be made only by a trusted Strategist. The Authorization contract can further constrain when or how Strategist actions can be taken.
- Update: The strategist can update the current redemption rate.
Update { rate: Uint256 } - Pause and Unpause: The strategist can pause and unpause vault operations.
Pause {}
Program subroutines
The program authorizes the Strategist to update the redemption rate and transport funds between various Accounts.
Allowing the Strategist to transport funds
---
title: From Ethereum Deposit Account to Neutron Position Account
---
graph LR
	subgraph Ethereum
		ED((Deposit))
		ET(Bridge Transfer)
	end
	subgraph Neutron
		NPH((Position Holder))
		NPD(Position Depositor)
		ND((Deposit))
	end

	ED --> ET --> ND --> NPD --> NPH
---
title: From Neutron Position Account to Ethereum Withdraw Account
---
graph RL
	subgraph Ethereum
		EW((Withdraw))
	end
	subgraph Neutron
		NPH((Position Holder))
		NW((Withdraw))
		NT(Bridge Transfer)
		NPW(Position Withdrawer)
	end

	NPH --> NPW --> NW --> NT --> EW
---
title: Between Ethereum Deposit and Ethereum Withdraw Accounts
---
graph
	subgraph Ethereum
		ED((Deposit))
		EW((Withdraw))
		FDW(Forwarder)
	end
	ED --> FDW --> EW
Design notes
This is a simplified design to demonstrate how a crosschain vault can be implemented with Valence Programs. Production deployments will need to consider additional factors not covered here including:
- Fees for gas, bridging, and for entering/exiting the position on Neutron. It is recommend that the vault impose withdraw fee and platform for users.
- How to constrain Strategist behavior to ensure they set redemption rates correctly.
Vault Strategist
Note: Vault Strategist is a type of Valence Coordinator. More information about the coordinator capabilities and design principles can be found in the Valence Coordinator SDK repo.
Overview
Vault Strategist is a type of off-chain solver (coordinator) that performs operations needed in order to keep the Valence Vaults functioning and up to date.
Coordinator is meant to be run as an independent process, only interacting with the domains relevant for its operations via (g)RPC requests submitted to respective nodes.
A complete on-chain flow of a cross-chain Valence Vault — accepting deposits on Ethereum and entering a position on Neutron — might look as follows:
---
title: Vaults on-chain overview
---
flowchart BT
    ica_ibc_transfer --> noble_inbound --> ntrn_deposit
    ica_cctp_transfer --> noble_outbound --> eth_withdraw
    neutron_ibc_forwarder --> ntrn_withdraw --> noble_outbound
    cctp_forwarder --> eth_deposit --> noble_inbound

    subgraph Ethereum
        direction LR
        style Ethereum fill:#f0f0f0,stroke:#333,stroke-width:1px
        eth_deposit((Deposit acc));
        eth_withdraw((Withdraw acc));
        user(User);
        vault[Valence Vault];
        cctp_forwarder[CCTP Forwarder];
        user --> vault --> user
        vault --> eth_deposit
        vault --> eth_withdraw --> user
    end


    subgraph Neutron
        direction RL
        style Neutron fill:#d6f5d6,stroke:#333,stroke-width:1px
        ntrn_deposit((Deposit acc));
        ntrn_position((Position acc));
        ntrn_withdraw((Withdraw acc));
        ica_ibc_transfer;
        astroport_lper;
        astroport_withdrawer;
        astroport_swap;
        neutron_ibc_forwarder;
        ica_cctp_transfer;

        ntrn_deposit --> astroport_lper --> ntrn_position
        ntrn_position --> astroport_withdrawer --> ntrn_withdraw
        ntrn_withdraw --> astroport_swap --> ntrn_withdraw
    end

    subgraph Noble
        direction LR
        style Noble fill:#d0e4ff,stroke:#333,stroke-width:1px
        noble_outbound((Noble Outbound ICA));
        noble_inbound((Noble Inbound ICA));
    end
Prerequisites
There are some prerequisites for a coordinator to be able to carry out its entire order of operations.
These prerequisites will fit into the following broad categories:
- ability to submit (g)RPC requests to target domains
- instantiated smart contracts on both Neutron and Ethereum that authorize the strategist to execute their methods
- liveness of the transport protocol (CCTP) and the domains themselves
Neutron Domain
Neutron side of the cross-chain vaults flow will involve a set of accounts and libraries authorizing the strategist to perform certain restricted actions.
Smart Contracts:
- Noble ICA ibc transfer - transferring funds from Noble inbound ICA to Neutron Deposit account
- Astroport Liquidity provider - entering into position
- Astroport Withdrawer - exiting from a position
- Neutron IBC forwarder - transferring funds from Neutron Withdraw account to Noble outbound ICA
- Noble CCTP transfer - CCTP transferring funds from Noble outbound ICA to Ethereum withdraw account
Accounts:
- Noble Inbound Interchain Account
- Noble Outbound Interchain Account
- Deposit account
- Position account
- Withdraw account
Ethereum Domain
The Ethereum domain hosts the entry and exit point for user interaction. The strategist interacts with the vault and the CCTP forwarder to deposit or redeem tokens.
Smart Contracts:
- CCTP Forwarder - routing USDC from Ethereum to Noble
- Valence Vault - Vault based on ERC-4626
Accounts:
- Deposit account - holding funds due to be routed to Noble
- Withdraw account - holding funds due to be distributed to users who initiated a withdrawal
Noble Domain
Noble acts as the intermediate bridging domain and handles both IBC and CCTP transfers.
Noble will host the inbound and outbound interchain accounts created by Valence Interchain Accounts deployed on Neutron.
Inbound ICA is meant for:
- receiving tokens deposited from Ethereum via CCTP Forwarder
- IBC Transferring those tokens from Noble to the Neutron deposit account
Outbound ICA is meant for:
- receiving withdrawn tokens from Neutron withdraw account
- routing those tokens from Noble to the Ethereum withdraw account by submitting a CCTP request
Valence Domain Clients
The Vault coordinator interacts with target domains by submitting (g)RPC requests.
These requests are constructed and submitted using Valence Domain Clients, which support async/await, batched requests spanning an arbitrary number of domains, encoding schemes, and other domain-specific semantics in a standardized manner.
CCTP Attestation Service
CCTP (Circle Cross-Chain Transfer Protocol) transfers require an attestation before assets can be minted on the destination chain.
Unfortunately the attestation service is closed-source and centralized. The only responsibility of the Strategist regarding it is to monitor its liveness, which is critical to Vault operation.
Strategist Operations
The Strategist has a limited set of operations required to keep the Vault functioning properly.
There are various ways to orchestrate these operations. Some may be triggered by circuit breakers, event listeners, or other events.
To keep things simple, the following describes a basic strategy where actions are performed at fixed intervals (e.g., once per day):
1. Routing funds from Neutron to Ethereum
Routing funds back to the Vault chain would involve the following steps:
- Neutron IBC Forwarder
transfercall to IBC send the tokens from Neutron Withdraw account to Noble outbound ICA - Wait until the funds have arrived to the Noble outbound ICA
- Noble CCTP transfer
transfercall to CCTP transfer the tokens from Noble outbound ICA to the Ethereum withdraw account - Wait until the funds have arrived to the Ethereum withdraw account
2. Update the Vault state
Updating the Vault state is the most involved action that the strategist must take.
It involves three substeps and the final update call:
- Calculating the netting amount N
- Query the Ethereum Valence Vault for total amount due for withdrawal S (expressed in USDC)
- Query the Ethereum deposit account balance $d$ $$N = min(d, S)$$
- Calculating the redemption rate R
- Query the Ethereum Valence Vault for total shares issued (s)
- Query pending deposits in Neutron deposit account
- Simulate the shares liquidation into the deposit denom $$R = a / s$$
- Calculating the total fee F
- Query the Ethereum Valence Vault for the constant vault fee F_c
- Query the Neutron Astroport pool for the position fee F_p $$F = F_c + F_p$$
- Ethereum Valence Vault update call:
update(R, P, S)
3. Routing funds from Ethereum to Neutron
Routing funds from Ethereum to Neutron is performed as follows:
- Ethereum CCTP transfer
transfercall to CCTP transfer the tokens from Ethereum deposit account to Noble inbound ICA - Wait until the funds have arrived to the Noble inbound ICA
- Noble ICA IBC transfer call to pull the funds from Noble inbound ICA to the Neutron Deposit account
- Wait until the funds have arrived to the Neutron Deposit account
4. Enter the position on Neutron
Entering the position on Neutron is performed as follows:
- Query Neutron Deposit account balance of the deposit token
- Astroport Liquidity provider
provide_single_sided_liquiditycall to enter into the position
5. Exit the position on Neutron
Exiting the position on Neutron is performed as follows:
- Astroport Liquidity withdrawer
withdraw_liquiditycall to trigger the liquidity withdrawal which will deposit the underlying tokens into the Withdraw account. Note that this action may be subject to a lockup period! - Astroport Swapper
swapcall to swap the counterparty denom obtained from withdrawing the position into USDC
Testing your programs
Our testing infrastructure is built on several tools that work together to provide a comprehensive local testing environment:
Core Testing Framework
We use local-interchain, a component of the interchaintest developer toolkit. This allows you to deploy and run chains in a local environment, providing a controlled testing space for your blockchain applications.
Localic Utils
To make these tools more accessible in Rust, we've developed localic-utils. This Rust library provides convenient interfaces to interact with the local-interchain testing framework.
Program Manager
We provide a tool called Program Manager that helps you manage your programs. We've created all the abstractions and helper functions to create your programs more efficiently together with local-interchain.
The Program Manager use is optional, it abstracts a lot of functionality and allows creating programs in much less code. But if you want to have more fine-grained control over your programs, we provide helper functions to create and interact with your programs directly without it. In this section, we'll show you two different examples on how to test your programs, one using the Program Manager and the other without it. There are also many more examples each of them for different use cases. They are all in the examples folder of our e2e folder.
Initial Testing Set Up
For testing your programs, no matter if you want to use the manager or not, there is a common set up that needs to be done. This set up is necessary to initialize the testing context with all the required information of the local-interchain environment.
1. Setting the TestContext using the TestContextBuilder
The TestContext is the interchain environment in which your program will run. Let's say you want to configure the Neutron chain and Osmosis chain, you may set it up as follows:
#![allow(unused)]
fn main() {
    let mut test_ctx = TestContextBuilder::default()
        .with_unwrap_raw_logs(true)
        .with_api_url(LOCAL_IC_API_URL)
        .with_artifacts_dir(VALENCE_ARTIFACTS_PATH)
        .with_chain(ConfigChainBuilder::default_neutron().build()?)
        .with_chain(ConfigChainBuilder::default_osmosis().build()?)
        .with_log_file_path(LOGS_FILE_PATH)
        .with_transfer_channels(NEUTRON_CHAIN_NAME, OSMOSIS_CHAIN_NAME)
        .build()?;
}
This will instantiate a TestContext with two chains, Neutron and Osmosis, that are connected via IBC by providing the transfer_channels parameter. The api_url is the URL of the local-interchain API, and the artifacts_dir is the path where the compiled programs are stored. The log_file_path is the path where the logs will be stored. The most important part here are the chains, which are created using the ConfigChainBuilder with the default configurations for Neutron and Osmosis and the transfer channels between them. We provide builders for most chains but you can also create your own configurations.
2. Custom chain-specific setup
Some chains require additional setup to interact with others. For example, if you are going to use a liquid staking chain like Persistence, you need to register and activate the host zone to allow liquid staking of its native token. We provide helper functions that do this for you, here's an example:
#![allow(unused)]
fn main() {
    info!("Registering host zone...");
    register_host_zone(
        test_ctx
            .get_request_builder()
            .get_request_builder(PERSISTENCE_CHAIN_NAME),
        NEUTRON_CHAIN_ID,
        &connection_id,
        &channel_id,
        &native_denom,
        DEFAULT_KEY,
    )?;


    info!("Activating host zone...");
    activate_host_zone(NEUTRON_CHAIN_ID)?;
}
Other examples of this would be deploying Astroport contracts, creating Osmosis pools... We provider helper functions for pretty much all of them and we have examples for all of them in the examples folder.
Example without Program Manager
This example demonstrates how to test your program without the Program Manager after your initial testing set up has been completed as described in the Initial Testing Set Up section.
Use-case: In this particular example, we will show you how to create a program that liquid stakes NTRN tokens on a Persistence chain directly from a base account without the need of using libraries. Note that this example is just for demonstrating purposes. In a real-world scenario, you would not liquid stake NTRN as it is not a staking token. We also are not using a liquid staking library for this example, although one could be creating for this purpose.
The full code for this example can be found in the Persistence Liquid Staking example.
- Set up the Authorization contract and processor on the
Main Domain(Neutron).
#![allow(unused)]
fn main() {
    let now = SystemTime::now();
    let salt = hex::encode(
        now.duration_since(SystemTime::UNIX_EPOCH)?
            .as_secs()
            .to_string(),
    );

    let (authorization_contract_address, _) =
        set_up_authorization_and_processor(&mut test_ctx, salt.clone())?;
}
This code sets up the Authorization contract and processor on Neutron. We use a time based salt to ensure that each test run the generated contract addresses are different. The set_up_authorization_and_processor function is a helper function instantiates both the Processor and Authorization contracts on Neutron and provides the contract addresses to interact with both. As you can see, we are not using the Processor on Neutron here, but we are still setting it up.
- Set up an external domain and create a channel to start relaying messages.
#![allow(unused)]
fn main() {
    let processor_on_persistence = set_up_external_domain_with_polytone(
        &mut test_ctx,
        PERSISTENCE_CHAIN_NAME,
        PERSISTENCE_CHAIN_ID,
        PERSISTENCE_CHAIN_ADMIN_ADDR,
        LOCAL_CODE_ID_CACHE_PATH_PERSISTENCE,
        "neutron-persistence",
        salt,
        &authorization_contract_address,
    )?;
}
This function does the following:
- Instantiates all the Polytone contracts on both the main domain and the new external domain. The information of the external domain is provided in the function arguments.
- Creates a channel between the Polytone contracts that the relayer will use to relay messages between the Authorization contract and the processor.
- Instantiates the Processor contract on the external domain with the correct Polytone information and the Authorization contract address.
- Adds the external domain to Authorization contract with the Polytone information and the processor address on the external domain.
After this is done, we can start creating authorizations for that external domain and when we send messages to the Authorization contract, the relayer will relay the messages to the processor on the external domain and return the callbacks.
- Create one or more base accounts on a domain.
#![allow(unused)]
fn main() {
    let base_accounts = create_base_accounts(
        &mut test_ctx,
        DEFAULT_KEY,
        PERSISTENCE_CHAIN_NAME,
        base_account_code_id,
        PERSISTENCE_CHAIN_ADMIN_ADDR.to_string(),
        vec![processor_on_persistence.clone()],
        1,
        None,
    );
    let persistence_base_account = base_accounts.first().unwrap();
}
This function creates a base account on the external domain and grants permission to the processor address to execute messages on its behalf. If we were using a library instead, we would be granting permission to the library contract instead of the processor address in the array provided.
- Create the authorization
#![allow(unused)]
fn main() {
    let authorizations = vec![AuthorizationBuilder::new()
        .with_label("execute")
        .with_subroutine(
            AtomicSubroutineBuilder::new()
                .with_function(
                    AtomicFunctionBuilder::new()
                        .with_domain(Domain::External(PERSISTENCE_CHAIN_NAME.to_string()))
                        .with_contract_address(LibraryAccountType::Addr(
                            persistence_base_account.clone(),
                        ))
                        .with_message_details(MessageDetails {
                            message_type: MessageType::CosmwasmExecuteMsg,
                            message: Message {
                                name: "execute_msg".to_string(),
                                params_restrictions: None,
                            },
                        })
                        .build(),
                )
                .build(),
        )
        .build()];

    info!("Creating execute authorization...");
    let create_authorization = valence_authorization_utils::msg::ExecuteMsg::PermissionedAction(
        valence_authorization_utils::msg::PermissionedMsg::CreateAuthorizations { authorizations },
    );

    contract_execute(
        test_ctx
            .get_request_builder()
            .get_request_builder(NEUTRON_CHAIN_NAME),
        &authorization_contract_address,
        DEFAULT_KEY,
        &serde_json::to_string(&create_authorization).unwrap(),
        GAS_FLAGS,
    )
    .unwrap();
    std::thread::sleep(std::time::Duration::from_secs(3));
    info!("Execute authorization created!");
}
In this code snippet, we are creating an authorization to execute a message on the persistence base account. For this particular example, since we are going to execute a CosmosMsg::Stargate directly on the account passing the protobuf message, we are not going to set up any param restrictions. If we were using a library, we could potentially set up restrictions for the json message that the library would expect.
- Send message to the Authorization contract
#![allow(unused)]
fn main() {
info!("Send the messages to the authorization contract...");

    let msg_liquid_stake = MsgLiquidStake {
        amount: Some(Coin {
            denom: neutron_on_persistence.clone(),
            amount: amount_to_liquid_stake.to_string(),
        }),
        delegator_address: persistence_base_account.clone(),
    };
    #[allow(deprecated)]
    let liquid_staking_message = CosmosMsg::Stargate {
        type_url: msg_liquid_stake.to_any().type_url,
        value: Binary::from(msg_liquid_stake.to_proto_bytes()),
    };

    let binary = Binary::from(
        serde_json::to_vec(&valence_account_utils::msg::ExecuteMsg::ExecuteMsg {
            msgs: vec![liquid_staking_message],
        })
        .unwrap(),
    );
    let message = ProcessorMessage::CosmwasmExecuteMsg { msg: binary };
    let send_msg = valence_authorization_utils::msg::ExecuteMsg::PermissionlessAction(
        valence_authorization_utils::msg::PermissionlessMsg::SendMsgs {
            label: "execute".to_string(),
            messages: vec![message],
            ttl: None,
        },
    );

    contract_execute(
        test_ctx
            .get_request_builder()
            .get_request_builder(NEUTRON_CHAIN_NAME),
        &authorization_contract_address,
        DEFAULT_KEY,
        &serde_json::to_string(&send_msg).unwrap(),
        GAS_FLAGS,
    )
    .unwrap();
    std::thread::sleep(std::time::Duration::from_secs(3));
}
In this code snippet, we are sending a message to the Authorization contract to execute the liquid staking message on the base account on Persistence. Note that we are using the same label that we used in the authorization creation. This is important because the Authorization contract will check if the label matches the one in the authorization. If it does not match, the execution will fail. The Authorization contract will send the message to the corresponding Polytone contract that will send it via IBC to the processor on the external domain.
- Tick the processor
#![allow(unused)]
fn main() {
    tick_processor(
        &mut test_ctx,
        PERSISTENCE_CHAIN_NAME,
        DEFAULT_KEY,
        &processor_on_persistence,
    );
    std::thread::sleep(std::time::Duration::from_secs(3));
}
The message must now be sitting on the processor on Persistence, therefore we need to tick the processor to trigger the execution. This will execute the message and send a callback with the result to the Authorization contract, which completes the full testing cycle.
Example with Program Manager
This example demonstrates how to test your program using the Program Manager after your initial testing set up has been completed as described in the Initial Testing Set Up section.
Use-case: This example outlines the steps needed to create a program that provides and withdraws liquidity from an Osmosis Concentrated Liquidity pool using two library contracts: a CL Liquidity Provider and a CL Liquidity Withdrawer.
Prerequisites
Before proceeding, ensure you have:
- A basic understanding of Osmosis, Neutron, CosmWasm, and Valence
- Completed the initial testing setup as described in the setup section
- Installed all necessary dependencies and have a working development environment
Solution Overview
Full working code for this example can be found in the Osmosis Concentrated Liquidity example.
Our solution includes the following:
- We create three accounts on Osmosis
- CL Input holds tokens ready to join the pool
- CL Output holds the position of the pool
- Final Output holds tokens after they've been withdrawn from the pool
- We instantiate the Concentrated Liquidity Provider and Concentrated Liquidity Withdrawer libraries on Osmosis
- The Liquidity Provider library will draw tokens from the CL Input account and use them to enter the pool
- The Liquidity Withdrawer library will exit the pool from the position held in the CL Output account and deposit redeemed tokens to the Final Output account
- We add two permissionless authorizations on Neutron:
- Provide Liquidity: When executed, it'll call the provide liquidity function
- Withdraw Liquidity: When executed, it'll call the withdraw liquidity function
The following is a visual representation of the system we are building:
graph TD;
    subgraph Osmosis
        A1((CL Input))
        A2((CL Output))
        A3((Final Output))
        L1[Liquidity Provider]
        L2[Liquidity Withdrawer]
        EP[Processor]
    end

    subgraph Neutron
        A[Authorizations]
        MP[Processor]
    end

    A1 --> L1 --> A2
    A2 --> L2 --> A3

    User --Execute Msg--> A --Enqueue Batch --> EP
    EP --> L1
    EP --> L2
Code walkthrough
Before we begin, we set up the TestContext as explained in the previous setup section. Then we can move on to steps pertinent to testing this example.
1. Setting up the program
1.1 Set up the Concentrated Liquidity pool on Osmosis
#![allow(unused)]
fn main() {
let ntrn_on_osmo_denom = test_ctx
    .get_ibc_denom()
    .base_denom(NEUTRON_CHAIN_DENOM.to_owned())
    .src(NEUTRON_CHAIN_NAME)
    .dest(OSMOSIS_CHAIN_NAME)
    .get();

let pool_id = setup_cl_pool(&mut test_ctx, &ntrn_on_osmo_denom, OSMOSIS_CHAIN_DENOM)?;
}
This sets up a CL pool on Osmosis using NTRN and OSMO as the trading pair. Because NTRN on Osmosis will be transferred over IBC, a helper function is used to get the correct denom on Osmosis.
1.2 Set up the Program config builder and prepare the relevant accounts
The Program Manager uses a builder pattern to construct the program configuration. We set up the three accounts that will be used in the liquidity provision and withdrawal flow.
#![allow(unused)]
fn main() {
let mut builder = ProgramConfigBuilder::new(NEUTRON_CHAIN_ADMIN_ADDR.to_string());
let osmo_domain = Domain::CosmosCosmwasm(OSMOSIS_CHAIN_NAME.to_string());
let ntrn_domain = Domain::CosmosCosmwasm(NEUTRON_CHAIN_NAME.to_string());

// Create account information for LP input, LP output and final (LW) output accounts
let cl_input_acc_info = AccountInfo::new("cl_input".to_string(), &osmo_domain, AccountType::default());
let cl_output_acc_info = AccountInfo::new("cl_output".to_string(), &osmo_domain, AccountType::default());
let final_output_acc_info = AccountInfo::new("final_output".to_string(), &osmo_domain, AccountType::default());

// Add accounts to builder
let cl_input_acc = builder.add_account(cl_input_acc_info);
let cl_output_acc = builder.add_account(cl_output_acc_info);
let final_output_acc = builder.add_account(final_output_acc_info);
}
1.3 Configure the libraries
Next we configure the libraries for providing and withdrawing liquidity. Each library is configured with input and output accounts and specific parameters for their operation.
Note how cl_output_acc serves a different purpose for each of those libraries:
- for liquidity provider library it is the output account
- for liquidity withdrawer library it is the input account
#![allow(unused)]
fn main() {
// Configure Liquidity Provider library
let cl_lper_config = LibraryConfig::ValenceOsmosisClLper({
    input_addr: cl_input_acc.clone(),
    output_addr: cl_output_acc.clone(),
    lp_config: LiquidityProviderConfig {
        pool_id: pool_id.into(),
        pool_asset_1: ntrn_on_osmo_denom.to_string(),
        pool_asset_2: OSMOSIS_CHAIN_DENOM.to_string(),
        global_tick_range: TickRange {
            lower_tick: Int64::from(-1_000_000),
            upper_tick: Int64::from(1_000_000),
        },
    },
});

// Configure Liquidity Withdrawer library
let cl_lwer_config = LibraryConfig::ValenceOsmosisClWithdrawer({
    input_addr: cl_output_acc.clone(),
    output_addr: final_output_acc.clone(),
    pool_id: pool_id.into(),
});

// Add libraries to builder
let cl_lper_library = builder.add_library(LibraryInfo::new(
    "test_cl_lper".to_string(),
    &osmo_domain,
    cl_lper_config,
));

let cl_lwer_library = builder.add_library(LibraryInfo::new(
    "test_cl_lwer".to_string(),
    &osmo_domain,
    cl_lwer_config,
));
}
1.4 Create links between accounts and libraries
Input links (first array in the add_link() call) are meant to enable libraries permission to execute on the specified accounts. Output links specify where the fungible results of a given function execution should be routed to.
#![allow(unused)]
fn main() {
// Link input account -> liquidity provider -> output account
builder.add_link(&cl_lper_library, vec![&cl_input_acc], vec![&cl_output_acc]);
// Link output account -> liquidity withdrawer -> final output account
builder.add_link(&cl_lwer_library, vec![&cl_output_acc], vec![&final_output_acc]);
}
1.5 Create authorizations
Next we create authorizations for both providing and withdrawing liquidity. Each authorization contains a subroutine that specifies which function to call on which library. By default, calling these subroutines will be permissionless, however using the AuthorizationBuilder we can constrain the authorizations as necessary.
#![allow(unused)]
fn main() {
builder.add_authorization(
    AuthorizationBuilder::new()
        .with_label("provide_liquidity")
        .with_subroutine(
            AtomicSubroutineBuilder::new()
                .with_function(cl_lper_function)
                .build(),
        )
        .build(),
);

builder.add_authorization(
    AuthorizationBuilder::new()
        .with_label("withdraw_liquidity")
        .with_subroutine(
            AtomicSubroutineBuilder::new()
                .with_function(cl_lwer_function)
                .build(),
        )
        .build(),
);
}
1.6 Set up the Polytone connections
In order for cross-domain Programs to be able to communicate between different domains, we instantiate the Polytone contracts and save the configuration in our Program Manager.
setup_polytone sets up the connection between two domains and therefore expects the following parameters:
- source and destination chain names
- source and destination chain ids
- source and destination chain native denoms
#![allow(unused)] fn main() { // prior to initializing the manager, we do the middleware plumbing setup_polytone( &mut test_ctx, NEUTRON_CHAIN_NAME, OSMOSIS_CHAIN_NAME, NEUTRON_CHAIN_ID, OSMOSIS_CHAIN_ID, NEUTRON_CHAIN_DENOM, OSMOSIS_CHAIN_DENOM, )?; }
1.7 Initialize the program
Calling builder.build() here acts as a snapshot of the existing builder state.
That state is then passed on to the use_manager_init() call, which consumes it and builds the final program configuration before initializing it.
#![allow(unused)] fn main() { let mut program_config = builder.build(); use_manager_init(&mut program_config)?; }
Congratulations! The program is now initialized across the two chains!
2. Executing the Program
After the initialization, we are ready to start processing messages. For a message to be executed, it first needs to be enqueued to the processor.
2.1 Providing Liquidity
If there are tokens available in the CL Input account, we are ready to provide liquidity. To enqueue provide liquidity message:
#![allow(unused)] fn main() { // build the processor message for providing liquidity let lp_message = ProcessorMessage::CosmwasmExecuteMsg { msg: Binary::from(serde_json::to_vec( &valence_library_utils::msg::ExecuteMsg::<_, ()>::ProcessFunction( valence_osmosis_cl_lper::msg::FunctionMsgs::ProvideLiquidityDefault { bucket_amount: Uint64::new(10), }, ), )?), }; // wrap the processor message in an authorization module call let provide_liquidity_msg = valence_authorization_utils::msg::ExecuteMsg::PermissionlessAction( valence_authorization_utils::msg::PermissionlessMsg::SendMsgs { label: "provide_liquidity".to_string(), messages: vec![lp_message], ttl: None, }, ); contract_execute( test_ctx .get_request_builder() .get_request_builder(NEUTRON_CHAIN_NAME), &authorization_contract_address, DEFAULT_KEY, &serde_json::to_string(&provide_liquidity_msg)?, GAS_FLAGS, )?; }
Now anyone can tick the processor to execute the message. After receiving a tick, the processor will execute the message at the head of the queue and send a callback to the Authorization contract with the result.
#![allow(unused)] fn main() { contract_execute( test_ctx .get_request_builder() .get_request_builder(OSMOSIS_CHAIN_NAME), &osmo_processor_contract_address, DEFAULT_KEY, &serde_json::to_string( &valence_processor_utils::msg::ExecuteMsg::PermissionlessAction( valence_processor_utils::msg::PermissionlessMsg::Tick {}, ), )?, &format!( "--gas=auto --gas-adjustment=3.0 --fees {}{}", 5_000_000, OSMOSIS_CHAIN_DENOM ), )?; }
2.2 Withdraw Liquidity
To enqueue withdraw liquidity message:
#![allow(unused)] fn main() { // build the processor message for withdrawing liquidity let lw_message = ProcessorMessage::CosmwasmExecuteMsg { msg: Binary::from(serde_json::to_vec( &valence_library_utils::msg::ExecuteMsg::<_, ()>::ProcessFunction( valence_osmosis_cl_withdrawer::msg::FunctionMsgs::WithdrawLiquidity { position_id: output_acc_cl_position.position_id.into(), liquidity_amount: Some(liquidity_amount), }, ), )?), }; // wrap the processor message in an authorization module call let withdraw_liquidity_msg = valence_authorization_utils::msg::ExecuteMsg::PermissionlessAction( valence_authorization_utils::msg::PermissionlessMsg::SendMsgs { label: "withdraw_liquidity".to_string(), messages: vec![lw_message], ttl: None, }, ); contract_execute( test_ctx .get_request_builder() .get_request_builder(NEUTRON_CHAIN_NAME), &authorization_contract_address, DEFAULT_KEY, &serde_json::to_string(&withdraw_liquidity_msg)?, GAS_FLAGS, )?; }
The above enqueues the message to withdraw liquidity. The processor will execute it next time it is ticked.
#![allow(unused)] fn main() { contract_execute( test_ctx .get_request_builder() .get_request_builder(OSMOSIS_CHAIN_NAME), &osmo_processor_contract_address, DEFAULT_KEY, &serde_json::to_string( &valence_processor_utils::msg::ExecuteMsg::PermissionlessAction( valence_processor_utils::msg::PermissionlessMsg::Tick {}, ), )?, &format!( "--gas=auto --gas-adjustment=3.0 --fees {}{}", 5_000_000, OSMOSIS_CHAIN_DENOM ), )?; }
This concludes the walkthrough. You have now initialized the program and used it to provide and withdraw liquidity on Osmosis from Neutron!
Security
Valence Programs have been independently audited. Please find audit reports here.